HDF Inwentaryzacja 7 — user manual
User manual of the fixed assets inventory software. Current version.
Table of contents
- Installation and first launch
- License registration and deactivation
- Main window of HDF Inwentaryzacja 7
- Filters
- Program users
- Entering the required data in the „Słowniki” tab
- Fixed / low-value / intangible assets
- Depreciation
- Inventory count
- Reports
- Printing labels
- Documents
- Frequently asked questions (FAQ)
1. Installation and first launch
The steps below will take you from installation to your first inventory count. Perform them once, before you start working with the program.
1.1. Database
The program uses a Microsoft SQL Server database. The database is central – it is installed once, and individual computers connect to it over the network. There is no need to install the database on every workstation.
- Choosing the SQL Server edition. For up to 500,000 fixed assets, the free SQL Server Express 2019 or 2022 is sufficient (the full edition is also supported). For older computers we recommend the 2019 edition.
- Download. Search Google for „Microsoft SQL Server Express 2019 download” or „Microsoft SQL Server Express 2022 download”. We do not provide direct links, because Microsoft frequently changes their location.
- Placement. It is best to install the database on a server. It can also run on a laptop if the program is used on a single workstation.
1.2. Connection configuration – AdminTool.exe
Database connection parameters are set in the AdminTool.exeprogram, located in the program's installation directory (e.g. C:\Program Files\HDF Inwentaryzacja). Running it requires administrator privileges.
In AdminTool.exe you can:
- set up the database connection and create the database,
- choose how inventory numbers are assigned – manual or automatic. We recommend automatic numbering, because it guarantees the uniqueness of asset numbers,
- configure the depreciation process and the FTP file server.
On each additional computer that is to use the same database, it is enough to set the connection to it in AdminTool.exe – the database is not created again.
Test and production database. You can maintain two databases on a single server. In AdminTool.exe create a test database and set the connection, then in the same place create a production database. You switch between the databases in AdminTool.exe.
Upgrading from an older version. If you are using an older version of the program, converting the database requires no action. On first launch the program checks whether the database needs conversion and, if necessary, performs it automatically. Subsequent launches do not repeat this operation.
1.3. License and subscription registration
After configuring the database, register the program (see chapter 2). If you plan automatic inventory counts using collectors, also register the subscription for exchanging data with the cloud – without it the „Inwentaryzacja” window will not open.
1.4. Entering the initial data
Before the first inventory count you must enter the initial data into the program: dictionaries (chapter 6) and assets (chapter 7). For a large number of assets, a template-based method is recommended:
- Manually create 1–3 assets and all the required dictionaries, and fill in the complete data in the system.
- Export these assets to an XLS file – this produces a ready template with the correct column structure.
- Fill the template with your data (e.g. 1500 records).
- Import the completed file.
2. License registration and deactivation
The „Rejestracja” window – field description
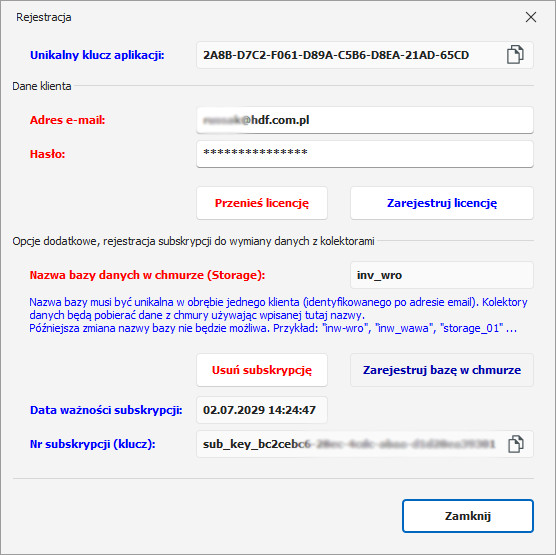
The „Rejestracja” window is divided into three parts:
1. Unique application key
A read-only field containing a unique key generated for the given computer. The key is different on each workstation and permanently assigned to it. Using the icon on the right side of the field, the key can be copied to the clipboard.
2. Client data
- E-mail address (required field) – the address provided when purchasing the license, used as the login for registration.
- Password (required field) – the license password received by e-mail after payment.
- Zarejestruj licencję – registers the license on the current computer.
- Przenieś licencję – deactivates the license on the current computer, allowing it to be registered on another workstation.
3. Additional options – registering a subscription for data exchange with collectors
This part concerns working in the HDF Software cloud – exchanging data with collectors during offline inventory counts. The cloud stores only the part of the data needed to carry out the inventory count; the full data set always remains on the client's PC. The cloud is used to send data to the collector, scan barcodes offline, and then return the differences back to the PC.
Export to the cloud is available only in the Business edition (the Standard edition does not support this feature). The Business edition includes the option of working in the cloud, but using collectors requires a separate purchase of collector licenses (HDF InvMobile).
A single Business license covers one PC and any number of collector licenses. The number of collector licenses determines how many users can carry out the inventory count simultaneously. A client may also purchase several Business licenses – each of them allows creating a separate cloud database, and during work you can freely switch between these databases.
- Cloud database name (Storage) (required field) – a name unique within a single client (identified by e-mail address). Collectors retrieve data from the cloud based on this name. The name cannot be changed later. Examples: „inw-wro”, „inw-wawa”, „storage_01”.
- Zarejestruj bazę w chmurze – creates a subscription and a cloud database with the given name.
- Usuń subskrypcję – removes the subscription for data exchange with collectors. Removing the subscription does not delete the data stored in the cloud.
- Data ważności subskrypcji – a read-only field. It shows the period during which the cloud can be used. The actual access time is determined by the collector licenses (HDF InvMobile) – these are the ones subject to renewal.
- Nr subskrypcji (klucz) – a read-only field; the subscription identifier, which can be copied using the icon on the right side.
After installing the program, you must register the program on the chosen computer. If you have purchased multiple licenses, repeat this operation on all computers on which the program is ultimately to run.
To register the program, you must first purchase it – provide your e-mail address when placing the order. This e-mail address serves as the login for registering the software. If you order more than one license, you may specify an e-mail address for each user or the same e-mail address for all users. The number of purchased licenses is recorded in our database and is subject to our administration.
After payment you will receive an e-mailed password linked to the e-mail address provided during purchase, needed for registration.
You can change the license password only through us – to do so, send us an e-mail at [email protected]with a request to change the license password, and in reply you will receive an automatically generated new, secure password.
Note! The license password and login are not used to log in to the program, but only to register the license.
How to register HDF Inwentaryzacja 7?
Registering the software requires an internet connection.
- Click the green field Rejestracja, located at the top on the left side of the menu. A registration dialog window will appear.
- In the window, enter the e-mail address and password that you received at the address provided during purchase.
- Then click the button Zarejestruj Licencję.
- Your registration was successful. Restart the program.
- Log in with the default login and password (login: full, password: a) and use the program license on this computer. You can then change the default login and password by clicking Opcje → Użytkownicy aplikacji → Modyfikuj użytkownika.
If you have purchased more than one license, repeat this operation on all computers on which they are to be located. Remember that each computer has a different license key (unique application key), which is generated automatically when the license is registered on a given computer and is assigned to it.
If you want to change the workstation on which the program is to be used, you can deactivate the program license and register it on another computer using the same e-mail address and password as during the first registration.
How to use cloud working (working with data collectors)?
To be able to carry out inventory counts with data collectors, create a cloud database with HDF Software; this operation requires an internet connection and theBusiness.
- Click the green field Rejestracja, located at the top on the left side of the menu. A registration dialog window will appear.
- In the window, enter the e-mail address and password that you received at the address provided during purchase.
- In the field Nazwa bazy danych w chmurze (Storage) enter a unique name for your database.
- Then click the button Zarejestruj bazę w chmurze.
- Your registration was successful. From this moment you can send data to the data collectors.
How to transfer the license to another computer (license deactivation)?
Transferring the license requires an internet connection.
- Click the green field Rejestracja, located at the top on the left side of the menu. A registration dialog window will appear.
- In the window, enter the e-mail address and password that you received at the address provided during purchase.
- Then click the button Przenieś licencję.
- The license on the computer you were using has been deactivated successfully. You can now install the program on another computer.
Note!The unique application key is different on every computer. This means that if one of the computers breaks down, the license with that key is still active only on that computer and can be deactivated only from it.
It is not possible to transfer the license from a computer other than the one on which it is active. To transfer the license from an unavailable computer to a new one, contact us by e-mail at [email protected].
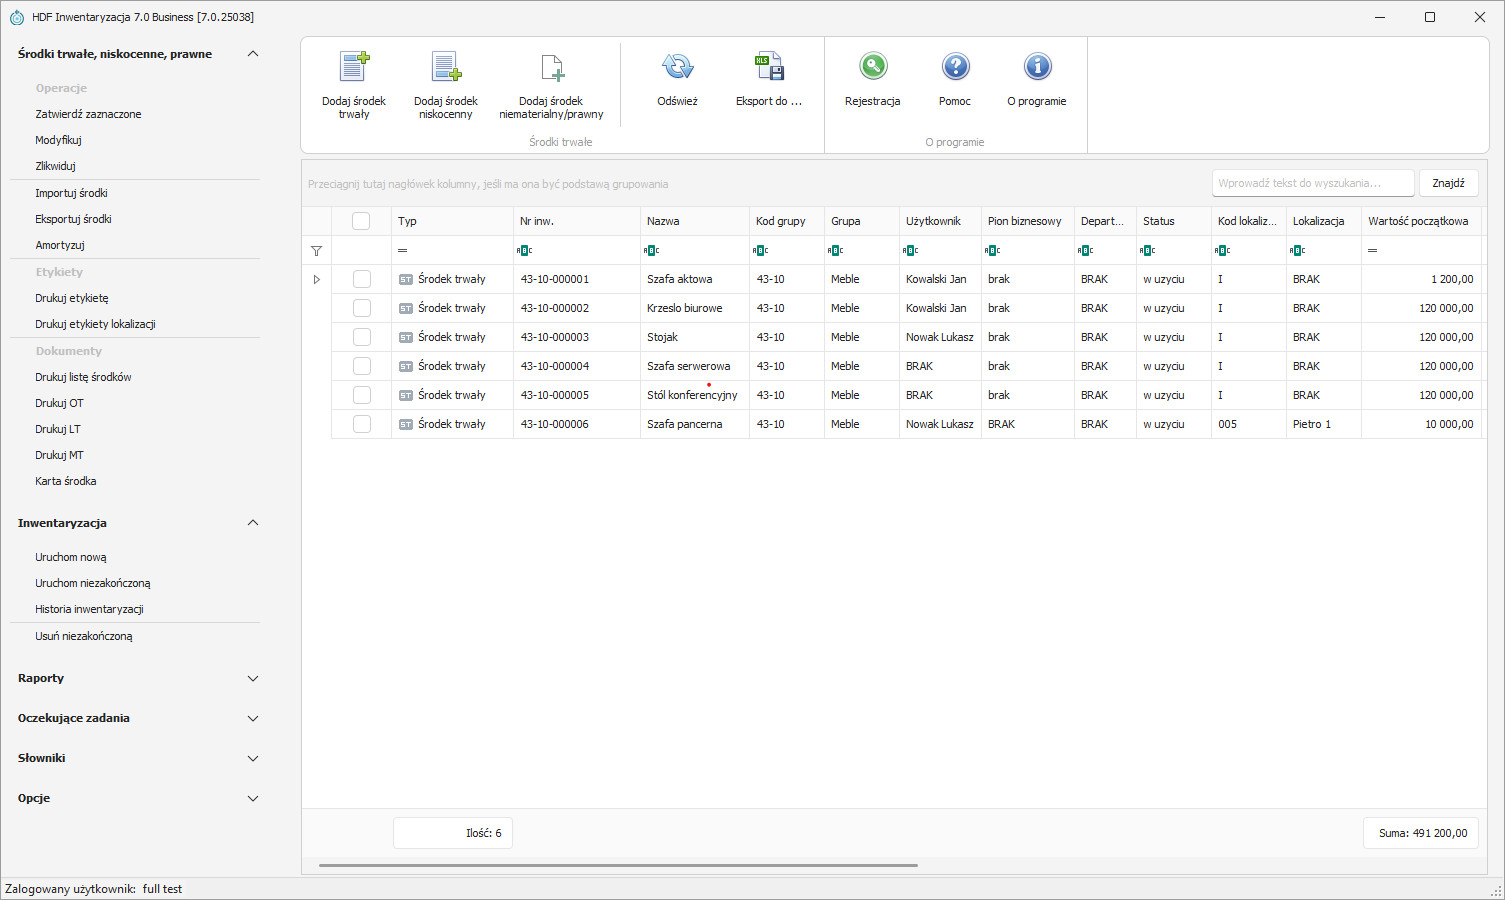
3. Main window of HDF Inwentaryzacja 7
The main application window consists of the following parts:
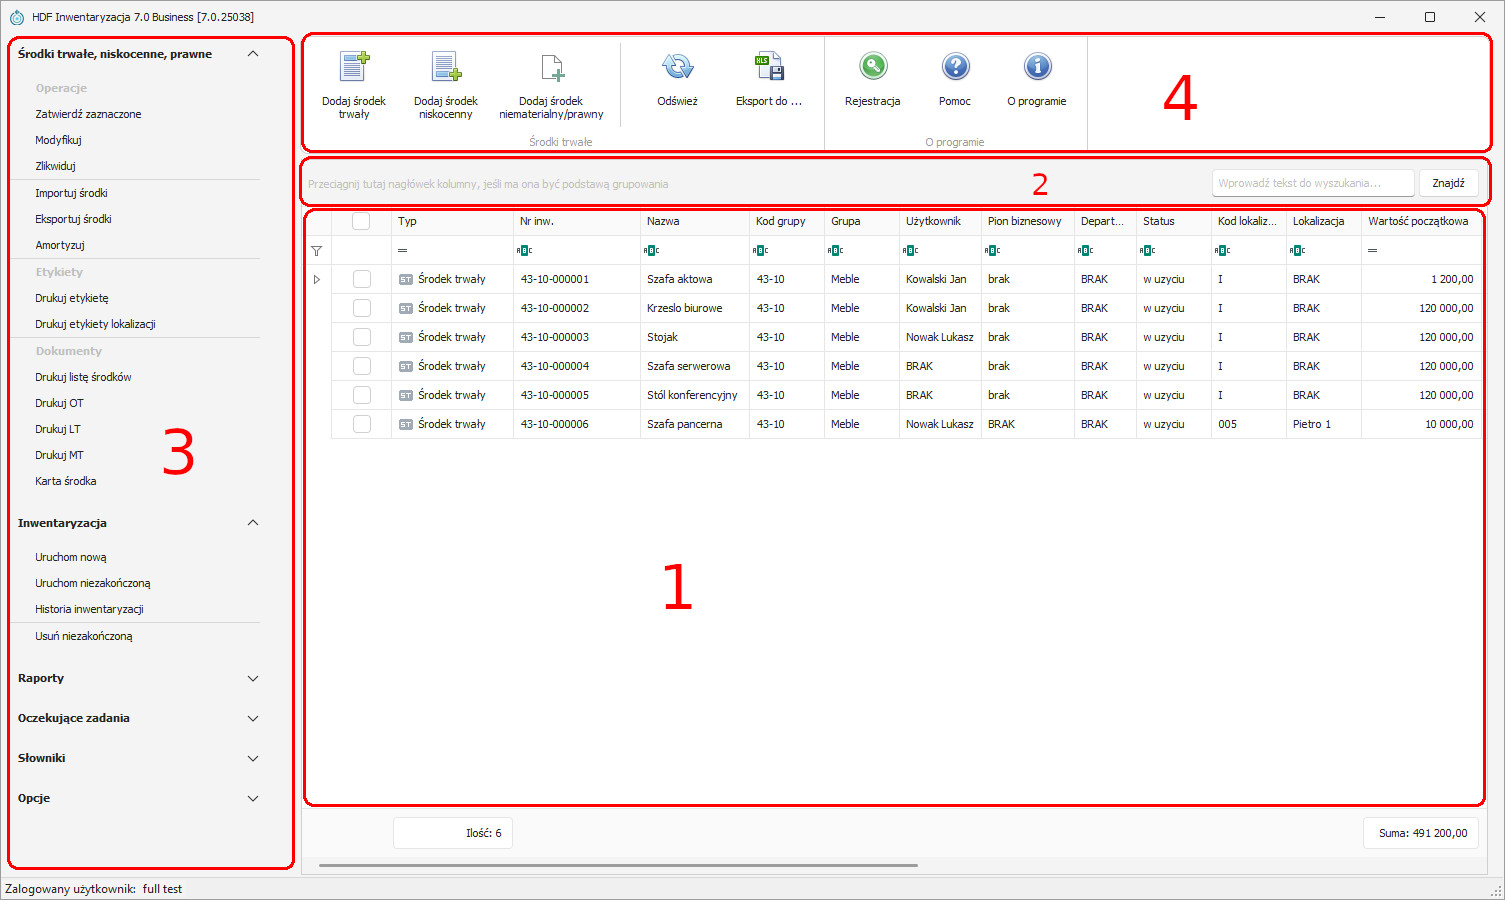
3.1. Work area
The work area contains a list of the fixed / low-value / intangible assets that have been entered into the program. The list contains the assets that match the criteria defined in the search tool (area 2 of the main window). Unapproved assets are marked in grey, retired assets in pink, and approved assets appear on a white background. Next to each asset's name there is an icon indicating its type: ŚT – fixed asset, N – low-value asset, P – intangible asset.
3.2. Quick filter bar
The bar allows easy searching for specific items and lets you filter the asset list in the work area of the main window accordingly. After each change of the filter criteria, click the „Znajdź” button.
This manual describes all the most important functions of the HDF Inwentaryzacja 7 application. To access them, you must be logged in to the program as a user with all permissions (by default this is the „full” user, password „a”).
3.3. Program menu
The program menu consists of the following elements:
3.3.1. Fixed, low-value and intangible assets
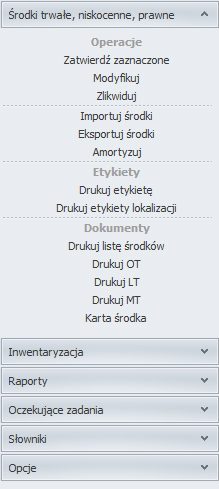
- Zatwierdź zaznaczone Approves the selected fixed/low-value/intangible asset. If an asset is not approved, it will not be included in either depreciation or the inventory count. Approved assets are shown in the work area on a white background, unapproved assets on a grey background.
- Modyfikuj Allows changes to be made to the (first) selected record.
- Zlikwiduj Retires the (first) record selected in the work area.
- Importuj środki Imports a list of assets from a text file.
- Eksportuj środki Exports selected data to a text file or Microsoft Excel.
- Amortyzuj Runs depreciation of the selected (or all) approved fixed assets for which depreciation criteria have been defined.
- Drukuj etykietę Prints labels only for the selected or all fixed and low-value assets, using the label templates defined in the program.
- Drukuj etykiety lokalizacji Prints labels for the selected (or all) locations using the label templates defined in the program.
- Drukuj listę środków Prints selected columns of the list containing the assets saved in the program.
- Drukuj OT Allows printing the fixed asset acceptance protocol (OT document).
- Drukuj LT Prints the fixed asset retirement protocol (LT document).
- Drukuj MT Allows printing the asset transfer protocol.
- Karta środka Opens the card and allows printing a report on a specific asset, together with all details of the given item: asset name, number, group, location, assigned user, etc.
3.3.2. Inventory count
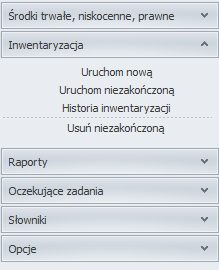
- Uruchom nową Launches a new inventory count of all (or only the selected) fixed and low-value assets.
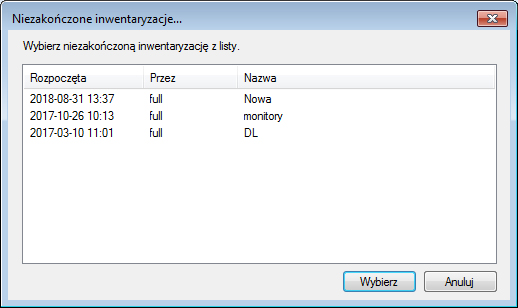
- Uruchom niezakończoną Launches an inventory count that was started earlier but interrupted for some reason. One can be selected from the list of unfinished inventory counts. The list contains the following data: start date and time of the inventory count, the user who started it, and the inventory count name.
- Historia inwentaryzacji Provides access to the list (and details) of finished inventory counts.
- Usuń niezakończoną Removes the selected unfinished inventory count from the list.
3.3.3. Reports
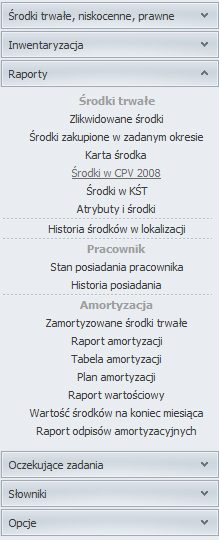
- Zlikwidowane środki Allows generating a list of fixed assets retired in a selected period and access to retirement justifications and information such as: inventory number of the retired asset, its name, retirement date, person performing the retirement, asset purchase value, value on the retirement date, and last location. It also allows previewing the retirement reason of a selected asset.
- Środki zakupione w zadanym okresie Allows generating and printing a report containing a list of purchased assets of a selected type (fixed, low-value, intangible/legal) or of all assets in a period defined by the user.
- Karta środka Opens the card and allows printing a report on a specific asset, together with all details of the given item: asset name, number, group, location, assigned user, date, purchase value, etc.
- Środki w CPV 2008 Allows creating and printing a report of assets contained in the Common Procurement Vocabulary CPV 2008.
- Środki w KŚT Allows generating and printing a report of assets recorded in the national Classification of Fixed Assets (KŚT).
- Historia środków w lokalizacji A list of assets located in a specific location within a time range chosen by the user. It also includes the inventory number of the assets, the name, and the operator assigned to them.
- Stan posiadania pracownika A report on the current status of all assets held by a selected employee.
- Historia posiadania A list of assets held by a selected employee in a specific time range.
- Zamortyzowane środki trwałe Generates a list (and allows printing it) of depreciated fixed assets for a period chosen by the user (the report may include tax depreciation).
- Raport amortyzacji Generating and printing a report containing a list of assets of a given group / department / business unit depreciated in a period chosen by the user.
- Tabela amortyzacji Allows generating a list of assets from a given group depreciated in a selected year. The tables contain data from depreciation carried out in the successive months of the defined year and a summary in the form of an opening and closing balance.
- Plan amortyzacji Allows planning a list of fixed assets designated for depreciation. It contains information about the purchase date and value, as well as the opening and closing balance.
- Raport wartościowy A report on selected asset groups for a given period (month, year). It contains information about gross and net value, accumulated depreciation, and tax depreciation.
- Wartość środków na koniec miesiąca Allows summarizing the value of assets in a selected month and printing the report.
- Raport odpisów amortyzacyjnych Allows printing a report of depreciation write-offs and the purchase value of assets before and after the write-off in a selected month.
- Atrybuty i środki Allows generating and printing a report of all attributes and assets, taking into account their value and status (choices: all, in use, retired, pending).
3.3.4. Pending tasks
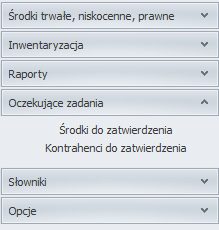
- Assets to approve Opens the list of unapproved assets. Selected records can be approved.
- Kontrahenci do zatwierdzenia Opens the list of unapproved contractors. Selected records can be approved.
3.3.5. Dictionaries
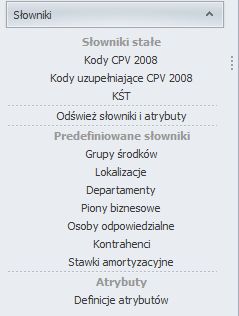
- Kody CPV 2008 — Displays the tree of CPV codes and allows easy searching for codes by number or name. Each code group can be expanded to see its subgroups.
- Kody uzupełniające CPV 2008 — Opens the supplementary CPV 2008 dictionary list. Here too you can easily find items using the search bar.
- KŚT — Displays the tree of the Classification of Fixed Assets, along with a code search tool.
- Odśwież słowniki i atrybuty — Allows refreshing the dictionary and attribute libraries if any changes or updates have been made to them.
- Grupy środków — Allows adding, editing and deleting asset groups and access to the list of previously defined groups.
- Lokalizacje — Allows adding, editing and deleting locations and access to the list of all previously defined locations.
- Departamenty — Allows adding, editing and deleting departments and access to the list of previously defined departments.
- Piony biznesowe — Opens a window with the list of saved business units. It also allows adding, editing and deleting business units.
- Osoby odpowiedzialne — Opens a window with the list of defined persons responsible for fixed and low-value assets and allows adding, editing and deleting persons previously defined as responsible.
- Kontrahenci — Opens a window with the list of defined contractors. It also allows adding, editing and deleting contractors.
- Stawki amortyzacyjne — Opens a window with the list of depreciation rates, including KŚT symbols. It also allows adding, editing and deleting rates.
- Definicje atrybutów — Opens a window with the list of attribute values. It also allows adding, editing and deleting attributes.
3.3.6. Options
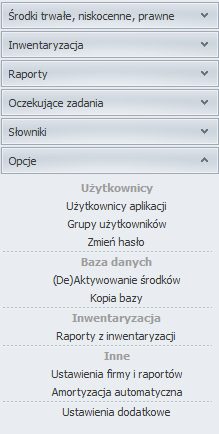
- Użytkownicy aplikacji Opens a window with the list of users and their basic data. It also allows adding / editing / deleting / activating / deactivating and restoring users. You can also search for a user, including (or not) deleted and inactive users.
- Grupy użytkowników Opens a window with the list of user groups. The list contains the group names and information about the number of users assigned to them and the number of permissions available to a given group. In this window you can also add / edit / delete user groups.
- Zmień hasło Allows changing the password of a specific user after entering the appropriate data.
- (De)Aktywowanie środków Activation of current assets or deactivation of retired assets.
- Kopia bazy Allows copying the database to a file.
- Raporty z inwentaryzacji Allows generating reports of a selected type. The available report types are: summary of inventory differences in warehouses, status before the inventory count, mismatched quantities, location changes, matching quantities, status after the inventory count, physical count, physical count (full).
- Ustawienia firmy i raportów Allows entering the company name and address and using this data in documents: OT, LT and MT, in place of the workplace stamp.
- Amortyzacja automatyczna Opens a window in which you can define the dates on which the program carries out automatic depreciation.
- Ustawienia dodatkowe Allows, among other things, editing the application colors for a specific user and changing field and column options.
3.4. Action bar
The action bar has the following buttons:
- Dodaj środek trwały – Enters the selected asset into the program.
- Dodaj środek niskocenny – Enters the selected asset into the program.
- Dodaj środek niematerialny / prawny – Enters the selected asset into the program.
- Odśwież – Refreshes the asset list after changes have been made.
- Eksport do – Allows exporting the asset list to a file or document, e.g. in MS Excel.
- O programie – Contains detailed information about the HDF Inwentaryzacja 7 program.
4. Filters
Filters added to each column allow precise definition of the criteria by which the asset list in the work area of the main window is generated.
By clicking the filter icon next to the appropriate column (e.g. the date column), a window with values and filters is displayed.
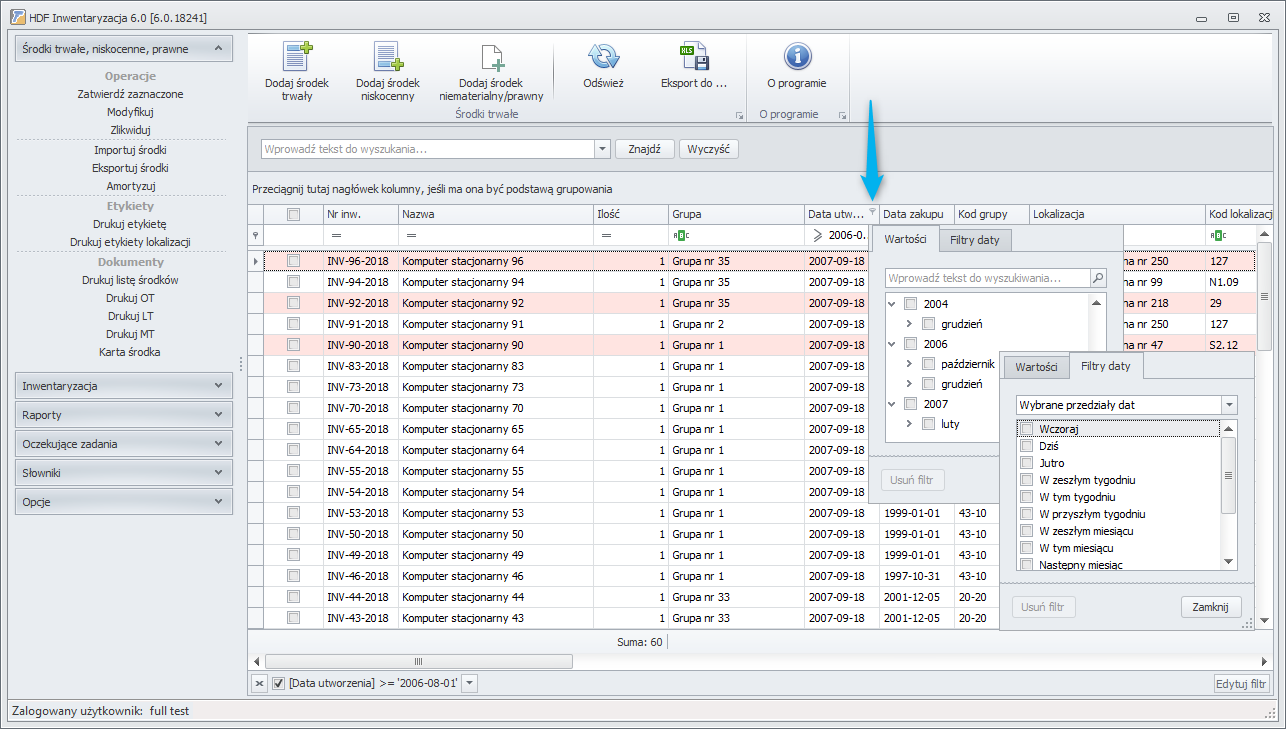
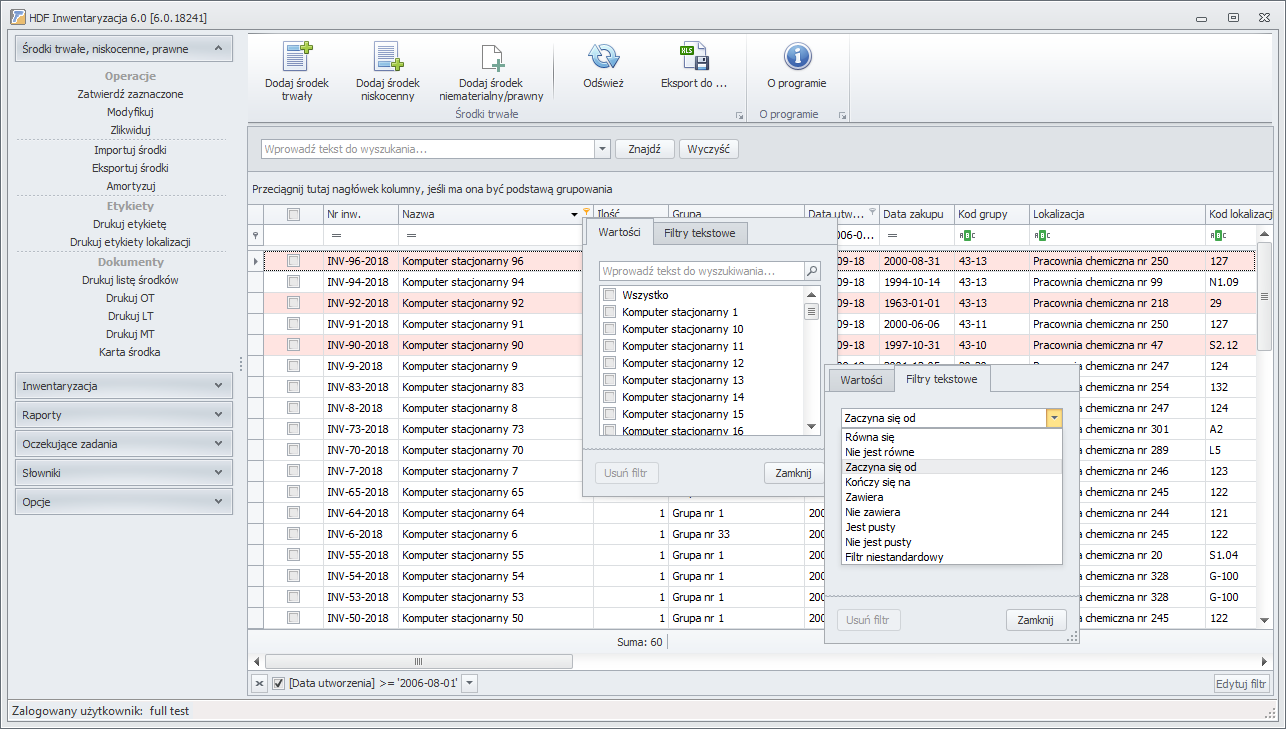
Items in the table can also be filtered by selecting:
- Asset names
- Quantity
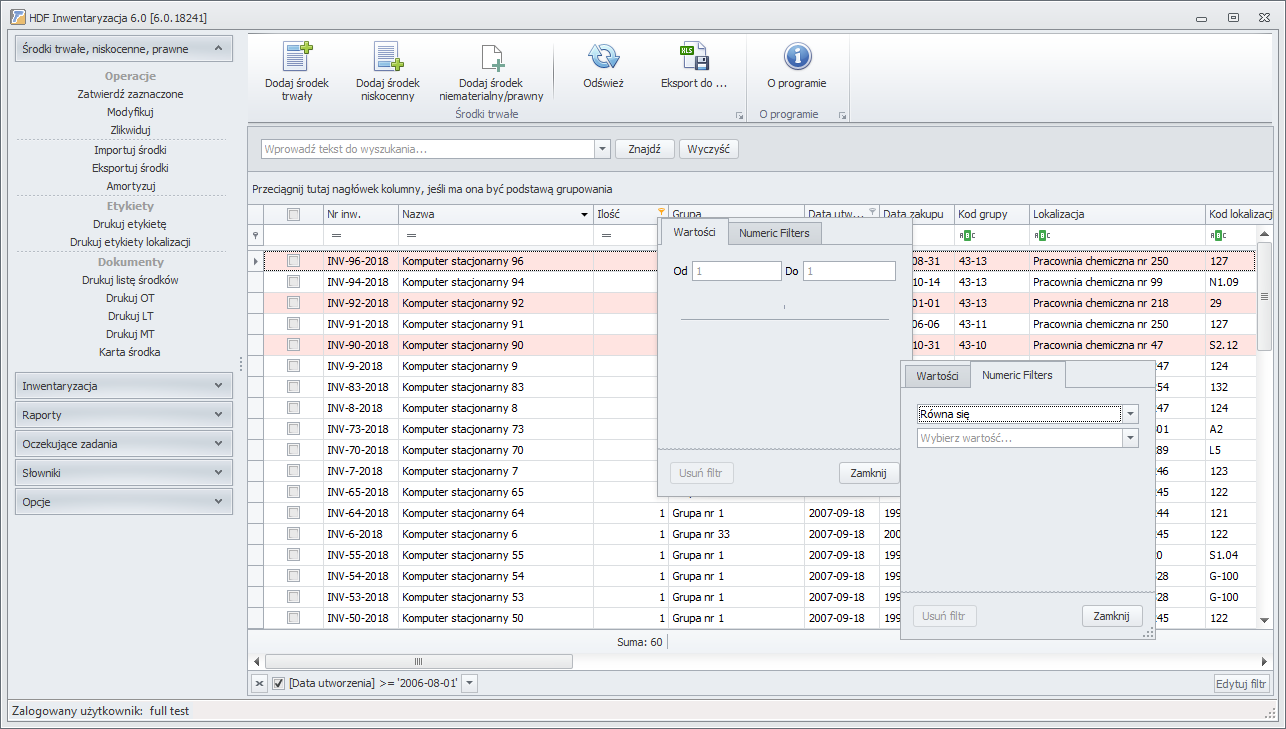
After entering the appropriate value in the selected filter window, only the matching items will remain in the list in the main window.
Once the first filter is applied, you can edit its values in any way using the „Edytuj filtr” button at the bottom of the screen.
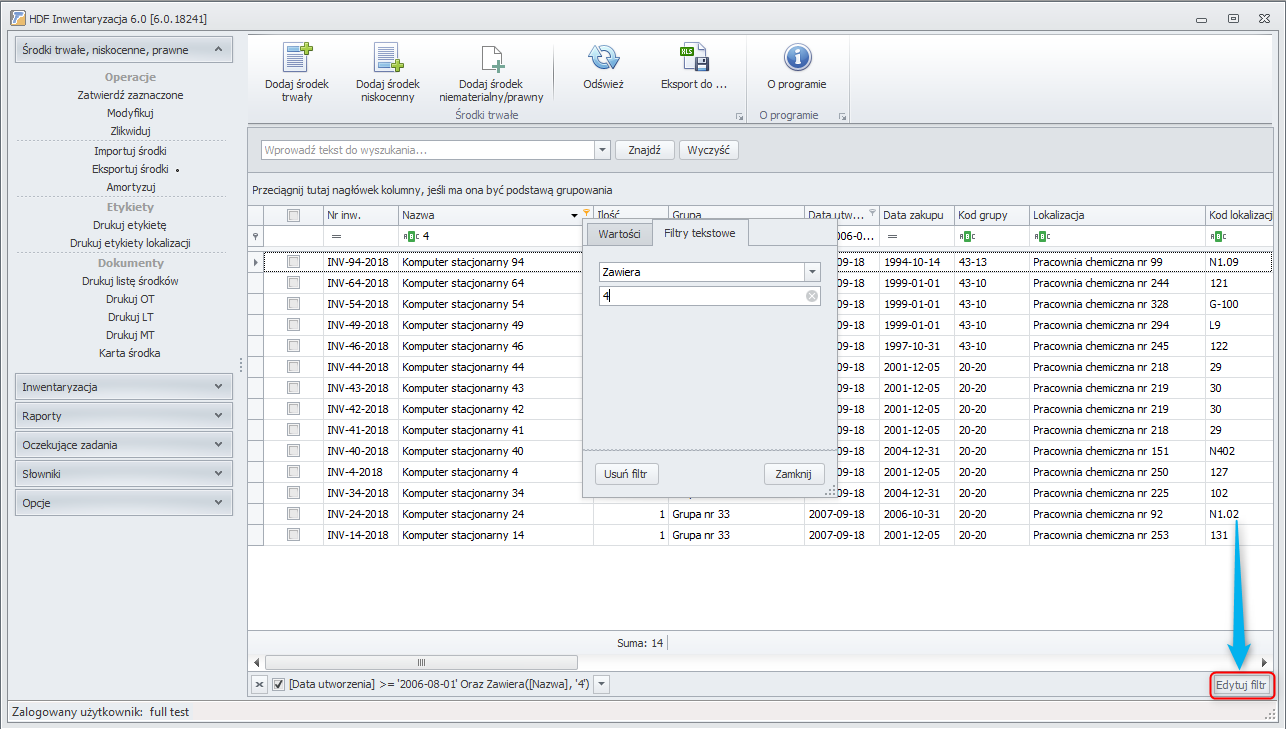
After clicking the „Edytuj filtr” button, the filter wizard window is displayed. This lets you add individual filters for different columns in one place and search for complex items in an advanced way.
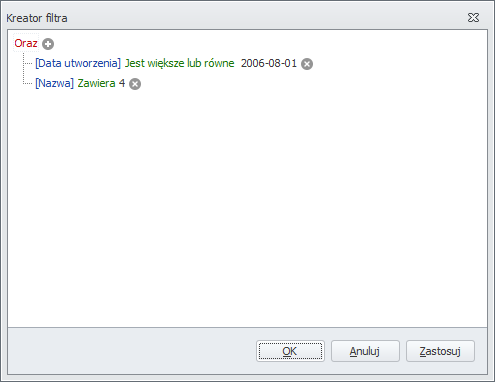
For example, we can search for an item:
- belonging to a specific asset name (e.g. „zamrażarka”),
- in a specific quantity (e.g. „jest równe 1”),
- with an individual inventory number (e.g. „I-43-10-035”).
We can add filters using the „+” button and delete them using the „x” button. After making changes, select the „Zastosuj” button to filter the asset database.
5. Program users
Only people who have been authorized to do so (who have a login, an access password, and a permission scope) can use the program.
5.1. Permission scope
HDF Inwentaryzacja 7 allows defining a multi-level permission system. This means that every program user must be assigned to a specific group with selected permissions to access various program functions and the data stored in it. By default, four access groups with different permissions are defined in the program – „full” (password „a”, has all possible permissions), administrator (has permissions to administer the program), accountant, operator (basic permission scope).
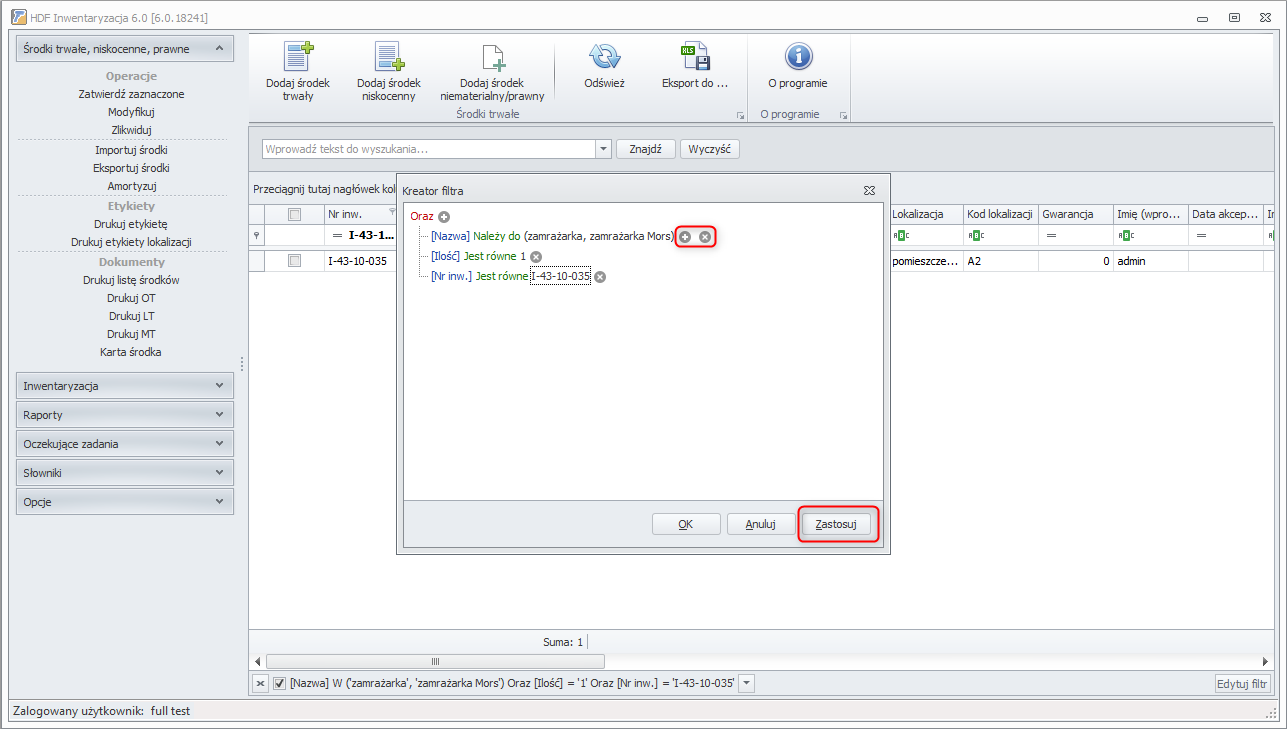
5.2. Adding a new permission group
To add a new permission group:
- In the program menu, in the „Opcje” tab, select „Grupy użytkowników”.
- Then, in the new window, select „Dodaj grupę”.
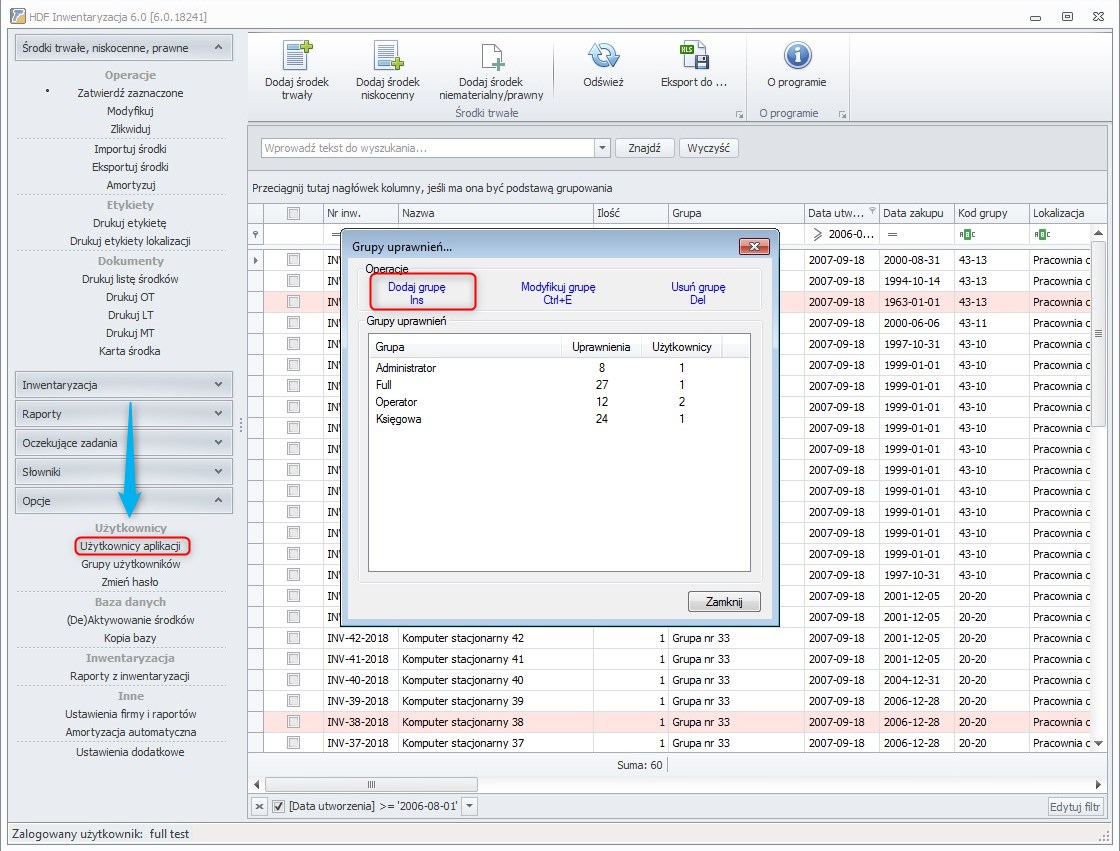
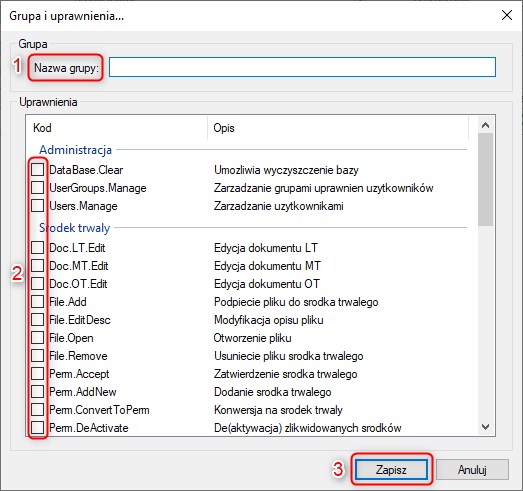
A new window with a list of permissions will appear. In the „Nazwa grupy” field [point 1 in the illustration below], enter a name for the group being defined, e.g. „pracownicy magazynu”. Then, by checking the appropriate boxes, select the permissions granted to the group [point 2 in the illustration below]. To save the entered data, click „Zapisz” [point 3 in the illustration below]. The name of the new group will appear in the „Grupy uprawnień” window.
5.3. Changing the permission scope of a group
To make changes to the permission scope granted to a group:
- In the program menu, in the „Opcje” tab, select „Grupy użytkowników” [Opcje → Grupy użytkowników].
- In the „Grupy uprawnień” window, select the group whose permission scope is to be changed, then click „Modyfikuj grupę”.
- Make the desired changes by checking (or unchecking) the appropriate checkboxes.
- Confirm the changes by clicking „Zapisz”.
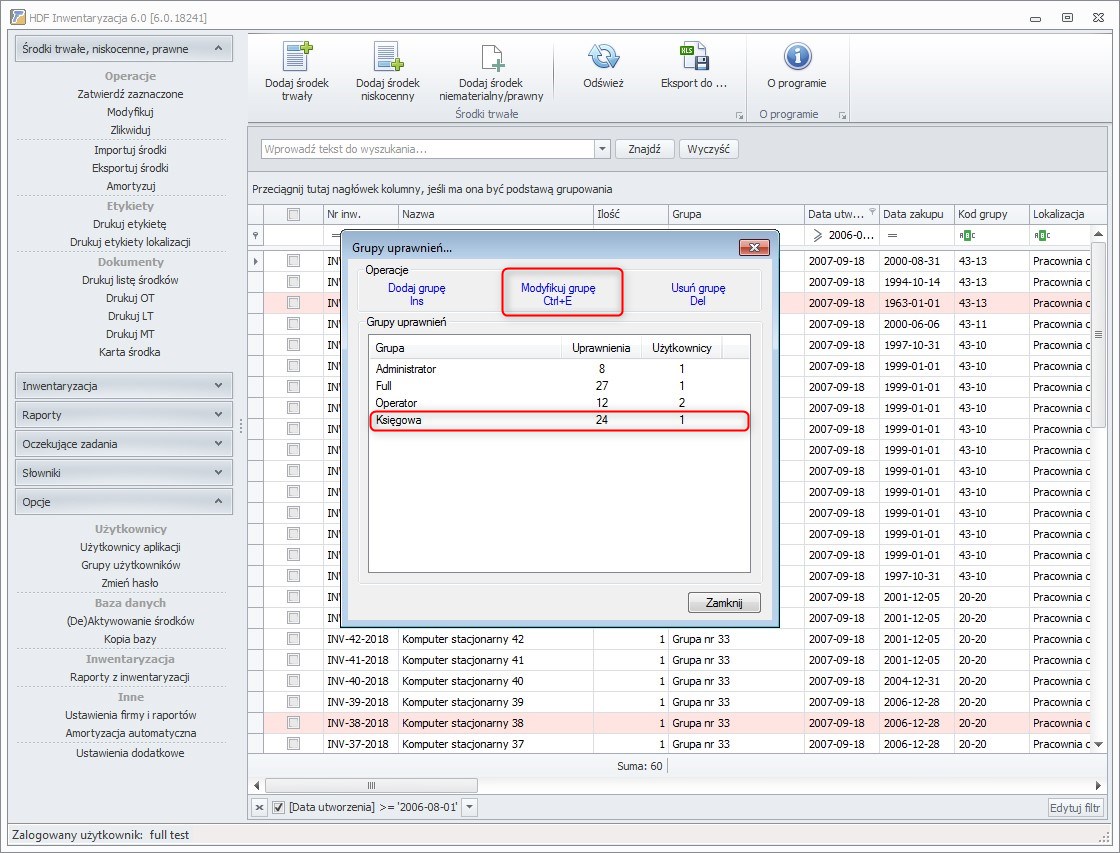
5.4. Viewing the permission scope of a group
To find out exactly what permissions a group has:
- In the program menu, in the „Opcje” tab, select „Grupy użytkowników” [Opcje → Grupy użytkowników].
- The „Grupy uprawnień” window will appear, containing a list of permission groups along with the specified number of permissions granted to each group and the number of users assigned to each group.
- To see the details, in the „Grupy uprawnień” window select the group whose permission scope you want to review, then click „Modyfikuj grupę”.
5.5. Deleting permission groups
To delete a permission group:
- In the program menu, in the „Opcje” tab, select „Grupy użytkowników” [Opcje → Grupy użytkowników].
- In the „Grupy uprawnień” window, select the group to be deleted, then click „Usuń grupę”.
5.6. User list
To view the list of program users, in the „Opcje” tab select „Użytkownicy aplikacji”. The „Użytkownicy” window will open, containing the list of users. If both selection options are checked (i.e. „Pokaż usuniętych”, „Pokaż nieaktywnych”), the list contains all users – active users are shown in black, inactive in blue, deleted in red.
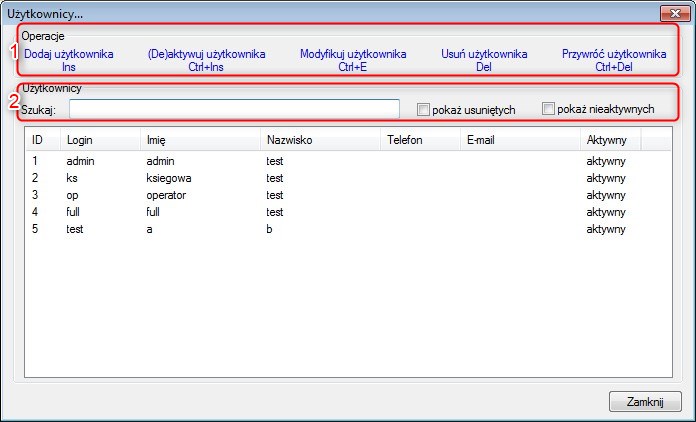
The user list contains the following information: user's sequential number, login, first name, last name, phone, e-mail, and activity status.
In the „Użytkownicy” window, in addition to the user list, there are also:
- A user search tool [2], allowing a user to be found by login, first name, last name, phone number, or e-mail. Next to the search tool there are options for listing deleted and inactive users.
- Function buttons [1], which allow the following operations: adding users, editing their data, activating and deactivating users, restoring users, deleting users.
The user list can be filtered so that it contains only data meeting specific criteria. To do this, use the user search tool (located above the list) and the checkboxes: „Pokaż usuniętych” (the list of deleted users will be shown), „Pokaż nieaktywnych” (the list of inactive users will be shown).
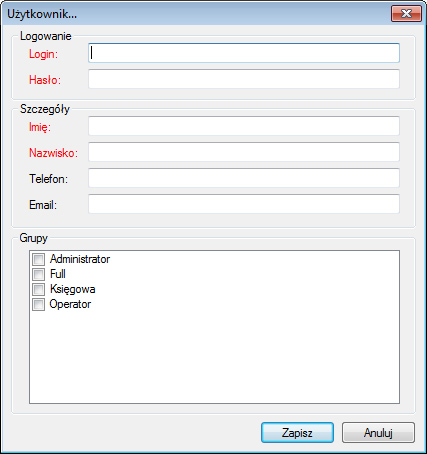
5.7. Adding a new user
To enter into the program the people authorized to use it:
- In the „Opcje” tab, select „Użytkownicy aplikacji”.
- In the „Użytkownicy” window, click the „Dodaj użytkownika” button. A new window will appear in which you must fill in the required fields (fields marked in red are mandatory) and assign the employee to a group with specific permissions.
- After confirming the entered data, the program will ask you to repeat the entered password and then add the new user to the list.
5.8. Editing user data
To change a user's data:
- In the „Opcje” tab, select „Użytkownicy aplikacji”.
- In the „Użytkownicy” window, select the user whose data is to be changed and click the „Modyfikuj użytkownika” button – a new window will appear in which you can enter the desired changes.
- Confirm the changed data by clicking „Zapisz”.
5.9. Activating / deactivating a user
Each user can be deactivated for a certain period and then reactivated. This function means that an inactive user cannot use the program until reactivated, but their login is in a sense „locked” – you cannot enter a new user with the same login. After activation, the user regains the right to access the program and the permissions previously granted to them.
5.10. Deleting a user
To delete a user, in the „Opcje” tab select „Użytkownicy aplikacji”. The „Użytkownicy” window will appear, in which you select the user to be deleted and then click „Usuń użytkownika”.
5.11. Restoring a user
To restore a previously deleted user, in the „Opcje” tab select „Użytkownicy aplikacji”. The „Użytkownicy” window will appear, in which you must:
- Check the „Pokaż usuniętych” option.
- Select the user to be restored, then click „Przywróć użytkownika”.
6. Entering the required data in the „Słowniki” tab
For the program to work correctly, before you start using it you must define the basic categories that will later be used while working with the application.
In the „Słowniki” tab you must define:
- Asset groups
- Locations
- Departments
- Business units
- Responsible persons
- Contractors
- Depreciation rates
6.1. Adding new data in the „Słowniki” tab
Below is an example of adding new data in the „Słowniki” tab, using the definition of a new location (the process is very similar in every category):
- Expand the „Słowniki” tab menu.
- Select one of the categories listed above (in this example it is the „Lokalizacje” category).
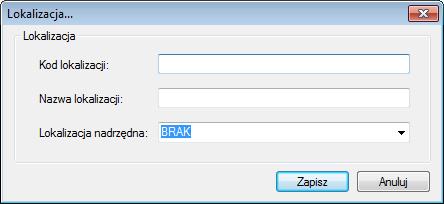
- In the category window, click „Dodaj lokalizację”.
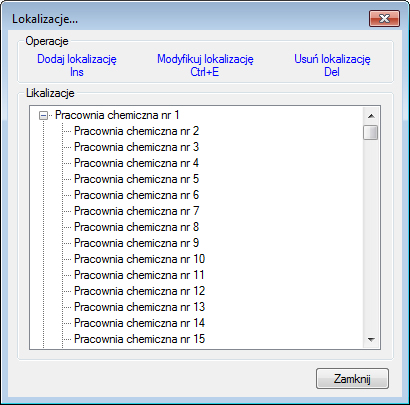
- In the new window, fill in the required fields (here: code, name, and in the case of the „Lokalizacje” category also „Lokalizacja nadrzędna”. The parent location is the first location entered into the program. When defining subsequent locations, it can be selected from a drop-down list).
- Confirm the entered data.
7. Fixed / low-value / intangible assets
7.1. Adding fixed assets
To enter a fixed asset into the program:
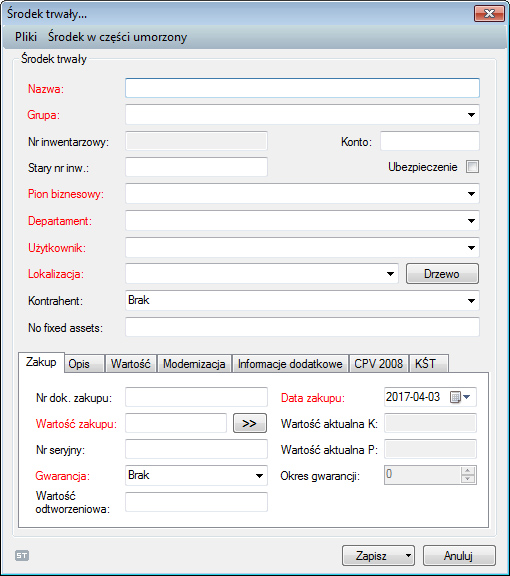
- Click „Dodaj środek trwały”.
- In the „Środek trwały” form, fill in the individual fields (fields marked in red are required). Data that can be selected from drop-down lists is defined in the „Słowniki” tab.
- Save the entered data. (After clicking „Zapisz”, by default one asset is saved in the program. The „Wprowadzanie wielu środków” subsection describes how to enter multiple assets of the same type into the program.)
Remember that until an entered asset is approved by an authorized person, it will not be included in the inventory count and depreciation.
7.2. Adding low-value assets
To enter a low-value asset into the program:
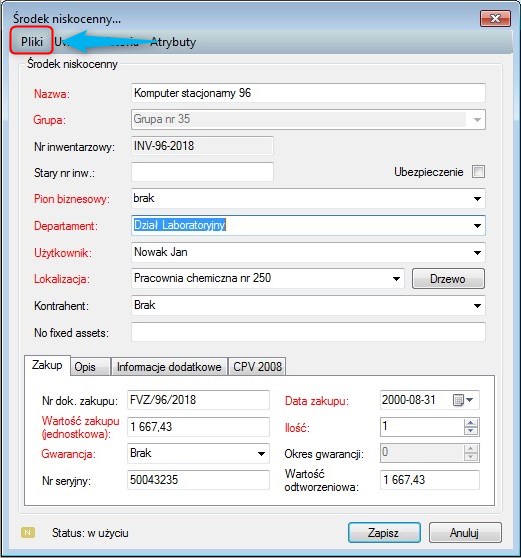
- Select „Dodaj środek niskocenny”.
- In the „Środek niskocenny” form, fill in the individual fields (fields marked in red are required).
- Save the entered data. (After clicking „Zapisz”, by default one asset is saved in the program. The „Wprowadzanie wielu środków” subsection describes how to enter multiple assets of the same type into the program.)
Remember that until an entered asset is approved by an authorized person, it will not be included in the inventory count.
7.3. Adding intangible / legal assets
To enter an intangible / legal asset into the program:
- Select „Dodaj środek niematerialny / prawny”.
- In the „Środek niematerialny / prawny” form, fill in the fields (fields marked in red are required). Data that can be selected from drop-down lists is defined in the „Słowniki” tab.
- Save the entered data. (After clicking „Zapisz”, by default one asset is saved in the program. The „Wprowadzanie wielu środków” subsection describes how to enter multiple assets of the same type into the program.)
Remember that until an entered asset is approved by an authorized person, it will not be included in the inventory count.
7.4. Adding multiple assets
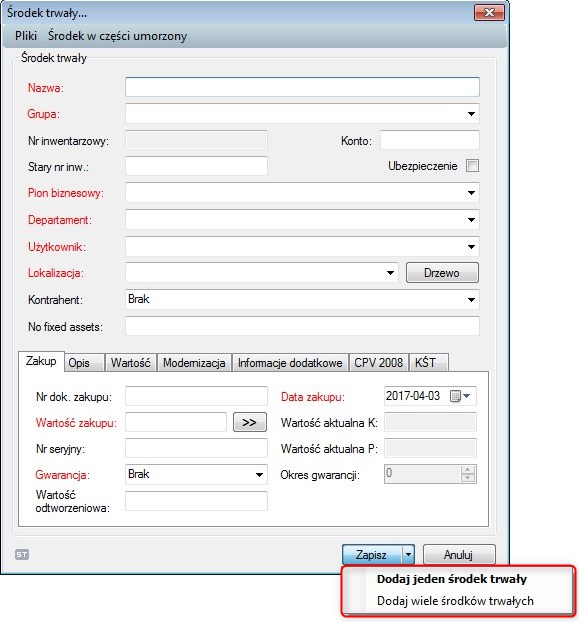
The program allows entering multiple assets of one type.
To do this, enter the selected asset according to points 1–2 detailed in the previous sections. To save multiple assets of the same type, expand the menu of the „Zapisz” button and select the „Dodaj wiele środków trwałych” option.
Note! This operation will not be possible if you manually enter an inventory number. To add multiple fixed assets, leave this field empty.
In the „Dodawanie środków” window, specify how many assets are to be entered and enter their serial numbers (after each number press Enter so that each number is entered on a separate line).

7.5. Approving a new fixed / low-value / intangible asset
Every asset entered into the program must be approved by an authorized person. Until a given asset is approved, it will not be included in the inventory count / depreciation. Moreover, approving a fixed / low-value / intangible asset causes that:
- the asset is assigned an inventory number (if the automatic generation option is active),
- the fixed / low-value / intangible asset window changes – new tabs with new, previously unavailable functions appear in it.
To approve a newly entered asset:
- In the program menu, expand the „Środki trwałe, niskocenne, prawne” tab.
- In the program's work area, select the assets to be approved (unapproved assets are marked in grey).
- Select the „Zatwierdź zaznaczone” option.
- Confirm that you want to approve the selected assets.
Another way to perform the same operation is to use the reminder window – if there are any unapproved assets saved in the program, a reminder box about the need to approve them will appear the next time the program is started. To approve the selected assets and contractors, or to see the results of automatically performed depreciation, click „Pokaż” and then approve the selected data.
Another way to approve an asset is to open the fixed asset form and click the „Zatwierdź” button in it.
After an asset is approved, the „Środek trwały” (low-value / intangible) window changes – new elements with new, previously unavailable functions appear in the menu bar.
7.6. Adding / editing / deleting / opening files attached to a given asset
To perform one of the operations listed above:
- Open the window of an approved fixed / low-value / intangible asset (to do this, double-click the selected asset in the program's work area, or just select it and click „Modyfikuj” in the program menu [Środki trwałe, niskocenne, prawne → Modyfikuj]).
- In the menu of the selected asset's form, click „Pliki”.
- In the new window, select one of the options: add / edit / delete / open (when choosing the edit, delete, or open option, first select the desired file in the list and then choose the operation to be performed).
7.7. Adding notes to an asset
To add notes to the fixed / low-value / intangible asset form:
- Open the window of an approved fixed / low-value / intangible asset (to do this, double-click the selected asset in the program's work area).
- In the form's menu bar, select „Uwagi”.
- In the „Uwagi” form, click „Dodaj”, enter the text, then confirm it by clicking „Zapisz”.
7.8. Retiring a fixed / low-value / intangible asset
To retire a selected fixed / low-value / intangible asset:
- In the program menu, select the „Środki trwałe, niskocenne, prawne” option.
- In the work area of the main program window, select the asset designated for retirement.
- In the program menu, click „Zlikwiduj”.
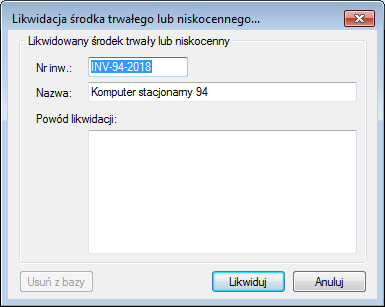
- A new window will appear („Likwidacja środka trwałego lub niskocennego”), in which you must enter the retirement reason.
- Confirm the retirement by clicking „Likwiduj”.
The asset has been retired. However, it does not disappear from the system; it is still present in it (marked in pink in the program's work area), but is not included in the inventory count and depreciation. For retired assets, the system automatically generates an additional „Powód likwidacji” tab, which contains information such as: retirement reason, who retired it, and when.
7.9. Printing the list of assets saved in the program
To print the list of assets saved in the program (or only selected data):
- In the program menu, select „Środki trwałe, niskocenne, prawne” and then „Drukuj listę środków”.
- Print the whole list or only selected columns (to select columns, click „Wybierz kolumny” and then check those to be printed).
- Click „Drukuj”.

7.10. History of a fixed / low-value / intangible asset
All operations performed in the program are recorded. They can be reviewed using the „Historia środka trwałego / niskocennego / prawnego” option.
7.11. Viewing asset history
To review the history of operations performed in the program:
- Open the form of the selected asset (double-click the selected asset in the program's work area).
- In the form's menu bar, click „Historia”.
- Select the categories the history is to concern (define e.g. the time range, the type of operations performed, or the user making the changes).
- Click „Odśwież”.
7.12. Printing asset history
To print the history of operations performed on a selected fixed / low-value / intangible asset:
- Open the window with the operation history (how to do this is described in the previous point).
- Click „Drukuj”.
- A print preview window will appear; if everything is correct, click „Drukuj”.
8. Depreciation
HDF Inwentaryzacja 7 allows defining the depreciation method. Using the application, you can carry out depreciation:
- straight-line,
- declining-balance,
- one-time.
Depreciation can be carried out „on demand” by the user or automatically, on days chosen by the user. The user can create a plan for carrying out automatic depreciation for the entire year. In addition, the program allows carrying out depreciation of all approved fixed assets or only those selected by the user. A list of depreciation rates is entered in the program by default – they can be modified, deleted, or new ones added.
8.1. Automatic depreciation – defining the date it is carried out
For the program to carry out automatic depreciation of fixed assets, you must define the days on which this operation is to be performed. To do this:
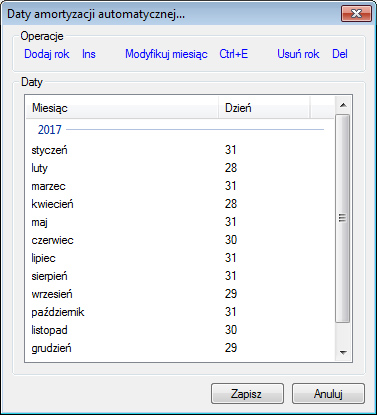
- In the program menu, open the „Opcje” tab and then select „Amortyzacja automatyczna” [Opcje → Amortyzacja automatyczna].
- The „Daty amortyzacji automatycznej…” window will open.
- Using the „Dodaj rok”, „Modyfikuj miesiąc”, „Usuń rok” buttons, define the automatic depreciation dates.
8.2. Depreciation of one (several or all) fixed assets
If the goal is to carry out depreciation of several (all) fixed assets:
- In the program's work area, select the fixed assets to be depreciated. If you want to depreciate all fixed assets, select them all by clicking the square in the top-left corner of the work area.
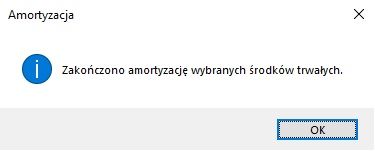
- Click „Amortyzuj” [Środki trwałe, niskocenne, prawne → Amortyzuj].
- An „Amortyzacja” box will appear, indicating that the depreciation of the selected fixed assets has been completed.
8.3. Fixed asset depreciation history / printing depreciation history
To review the depreciation history of a selected fixed asset:
- Open the fixed asset form (by double-clicking the selected fixed asset).
- Click the „Tabela amortyzacji” tab in the menu bar of the selected fixed asset's form.
- In the new window, check the checkboxes.
- Click „Odśwież”.
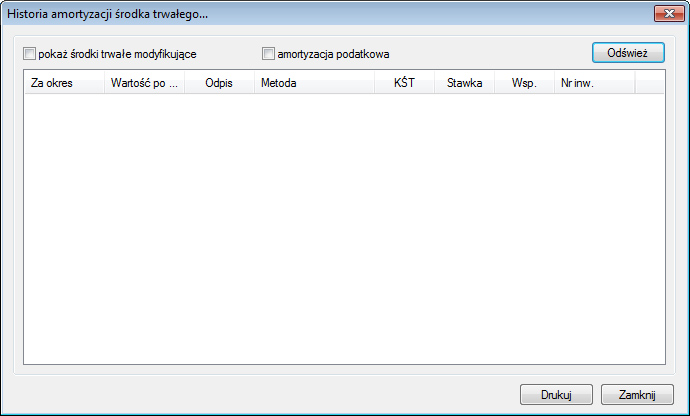
The generated depreciation history report can be printed. To do this, in the „Historia amortyzacji środka trwałego” window click „Drukuj”.
9. Inventory count
HDF Inwentaryzacja 7 allows carrying out an inventory count in two ways:
- using a collector,
- entering data directly into the application installed on the PC.
There is an option allowing an inventory count of either all fixed and low-value assets or only those selected by the user.
9.1. New inventory count
To start a new inventory count:
- In the program menu, select „Inwentaryzacja”.
- If only selected assets are to be subject to the inventory count, select them. If all assets are to be subject to it, click the square in the top-left corner of the work area.
- In the program menu, click „Uruchom nową”.
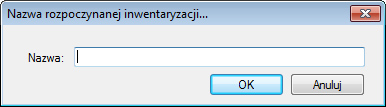
- In the new box, enter the inventory count name.
- The „Inwentaryzacja” window will open. In the „Inwentaryzacja” tab, choose how to carry out the count: automatic – using a data collector (see 8.2), or manual – directly on the PC (the „Ręcznie” button, see 8.3).
9.2. Automatic inventory count
The automatic inventory count is carried out using a data collector on which the HDF InvMobileprogram is installed. It requires the Business edition and a separate collector license.
Data is exchanged through the HDF Software cloud: it is exported from the PC to the cloud, collectors download it and scan offline, and the results return to the cloud and are imported back to the PC. The mode supports many collectors working in parallel – each scans its own part, and the person in charge imports the results of the individual collectors.
The procedure below indicates on which device each step is performed: [PC] – the application on the computer, [kolektor] – the HDF InvMobile application on the data collector.
- [PC] Start a new inventory count [Inwentaryzacja → Uruchom nową] or open an inventory count that was started earlier but not finished [Inwentaryzacja → Uruchom niezakończoną].
- [PC] In the „Inwentaryzacja” window, open the „Inwentaryzacja” tab.
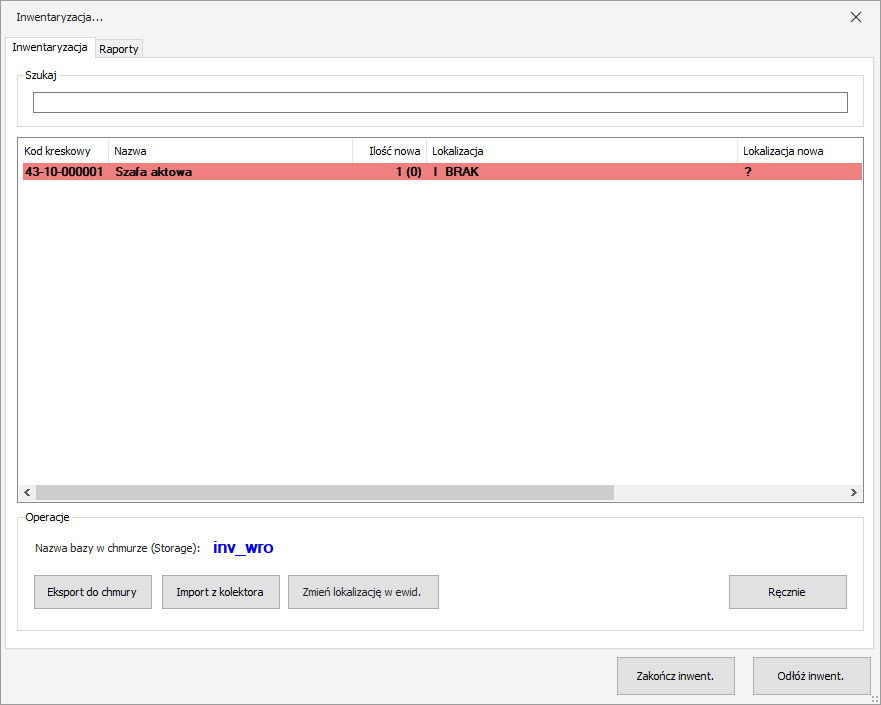
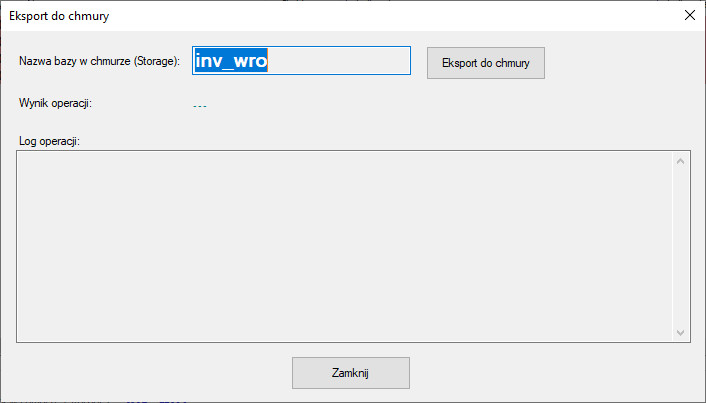
- [PC] Click „Eksport do chmury”. The asset data will be sent to the cloud.
- [kolektor] In the HDF InvMobile application, select the „Pobierz dane z chmury” option.
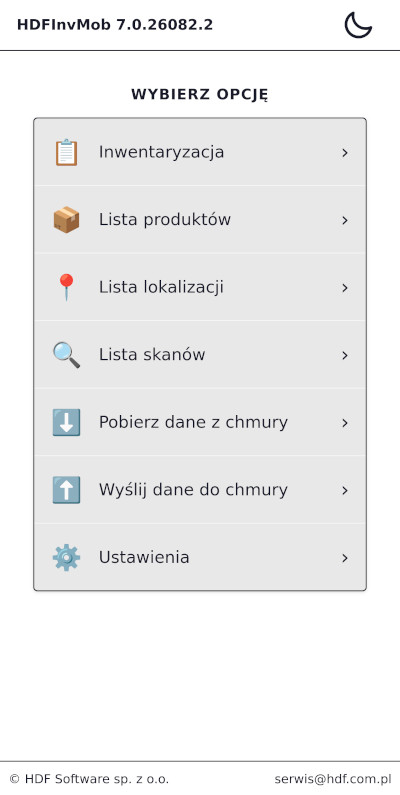
- [kolektor] Select the „Inwentaryzacja” option and scan the barcodes of the assets to be inventoried with the collector. Scanning is done offline – an internet connection is not required at this point.
- [kolektor] After finishing scanning, with internet access, select the „Wyślij dane do chmury” option. Each worker sends their part independently of the others.
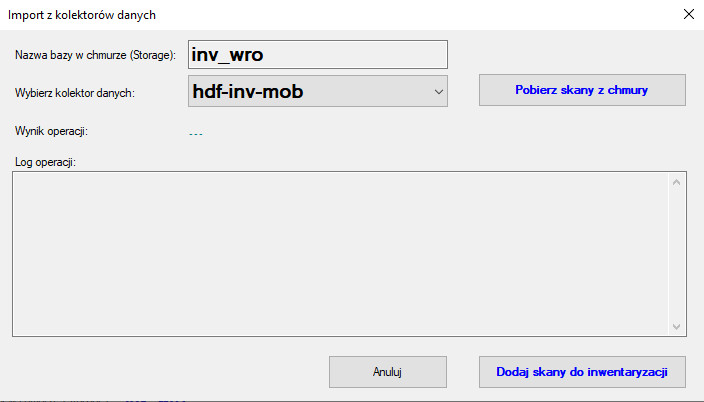
- [PC] In the „Inwentaryzacja” window, select „Import z kolektora”. In the „Import z kolektorów danych” window, indicate the collector from the „Wybierz kolektor danych” list, click „Pobierz skany z chmury”, and then „Dodaj skany do inwentaryzacji”. The scanned items will be added to the current inventory count. The import is performed separately for each collector and can be repeated – also again for the same collector (e.g. after a correction). If an asset's location has changed, to enter it into the main records click „Zmień lokalizację w ewidencji”.
- [PC] Once data from all collectors has been imported, check the results in the „Raporty” tab.
- [PC] Finish the inventory count by clicking „Zakończ” – the report will be generated automatically. You can also postpone the inventory count for later completion by clicking „Odłóż inwentaryzację”.
9.3. Inventory count without a collector – manual (carried out only on the PC)
During a manual inventory count, all data is entered into the application manually. A manual inventory count proceeds as follows:
- Start a new inventory count [Inwentaryzacja → Uruchom nową] or open an inventory count that was started earlier and not finished [Inwentaryzacja → Uruchom niezakończoną].
- In the „Inwentaryzacja” window, open the „Inwentaryzacja” tab.
- Click the „Ręcznie” button (marked in the illustration below).
- From the asset list, select an asset to inventory by double-clicking it.
- A new box will appear, in which you enter the quantity of assets held and (optionally) change their location.
- Confirm the changes by clicking „OK”.
- Repeat steps 4–6 as many times as there are assets on the list.
- The inventory count can be finished by clicking „Zakończ”, or saved for later completion by clicking „Odłóż inwentaryzację”.
9.4. Continuing a started inventory count
When carrying out an inventory count, the program's functions for continuing a previously started inventory count are also useful. To continue a previously started inventory count:
- In the program menu, select „Inwentaryzacja” and then „Uruchom niezakończoną”.
- In the list of unfinished inventory counts, select the one to be continued and click „Wybierz”.
- The window of the unfinished inventory count will open, which you can now continue.
9.5. Deleting unfinished inventory counts
You can always remove from the list of unfinished inventory counts those that are no longer needed. To do this:
- In the program menu, select „Inwentaryzacja” and then „Usuń niezakończoną”.
- In the list of unfinished inventory counts, select those to be permanently deleted and click „Wybierz”.
- Confirm that you want to delete the unfinished inventory count.

9.6. Inventory count history
To review the history of the inventory counts carried out (and the details of each one):
- In the application menu, select „Inwentaryzacja” and then click „Historia inwentaryzacji” [Inwentaryzacja → Historia inwentaryzacji].
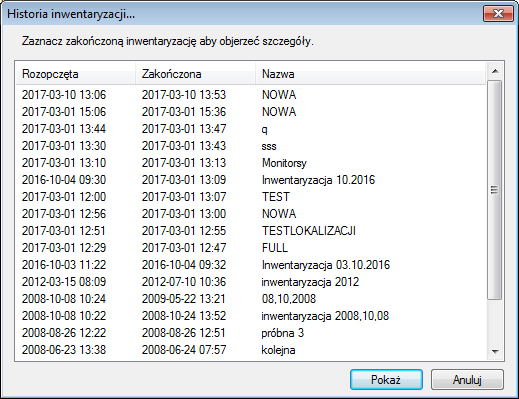
- The „Historia inwentaryzacji” window will open, containing a list of the inventory counts carried out along with the dates on which they were performed.
To review the details of a selected inventory count:
- In the „Historia inwentaryzacji” window, in the list of inventory counts carried out, select the one whose details the user wants to review.
- Click „Pokaż” – the inventory count window will open, with the assets that were subject to the inventory count listed, along with the inventory count reports.
10. Reports
HDF Inwentaryzacja 7 allows generating a wide range of depreciation and inventory count reports according to criteria defined by the user.
10.1. Report from a selected inventory count
To review the report on one selected inventory count:
- In the list of inventory counts carried out, select the one whose details interest the user and click „Pokaż” [Inwentaryzacja → Historia inwentaryzacji → Pokaż].
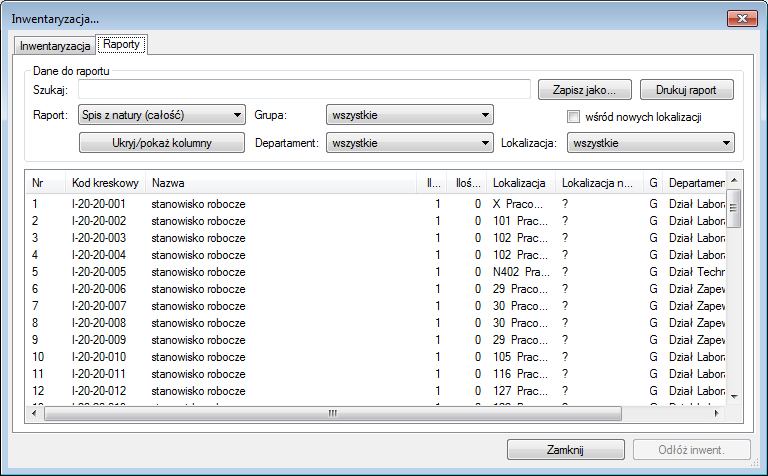
- In the „Inwentaryzacja” window, go to the „Raporty” tab.
- Define the criteria by which the report will be generated. The user can choose:
- the report type (full physical count, summary of inventory differences in warehouses, status before the inventory count, mismatched quantities, location changes, matching quantities, status after the inventory count, physical count),
- group (defines which asset groups are to be included when generating the report),
- location (specifies which locations will be included when generating the report),
- department (specifies which departments / divisions will be taken into account when generating the report).
- Save the report and/or print it by clicking „Zapisz jako” and/or „Drukuj”.
10.2. Selecting columns to print
An inventory count report can contain only the data columns selected by the user (these will also appear in any printout of the report).
To specify which columns the report is to contain:
- In the „Inwentaryzacja” window, in the „Raporty” tab, click the „Ukryj/pokaż kolumny” button [Inwentaryzacja → Historia inwentaryzacji → Pokaż → Raporty → Ukryj/pokaż kolumny].
- A window with a list of columns will appear – check those the report should contain, then click „OK”.
- In the work area of the „Inwentaryzacja” window, a report containing only the columns selected by the user will appear. To print the report, click „Drukuj raport”; to save the report to a file – „Zapisz jako”.
10.3. Renaming a report
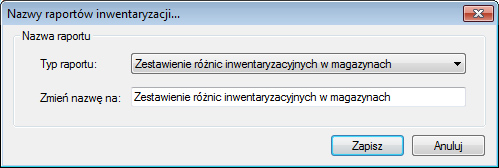
The „Raport” drop-down list contains the default names of report types. The user can change them freely so that they better suit their needs. To do this:
- In the program menu, in the „Opcje” tab, select „Raporty z inwentaryzacji” [Opcje → Raporty z inwentaryzacji].
- In the „Nazwy raportów inwentaryzacji” window, select from the drop-down list the report type whose name is to be changed, and in the field below enter the new name.
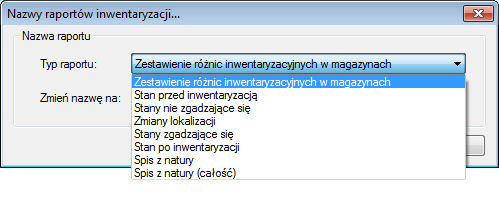
- Confirm the entered data by clicking „Zapisz”. The report type name has now been changed.
10.4. Depreciation reports
Depreciation reports can be created for a period chosen by the user and can optionally also include tax depreciation.
To generate a depreciation report:
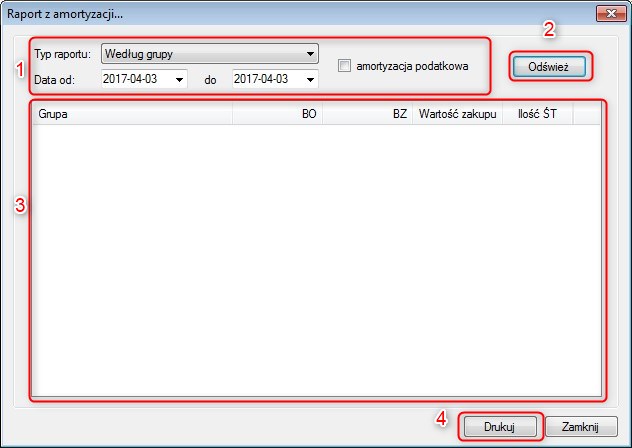
- Open the „Raport z amortyzacji” window [Raporty → Raport z amortyzacji].
- Specify the criteria to be taken into account when generating the report (fill in the fields in the frame marked no. 1).
- Specify the report type (report by group, report by department, report by business unit).
- Define the period the report is to cover.
- Specify whether the report is to include tax depreciation (checkbox checked) or not (checkbox empty).
- Click the „Odśwież” button (in the illustration, the field marked no. 2).
- In the area marked no. 3, a report reflecting the criteria selected by the user will appear.
- The report can be printed by clicking „Drukuj” (in the illustration, the button marked no. 4).
The „Zamortyzowane środki trwałe” report contains a list of assets depreciated in a period defined by the user.
To generate this report:
- Open the „Zamortyzowane środki trwałe” window [Raporty → Zamortyzowane środki trwałe].
- Specify the time to be included in the report and decide whether the report is to include tax depreciation or not.
- Click „Odśwież”.
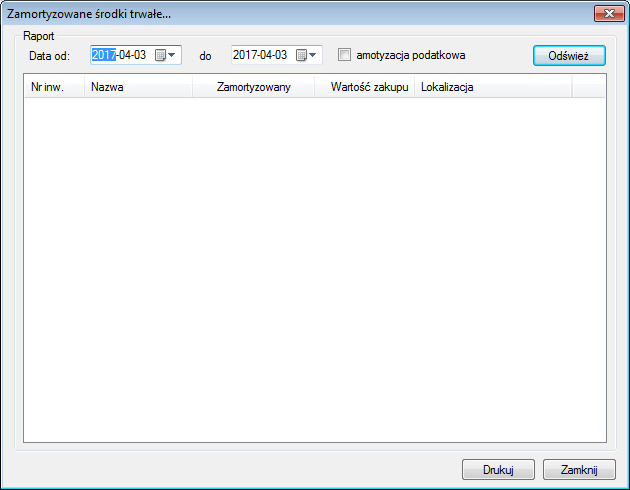
To print the report, click „Drukuj”.
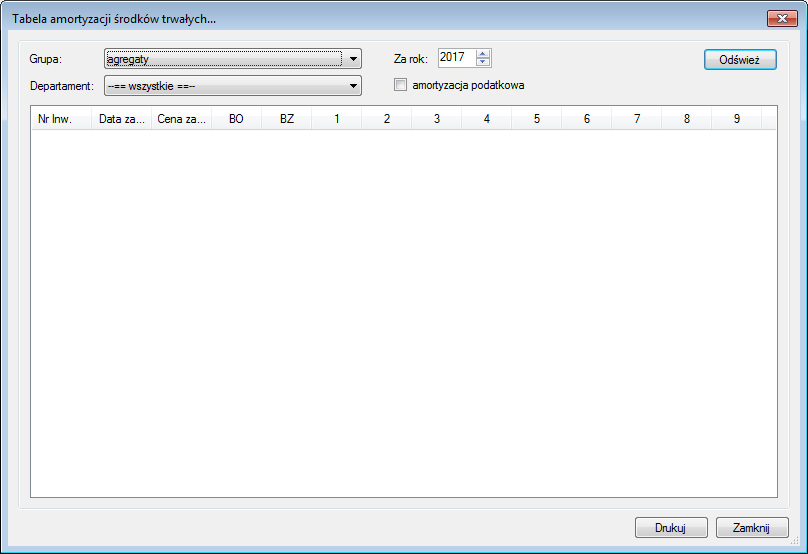
10.5. Depreciation tables
Fixed asset depreciation tables contain a list of assets depreciated in a given year and assigned to a group chosen by the user. The tables contain data from depreciation carried out in the successive months of the defined year and a summary in the form of an opening and closing balance.
To generate the appropriate depreciation table:
- Open the „Tabela amortyzacji środków trwałych” window [Raporty → Tabela amortyzacji].
- Define the asset group and the year – this data will be included in the report (you can also check the option to include tax depreciation in the report).
- Click „Odśwież”.
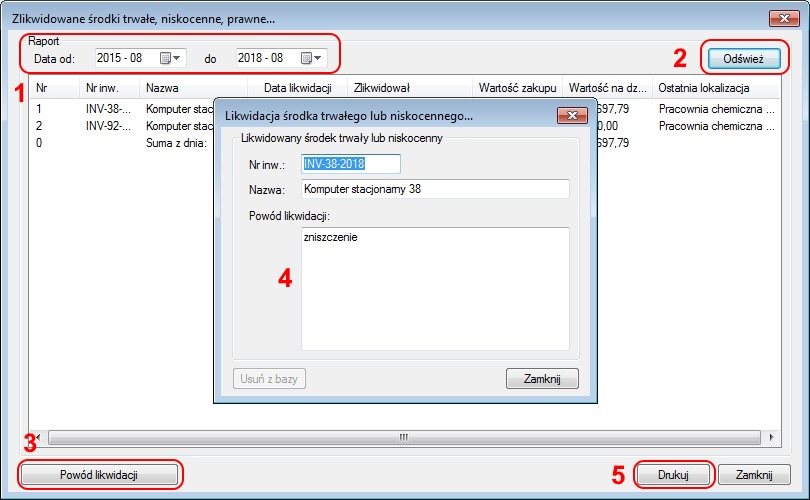
10.6. Retired assets – report
To generate a list of assets retired in a given period:
- Open the „Zlikwidowane środki trwałe, niskocenne, prawne” window [Raporty → Zlikwidowane środki].
- Define the period in which the assets were retired (in the illustration, the field marked no. 1).
- Click „Odśwież” (in the illustration, the field marked no. 2).
To review the retirement reason of a selected asset, select it in the list and then click „Powód likwidacji” (in the illustration, the field marked no. 3). A window will open in which the retirement reason is recorded (in the illustration, the field marked no. 4).
Printing the report will start after clicking the „Drukuj” button (in the illustration, the field marked no. 5).
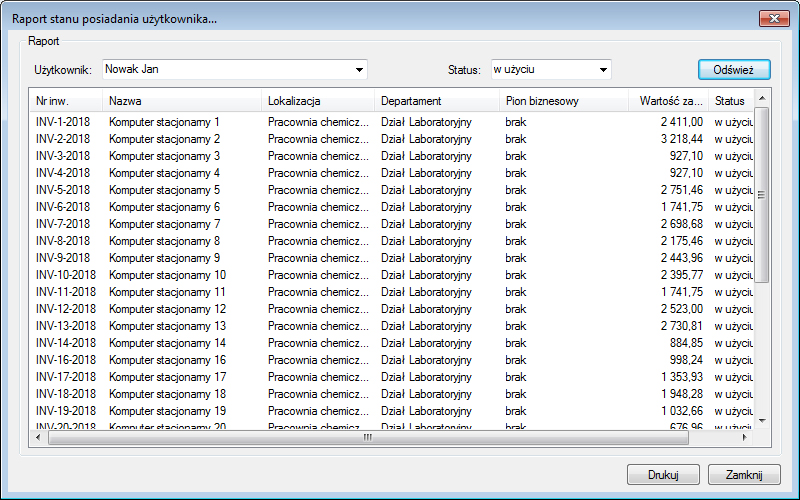
10.7. Employee holdings – report
The „Stan posiadania pracownika” report includes the assets for which a selected user is responsible. To generate it:
- Open the „Raport stanu posiadania pracownika” window [Raporty → Stan posiadania pracownika].
- Fill in the form: specify the user the report is to concern and the status of the assets it is to include (all / in use / retired / awaiting approval).
- After selecting the criteria, click „Odśwież”.
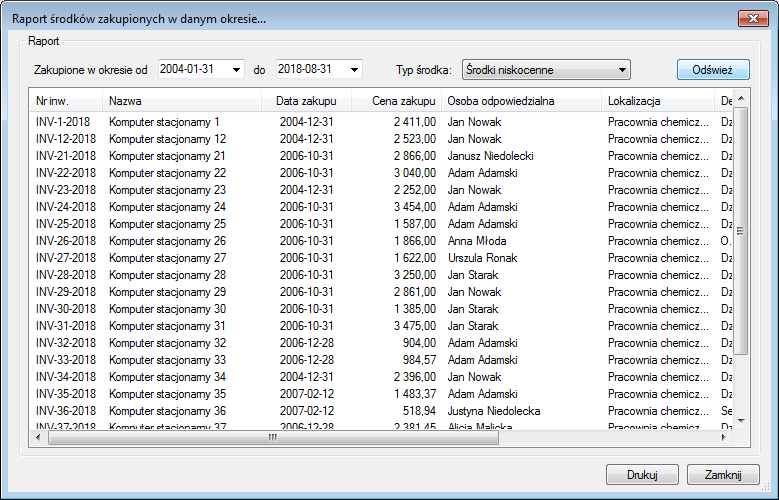
10.8. Assets purchased in a given period
The report of assets purchased in a given period contains a list of assets of a selected type (ŚT, N, P) purchased in a period defined by the user. The report also includes additional data such as: the asset's inventory number, its name, purchase date and price, the person responsible for the asset, the asset's location, department, business unit, and asset status.
To generate the report:
- Open the „Raport środków zakupionych w danym okresie” window [Raporty → Środki zakupione w zadanym okresie].
- Define the categories (period and asset type) to be included in the report.
- Click „Odśwież”.
To print the report, click „Drukuj”.
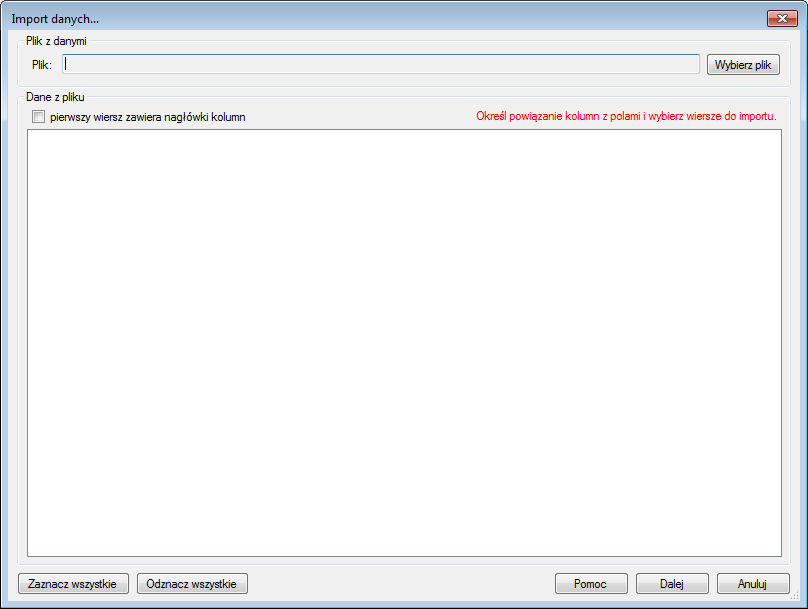
10.9. Importing assets from a text file (.txt, .csv)
To import data stored in a text file into HDF Inwentaryzacja 7:
- Prepare a text file with the data. All records in the text file should have the following structure:
asset type; name; group; business unit; department; user (last name first name); location; contractor *; purchase document no. *; purchase date yyyy-mm-dd; purchase value [K]; purchase value [P]; warranty *; warranty period; serial no. *; quantity **
Notes:
*– the field may have an empty value.**– the field applies only to low-value and intangible assets; for low-value assets there should be a number greater than 0; for fixed assets it is ignored.- asset type – ŚT or ST – fixed asset, N – low-value, P – intangible/legal.
- group; business unit; department; user (last name, first name); location; contractor – these are names occurring in the application; letter case does not matter.
- warranty – warranty code, available values: brak, serwis, standard, inna. Warranty and warranty period are ignored for intangible/legal assets.
- purchase value [K] – the accounting part.
- purchase value [P] – the tax part (for low-value and intangible assets the value is ignored).
- From the application menu, select „Środki trwałe, niskocenne, prawne” and then click „Importuj środki”.
- Select the file with the data to import and press „Dalej”.
- Click „Importuj”.
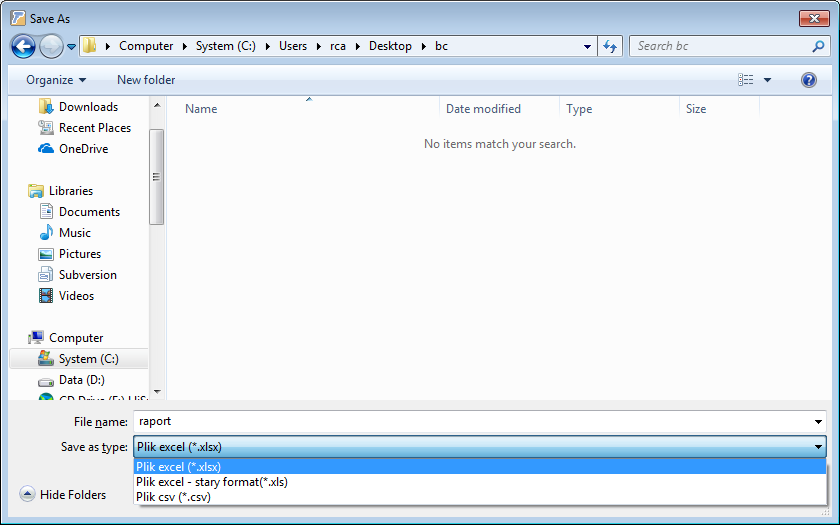
10.10. Exporting data to a text file / Microsoft Excel
To export data stored in HDF Inwentaryzacja 7 to a text file or Microsoft Excel, select the „Eksport do…” button from the application's top task bar.
The program will redirect us to a save window, in which you specify the type of file to which the data is to be exported.
To export the data to a file, also select where to save it, then click „Zapisz” at the bottom of the screen.
11. Printing labels
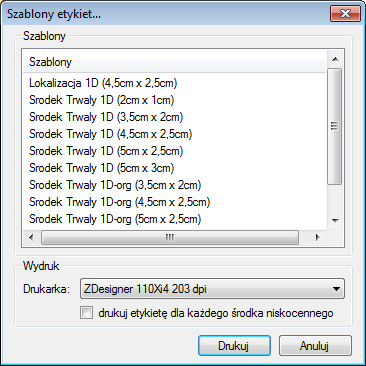
11.1. Printing labels for assets
To print labels for assets:
- In the program menu, select „Środki trwałe, niskocenne, prawne”.
- Select the desired assets if labels are to be printed only for them.
- Click „Drukuj etykietę”.
- Select a label template from those offered.
- Select a printer and confirm that you want to print („Drukuj”).
11.2. Printing labels for locations
To print labels for locations:
- In the program menu, select „Środki trwałe, niskocenne, prawne”.
- Click „Drukuj etykiety lokalizacji”.
- Select the locations for which labels are to be printed.
- Select a label template from those offered.
- Confirm that you want to print by clicking „OK” in the „Drukowanie” window.
12. Documents
OT, LT, MT documents, the asset list, or the asset card can be printed by going to the application's main menu, to the „Środki trwałe, niskocenne, prawne” tab.
To print an asset transfer protocol:
- In the application menu, select „Środki trwałe, niskocenne, prawne”.
- In the asset list, select the one for which the transfer protocol is to be printed.
- Click „Drukuj MT” [Środki trwałe, niskocenne, prawne → Drukuj MT].
- Printing of the document will start after clicking the „Drukuj” button.
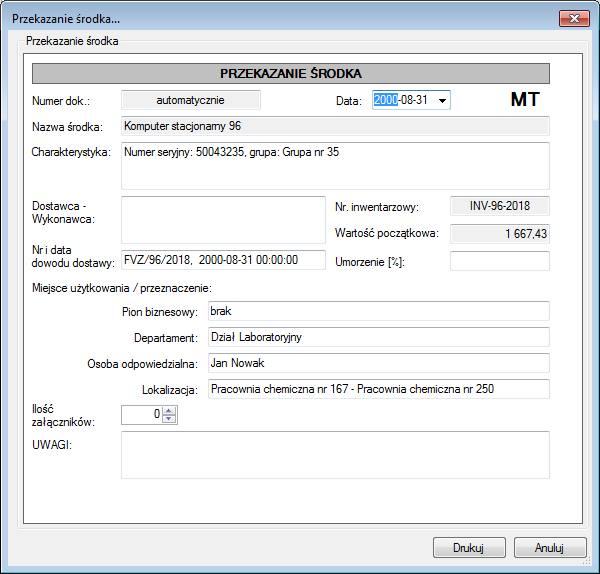
The asset transfer document contains space for the workplace stamp, all the details of the transferred asset, notes, and the signature of the person entrusted with its custody.
To print the remaining documents, perform analogous steps.
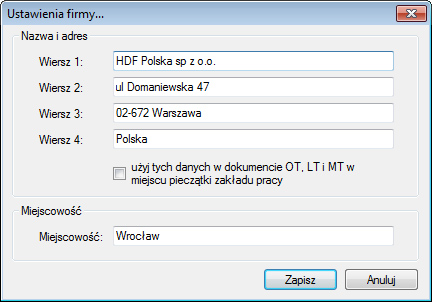
For the program to place company data automatically in every document, you must define this data beforehand. To do this:
- In the program menu, select „Opcje” and then „Ustawienia firmy i raportów”.
- In the „Ustawienia firmy i raportów” window, fill in the individual fields, following the pattern:
Line 1: Full company name Line 2: Street, building and unit number Line 3: Postal code and city Line 4: Country
- Check „użyj tych danych w dokumencie OT, LT i MT w miejscu pieczątki zakładu pracy”.
- Click „Zapisz”.
13. Frequently asked questions (FAQ)
This section gathers the most common problems reported while working with the program, together with a suggested solution. If the problem persists despite performing the described steps, please contact us: [email protected].
Database and configuration
A full description of database installation and configuration is in chapter 1. Below is a summary of the most common questions.
- How do I set the database connection parameters? In AdminTool.exe (installation directory, administrator privileges). Details: chapter 1.2.
- Does the database have to be installed on every computer? No. The database is central; on the endpoints you only set the connection in AdminTool.exe. Details: chapter 1.1.
- Can I have two databases – test and production? Yes, both on one server; switching in AdminTool.exe. Details: chapter 1.2.
- Which SQL database should I choose and where do I download it? For up to 500,000 assets the free SQL Server Express 2019 or 2022 is sufficient. Details and how to download: chapter 1.1.
- I have an older version of the program – do I have to convert the database? No, the program converts the database automatically on first launch. Details: chapter 1.2.
Registration and license
- Registration fails – the program reports incorrect login data. The login is the e-mail address provided during purchase, and the password is the license password received by e-mail after paying for the order (this is not the password for logging in to the program). Check that you are entering exactly this data, with no spaces at the beginning or end. If the password has been lost, request a new one by writing to [email protected].
- Registration fails – no connection. Registration, license transfer, and cloud operations require an internet connection. Make sure the computer has network access. If a firewall is running in your company, add an exception for the domain https://licenses.hdf.com.pl/ and the entire hdf.dev subnet – without this the program will not connect to the license server.
- The license is already active on another computer. Each license works on one computer at a time. To transfer it to another workstation, first deactivate it on the current computer using the „Przenieś licencję” button, then register it on the new one. The transfer can be performed only from the computer on which the license is active.
- The computer with the active license is unavailable (failure). The license cannot be transferred remotely from a damaged computer. In such a situation, contact us: [email protected].
- Registration fails despite correct data. The most common cause is a lack of free licenses – all purchased licenses are already in use. Before registering the program on a new computer, make sure you have deactivated (transferred the license) on the computer you are giving up.
Working with collectors (automatic inventory count)
- The „Inwentaryzacja” window does not open at all. The program will not show the „Inwentaryzacja” window until you register a subscription for data exchange with collectors. Register the subscription in the „Rejestracja” window (the „Zarejestruj bazę w chmurze” button, see chapter 1).
- The „Eksport do chmury” option is not visible. Data exchange with collectors works only in the Businessedition. The Standard edition does not support this feature.
- After downloading data, the collector shows an empty list. Check whether „Eksport do chmury” was previously performed on the computer for the current inventory count, and whether the same cloud database name (Storage) is used in the program on the computer and on the collector. Downloading data to the collector requires an internet connection.
- Does scanning itself require the internet? No. A connection is needed only when downloading data to the collector (before the count) and when sending the results to the cloud (after the count). Scanning is done offline.
- The report shows shortages even though the count is not finished. When working with several collectors, the results appear on the computer only after the data from a given collector has been imported. Until all workers send their scans to the cloud and they are imported („Import z kolektora”), assets not yet scanned will be shown as shortages. Finish and analyze the count only after importing from all collectors.
- A worker made a mistake while scanning. The import can be repeated. After resending the data from the collector to the cloud, perform „Import z kolektora” again for the same collector.
Assets and data
- How is the automatic inventory number created? The number consists of the asset's location identifier and a sequential number (location ID + sequential number). Automatic numbering guarantees the uniqueness of numbers; it is enabled in AdminTool.exe (see chapter 1.2).
- A new asset does not appear in the inventory count or depreciation. The asset must be approved by an authorized person. Unapproved assets (marked in grey in the work area) are not included. Approve the asset: „Środki trwałe, niskocenne, prawne” → „Zatwierdź zaznaczone”.
- Adding multiple assets at once does not work. The „Dodaj wiele środków” operation is not available if an inventory number was entered manually. Leave this field empty.
- A retired asset does not disappear from the list. This is correct behavior. A retired asset remains in the system (marked in pink) and is not included in the inventory count or depreciation, but retains its history and retirement reason.
- How do I import a large number of assets into an empty database? Recommended method: manually create 1–3 assets and all dictionaries, and fill in the complete data in the system. Then export these assets to an XLS file – this produces a ready template with the correct column structure. Fill it with your data (e.g. 1500 records) and perform the import.