HDF Labels 9 — user manual
Archived version. End of technical support: 31 Dec 2025.
Table of contents
- Introduction
- Instructional videos
- Installation, registration and deregistration
- Quick guide for experienced Windows users
- The program window
- Designing labels
- Working with objects
- Serial printing
- Barcode Wizard
1. Introduction
HDF Labels 9 is a modern, high-performance Windows program for designing and printing labels. Among other things, the program offers the following capabilities:
- Support for labels of any size.
- Printing on any type of printer.
- Designing labels based on objects that can be freely formatted: text, pictogram, line, image, rectangle, ellipse and barcode.
- Serial printing: labels can contain parameters filled with a variable value during printing. The variable can be a serial number, a date, or data read from a connected database. Mail-merge data can also be loaded from text files, an Excel spreadsheet, or a database connected via ODBC.
- Graphics can be embedded dynamically.
- Multi-print: many labels printed on a single page, in multiple rows and columns.
- Serial printing combined with multi-print: labels with selected data can be printed serially on a single sheet, in multiple rows and columns.
- Templates: you can create and save your own label templates with the Save template function.
- Undo and history: every action can be undone with the Undo function, and the history cleared with the Clear history button.
- Object anchoring: while designing, you can lock a selected object anywhere on the label with the Anchor object function.
- Formatting: all objects can be formatted — setting their position, rotation or order.
- Grid: the Program tab includes a Draw grid function that helps arrange objects evenly. The Snap to grid option automatically aligns objects to grid points.
2. Instructional videos
Check our YouTube channel.
3. Installation, registration and deregistration
To install HDF Labels 9, run the setup_hdf_labels_[version].exe file. It will install the program and the required components on your computer.
To register the program, you must first purchase it. To do so, send us your order:
- E-mail [email protected]
- Post HDF Software Sp. z o.o., ul. Sępa-Szarzyńskiego 34-36/L3, 50-351 Wrocław, Poland
When placing your order, provide your e-mail address — it serves as the login for software registration. If you order more than one license, you can assign a separate e-mail address to each user or the same address to everyone. The number of purchased licenses is stored in our database and is subject to our administration.
After payment, you will receive by e-mail a generated password, linked to the address you provided, needed for registration.
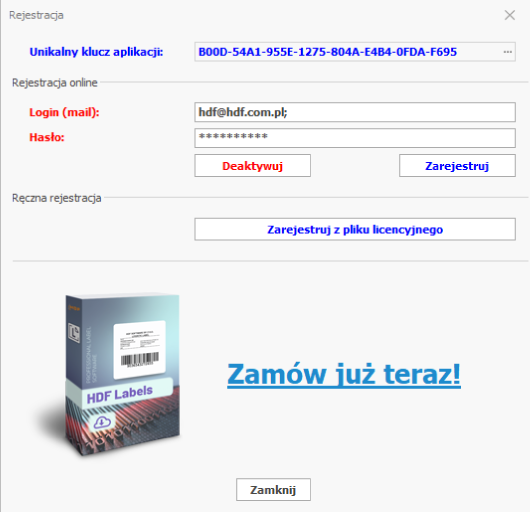
Registration requires an internet connection. From the menu, choose Help > License. A registration window appears in which you enter your e-mail address and password, then click Register.
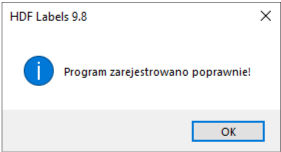
A message confirming registration appears on screen.
After registering, restart the program to use its full version.
If you want to change the workstation on which the program is used, you can deregister it and register it on another computer using the same e-mail address and password as during the first registration.
Deregistration also requires an internet connection. Choose Help > License. In the registration window the e-mail address and password should fill in automatically; if not, enter the data used at first registration and click Deactivate.
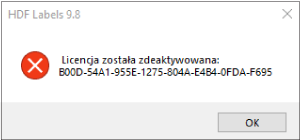
After restarting, the program will run in demo mode. You can now install it on another computer and repeat the registration. Using this method, you can move the program between computers an unlimited number of times.
Note! The unique application key is different on each computer. This means that if a computer breaks down, a license with that key remains active only on it and can only be deactivated from that computer. It is not possible to deactivate a license from a computer other than the one on which it is active. To transfer a license from an unavailable computer to a new one, contact us by e-mail ([email protected]) and we will deactivate it for you.
4. Quick guide for experienced Windows users
HDF Labels 9 has largely been designed in line with Windows conventions and ANSI standards, which makes it intuitive to use. Experienced Windows users will quickly get up to speed with the program.
This chapter is a brief introduction for such users — we assume they can select, position, move, minimize and enlarge objects and modify their properties, as well as use the open, save and print functions. We cover the three most important areas:
- designing labels,
- serial printing of labels,
- multi-printing of labels.
4.1. Designing a label
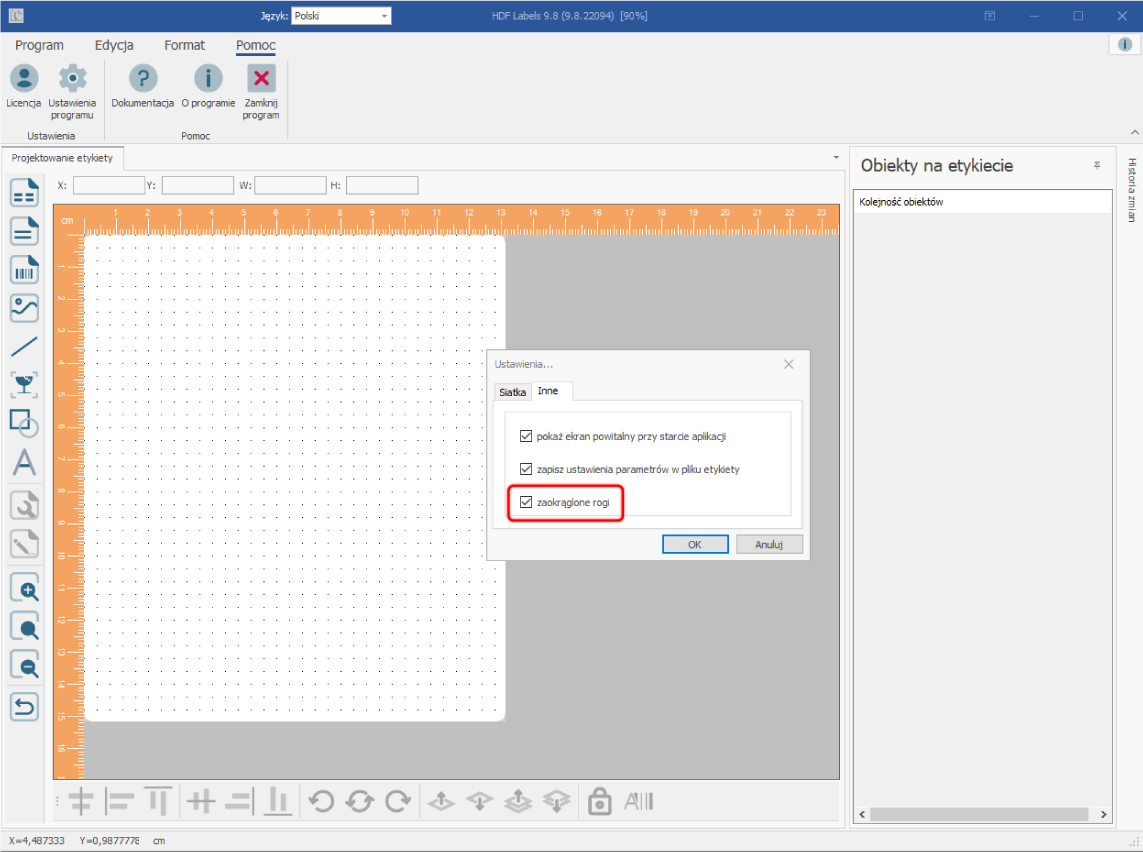
After starting the program, define the label size: choose Program > Label size and select a ready-made template or create your own. If you use a label with rounded corners, choose Help > Program settings, the Other tab, and select Rounded corners.
Next, insert objects onto the empty label and set their position. You will find object symbols on the top toolbar: click the chosen symbol, place the cursor on the label, press the left mouse button and drag until the object reaches the desired size, then release the button.
HDF Labels 9 supports the following object types: lines, rectangles / ellipses, text, images, pictograms, barcodes, Xlsx templates and Rtf templates.
Inserted objects can be moved, shrunk and enlarged — select the object and perform the usual Windows operations.
Barcode size is changed only in the Barcode Wizard (see the chapter "Barcode Wizard").
To set an object's properties, select it, right-click and choose "Object properties" or "Extended object properties".
To save a label, choose Program > Save or Save as.
To print labels, choose Program > Print, Serial printing or Multi-print.
4.2. Serial printing
In serial printing, objects fetch their content from external sources (text files, databases, numbering) only at the moment of printing. Objects that are to be filled with such data must first be parameterized at the label design stage. Each parameter is then assigned a field from the data source or a counter.
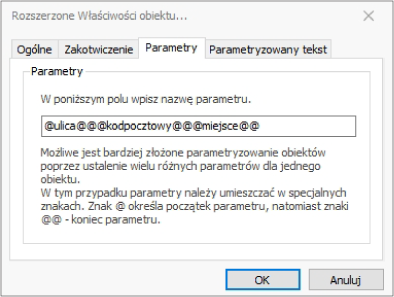
To parameterize an object, select it and choose "Extended object properties" from the context menu. Go to the Parameters tab and enter a parameter name. The name must start with "@" and end with "@@". It is worth using names that aid identification, e.g. @street@@. You can combine several parameters, e.g. @street@@@postcode@@@city@@.
For a better label preview, press Alt+F9.
Once the objects are parameterized, choose Program > Serial printing. The parameter names will appear in a list; connect each of them to a field from the data source or a numbering by clicking the Select link and filling in the dialog box. After assigning the data, set the printing options in the same window (e.g. whether to print all labels or only selected ones) and click Print to start serial printing.
Serial printing can be combined with multi-print.
4.3. Multi-print
Multi-print means printing several labels on a single sheet of paper. Before printing, specify how the labels are to be arranged on the page.
Choose Program > Multi-print. In the dialog box, enter the number of rows and columns and the vertical and horizontal spacing between labels. Click Print to start.
Multi-print can be combined with serial printing by choosing Serial printing from the menu.
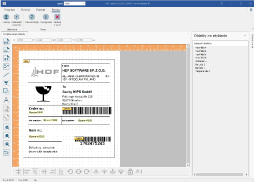
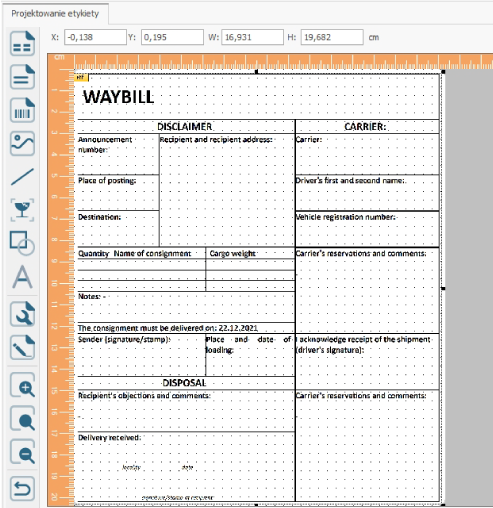
5. The program window
The HDF Labels 9 program window consists of eight important areas:
- Label — the area with the inserted objects.
- Menu — all program functions.
- Object toolbar — icons of all supported objects, making it easy to insert them quickly.
- Status bar — the exact cursor position and the position and size of the selected object.
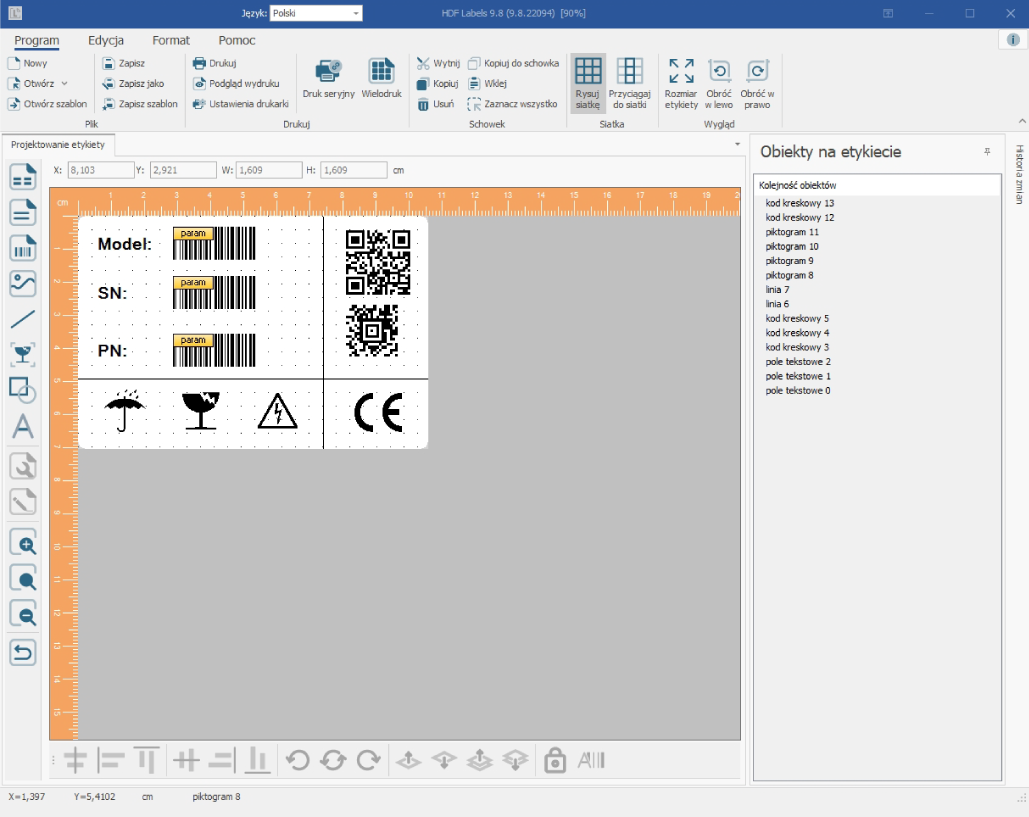
- Object order list — the names of all added objects and the order in which they were added (important when objects overlap). Selecting an object on the label also selects it in the list, and vice versa.
- Change history — a list of all performed actions, one per line. To clear it, choose Edit > Clear history.
- Context menu — appears when you right-click on a selected object.
- Function list — lets you rotate and align objects.
6. Designing labels
6.1. Creating a new label
On first launch, the program automatically loads an empty, standard label. To define your own:
- Choose Program > New.
- The Label size window appears — click Add.
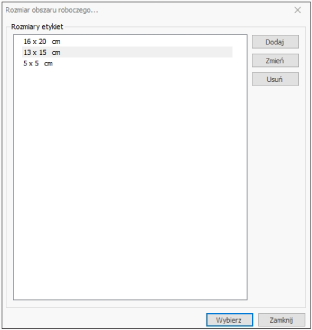
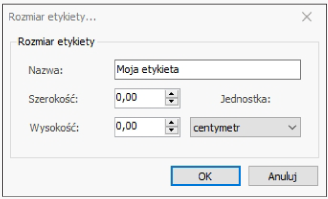
- In the next window, set the label height and width, choose the unit of measurement, give it a name and click OK.
- The program returns to the "Label size" window, where the new label is now available. Select it and click Select — an empty label of the chosen size appears on screen.
6.2. Creating a new label from a template
If labels are to be used repeatedly, you can save them as a template. To create a new label based on an existing template, choose Program > Open template.
6.3. Defining the label size
The label size can be changed at any time without losing the inserted objects. Choose Program > Label size, and in the window with the list of existing sizes select a label and click OK — or create a new one as described in chapter 6.1.
6.4. Drawing or hiding the grid
The grid makes it easier to position and align objects and is visible by default. To hide it, choose Program > Draw grid; to show it again, choose the option once more.
6.5. Aligning objects to the grid
The grid has an optional function that automatically snaps objects to its points — especially useful when positioning several objects at the same height or width. To enable it, choose Program > Snap to grid; to disable it, choose it again.
6.6. Defining the grid spacing and color
The grid can be adjusted to your needs — you can define its color and its vertical and horizontal spacing. Choose Help > Program settings, set the values and click OK.

6.7. Rotating the label
The label can be rotated left or right by 90 degrees. Choose Program > Rotate left or Rotate right.
- Before rotation
- After rotation
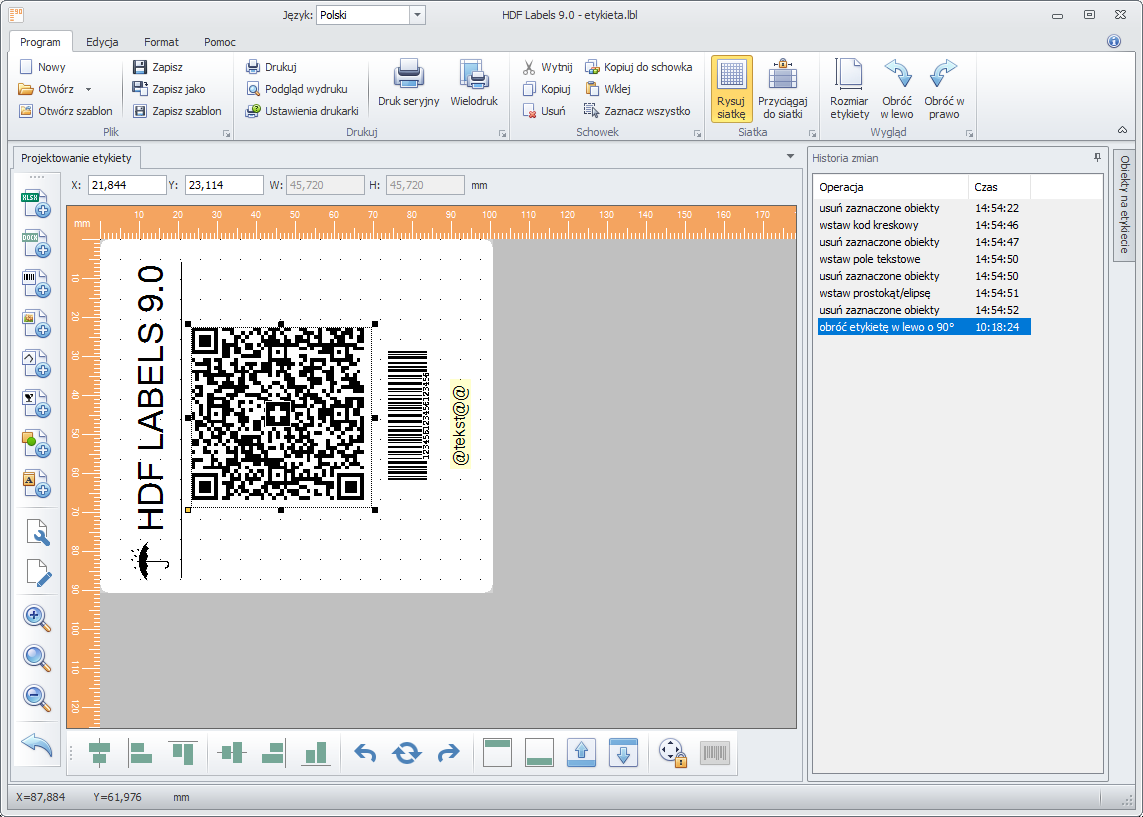
When the label is rotated, all defined objects are rotated as well.
6.8. Enlarging and reducing labels
The zoom function lets you view and position objects more precisely.
- To zoom in, click Zoom in (+)in the object list.

- To zoom out, click Zoom out (-)in the object list.

- To return to the original size, click Original sizein the object list.

You can also enlarge or reduce the whole program window — drag the bottom-right corner of the window to the desired size.
6.9. Saving labels
To save a label, choose Program > Save. To save it under a different name — Program > Save as. To save a label as a template for creating further labels, choose Program > Save template; such templates are opened with the Program > Open template command.
6.10. Printing labels
6.10.1. Printer settings
To change the printer settings, choose Program > Printer settings and specify the desired parameters.
6.10.2. Print preview
Choose Program > Print preview to see the label on screen before printing.
The label will appear in the paper format defined earlier in the printer settings (see section 6.10.1).
6.10.3. Printing labels
To print a label, choose Program > Print. The Windows system printer dialog appears, in which you select the target printer and click OK.
This function prints one label per sheet. To print several labels on a single page, choose Program > Multi-print.
6.10.4. Multi-print
HDF Labels 9 lets you print several labels on a single sheet — e.g. pre-cut self-adhesive labels on an A4 format. To launch it, choose Program > Multi-print.
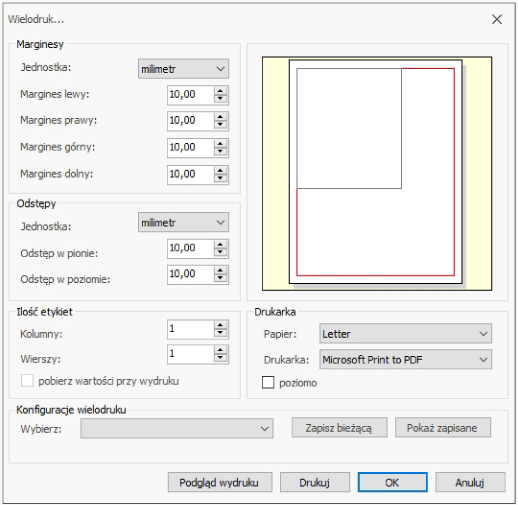
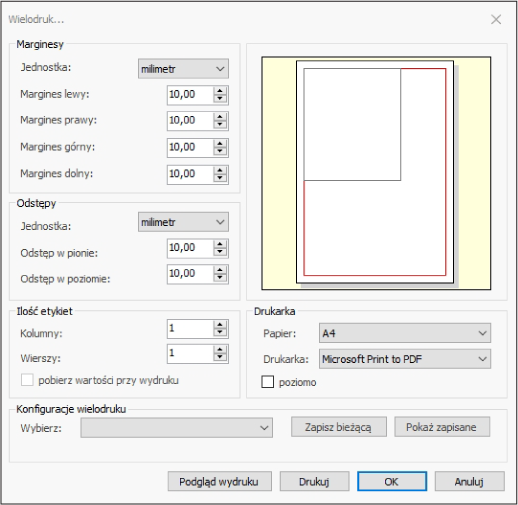
In the dialog box you set all multi-print parameters:
- Unit Millimeters, centimeters or inches.
- Left margin The distance between the first label and the left edge of the paper.
- Right margin The distance between the last label and the right edge of the paper.
- Top margin The distance between the first label and the top edge of the paper.
- Bottom margin The distance between the last label and the bottom edge of the paper.
- Vertical spacing The empty area between labels in the vertical direction.
- Horizontal spacing The empty area between labels in the horizontal direction.
- Columns The number of labels placed side by side.
- Rows The number of labels placed one below another.
- Paper The paper format of the printer used for printing.
- Printer The target printer.
- Landscape Paper orientation.
HDF Labels 9 remembers these settings when the label is saved, so multi-print can be used repeatedly without re-entering the parameters.
6.10.5. Serial printing
In serial printing, labels have the same layout but different variable data, read dynamically from a database, a text file, an Excel file, etc. Before choosing serial printing, parameterize the relevant objects to link them with the variable data (procedure in chapter 8 "Serial printing"). To start, choose Program > Serial printing.
7. Working with objects
7.1. Object types
HDF Labels 9 lets you insert the following object types: text, pictogram, line, image, rectangle, ellipse, barcode, xlsx template and rtf template.
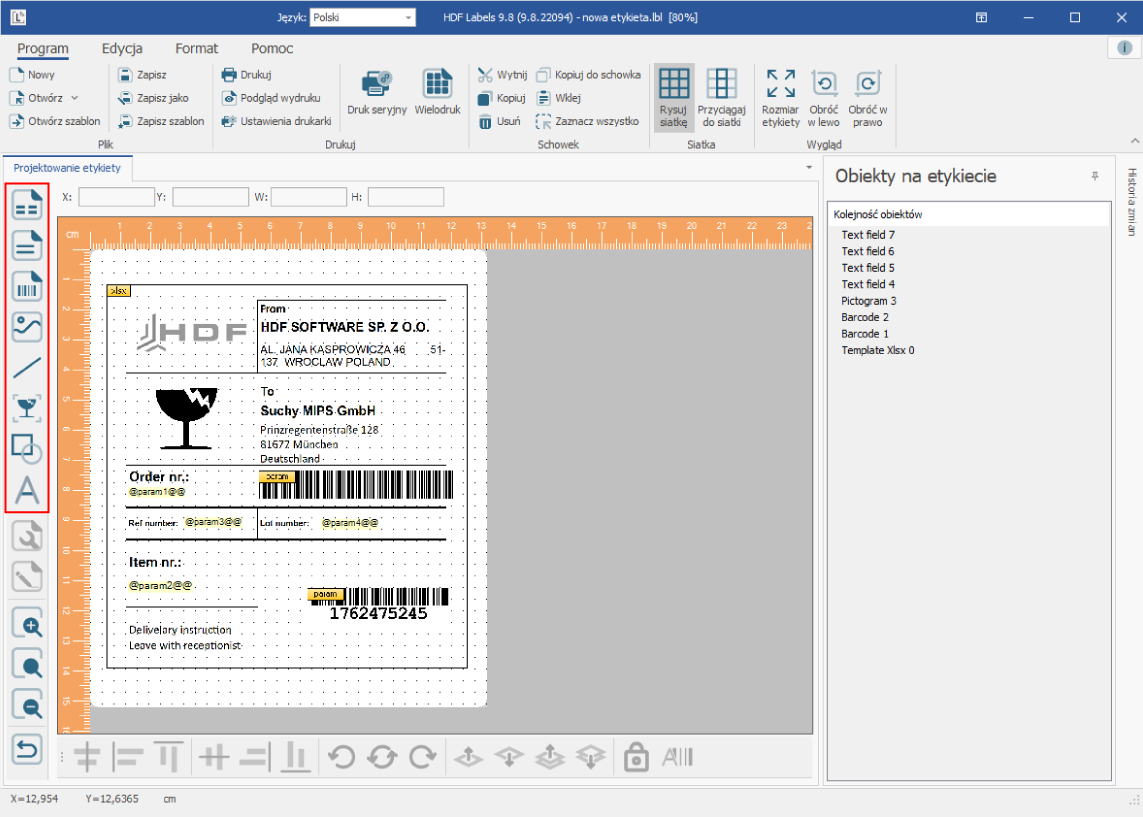
7.2. Placing objects
You insert each object type using the icons on the left side of the program window. Click the icon of the appropriate type, move the cursor onto the label area and click the left mouse button. For an image, first select the file, then click on the label. For a rectangle or ellipse, you can drag a frame with a second click and then release the mouse button.
7.3. Editing objects
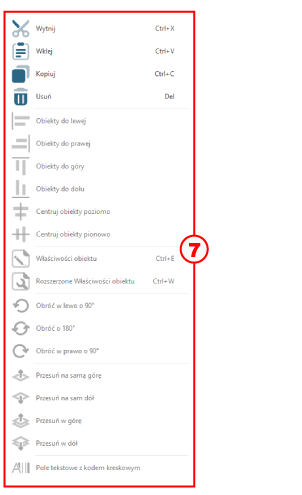
The following functions are available for all object types: Select, Cut, Paste, Copy, Delete, align objects left / right / top / bottom, Rotate left / right by 90 degrees, Center objects vertically / horizontally, Rotate by 180 degrees, Move to the very top / very bottom, and Move up / down.
7.3.1. Selecting objects
To select an object, click it with the left mouse button. To select several objects, hold Ctrl and click each one; you can also enclose objects in a selection by dragging with the left mouse button held down. To select everything, choose Program > Select all.
The Edit menu offers the Clear selection and Invert selection functions (selected objects become deselected, and deselected ones become selected).
7.3.2. Cutting and deleting objects
To cut objects, select them (as in chapter 7.3.1), right-click and choose Cut from the context menu or press Ctrl + X.
To delete objects, select them, right-click and choose Delete or press Delete.
The difference: cut objects remain in the clipboard and can be pasted later, whereas deleted objects are gone for good.
7.3.3. Copying objects
To copy objects, select them (as in chapter 7.3.1), right-click and choose Copy or press Ctrl + C. You add the copied objects to the label with the Paste command.
7.3.4. Pasting copied or cut objects
To add objects from the clipboard, right-click and choose Paste from the context menu or press Ctrl + V.
7.3.5. Rotating objects
Objects can be rotated left or right by 90 degrees. Select them (as in chapter 7.3.1), right-click and choose Rotate left by 90°, Rotate right by 90° or Rotate by 180°. Alternatively, use the icons on the bottom menu bar.
Text can be rotated and parameterized in the same way.
7.3.6. Moving objects
To move an object, select it — the cursor takes the shape of a hand. Press the left mouse button, drag the object to its target location and release the button.
Objects can also be positioned precisely by entering coordinates in the Extended object properties function (see the relevant chapter).
7.3.7. Resizing an object
To resize an object, select it — a frame with black handles appears around it. Hover over a handle until the cursor changes to a double arrow, press the left mouse button and drag to the desired size.
The size can also be fine-tuned with values in the Extended object properties function.Text fields can only be scaled when they are parameterized (intended for serial printing). Fields with fixed text automatically adjust their size to the text.Barcode size is set exclusively in the Barcode Wizard.
7.3.8. Aligning objects
HDF Labels 9 offers functions for centering and automatically aligning objects relative to each other, available from the context menu, the icons at the bottom of the window, or the Format menu.

- Select the objects and choose "Center objects horizontally" from the context menu or the corresponding icon on the bottom bar.

- Select the objects and choose "Center objects vertically" from the context menu or the corresponding icon on the bottom bar.

- All objects are moved so that their left margin aligns with the left margin of the object selected first.

- All objects are moved so that their right margin aligns with the right margin of the object selected first.

- All objects are moved so that their bottom margin aligns with the bottom margin of the object selected first.

- All objects are moved so that their top margin aligns with the top margin of the object selected first.
7.3.9. Setting the object order
HDF Labels 9 automatically assigns a name and a level to each new object. The level determines the stacking order of objects — an object on a higher level covers those beneath it. By default, an object added later has a higher level.
To change the order, select the object, right-click and choose one of the options:
- Move to the very bottom The object goes beneath all other objects.
- Move up The object is moved up by one level.
- Move down The object is moved down by one level.
- Move to the very top The object goes above all other objects.
7.3.10. Anchoring an object
To prevent an object from being moved accidentally, you can anchor it. Select the object and choose Anchor from the Format menu. The anchored object will be highlighted in red in the object list, with a lock symbol next to it.
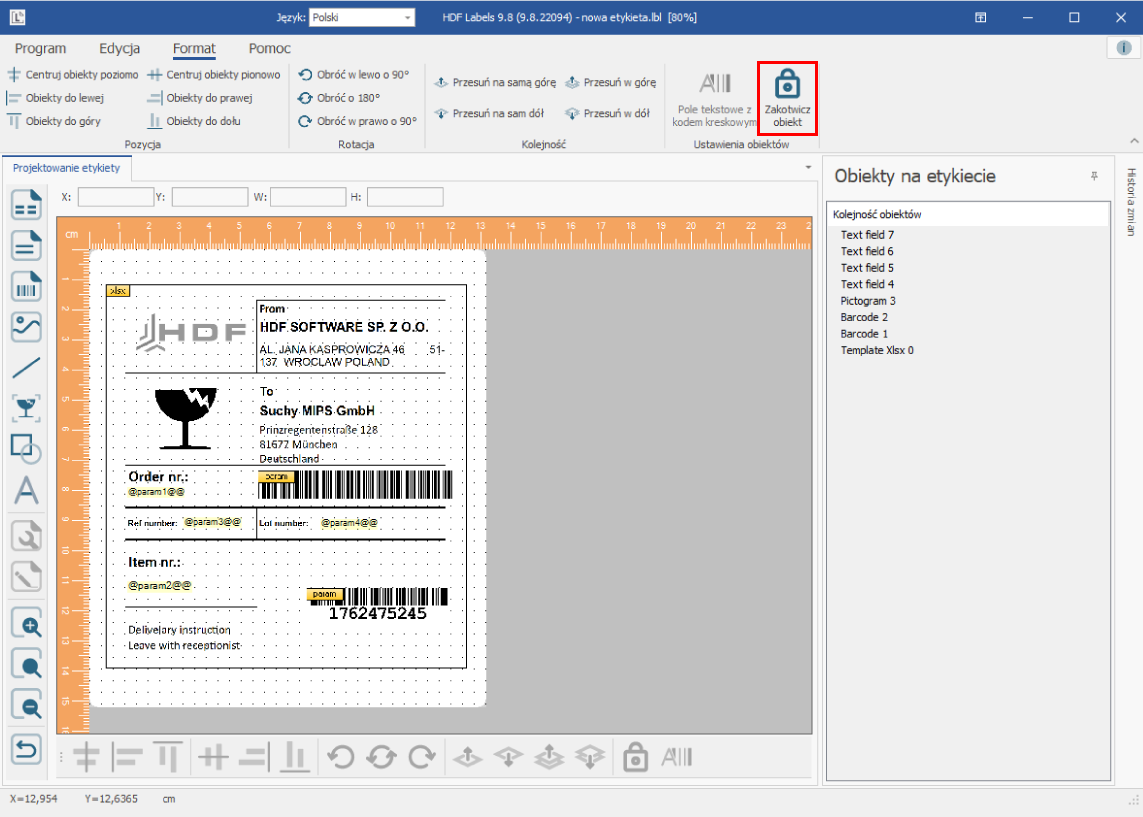
To unlock the object, select it and click Anchor again in the Format menu.
7.4. Object properties
All objects added to a label can be edited, that is, their properties can be set.
When the program starts, each object is given standard properties, which can then be changed. After changing the properties, every subsequent object of the same type inherits the most recently set values — which can be changed again.
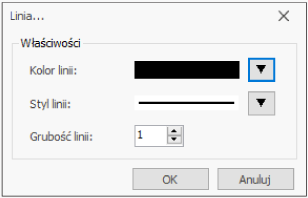
7.4.1. Inserting and editing lines
To insert a line, click the Line symbol in the left icon list. Place the cursor (cross-shaped) at the start of the line, hold the left mouse button and drag to the end point, then release the button.
When the Snap to grid function is enabled, the start and end of the line will be moved to the nearest grid points. The line's appearance follows the current properties (default: black, solid, thickness 1).
To change the line's appearance, a) double-click it, b) select it, right-click and choose Object properties, or c) select it and choose Edit > Object properties. In the Line editing window you set the color, thickness and line type, then click OK.
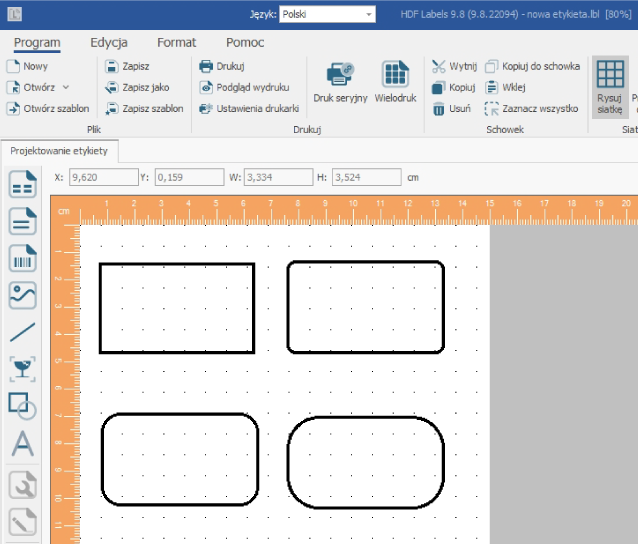
7.4.2. Inserting and editing rectangles / ellipses
To insert a rectangle or ellipse, click the Rectangle / Ellipse symbol in the icon list. Place the cursor (cross) at one corner, hold the left mouse button and drag to the opposite corner, then release the button.
Rectangles and ellipses are created by the same function; the object can later be switched in the editing window.A circle is a special form of an ellipse — you obtain it by giving the ellipse the appropriate shape.
When the Snap to grid function is enabled, the corners will be moved to grid points. To change the object's appearance, double-click it or select it and choose Format > Object properties. The editing window shows the same parameters as for a line (color, thickness, style — see chapter 7.4.1) plus additional options:
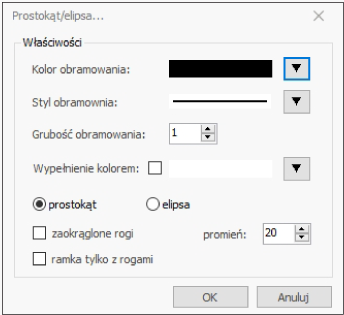
- Fill Select this if you want to fill the object with a color. You set the color by selecting the object, right-clicking and choosing "Fill object". Without a fill, objects remain transparent and objects beneath them are visible through them.
- Ellipse Select this to create an ellipse or circle.
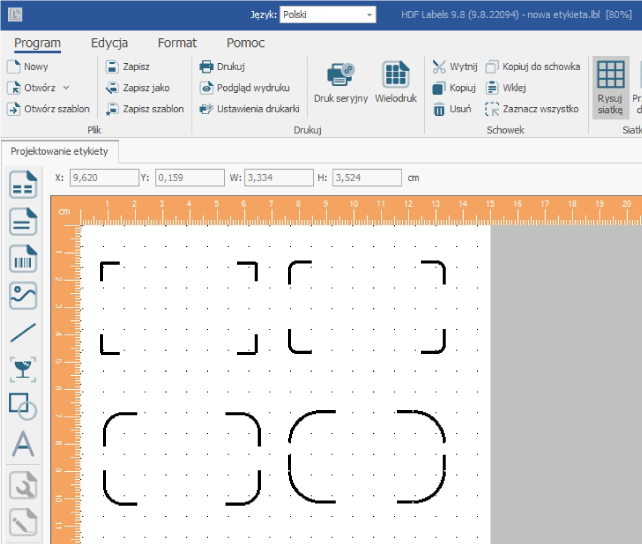
- Rectangle Select this to create a rectangle. A rectangle offers additional options: Rounded corners and Corner-only frame.
- Rounded corners Rounds the corners of the rectangle. In the window you set the Radius that defines the curvature of the corners.
- Corner-only frame Draws only the corners of the frame. The Radius field sets the curvature of the corners.
7.4.3. Inserting and editing text fields
To insert a text field, click the Text field symbol in the icon list. Place the cursor (cross) at the position of the field's top-left corner and release the button. The field will initially be filled with the words "Text field".
When the Snap to grid function is enabled, the top-left corner will be moved to the nearest grid point. The field's appearance follows the current properties (default: Microsoft Sans Serif font, size 9, black color).
To change the field's appearance, double-click it or select it and choose Edit > Object properties. In the editing window you set the font type and style, size and color, then click OK.
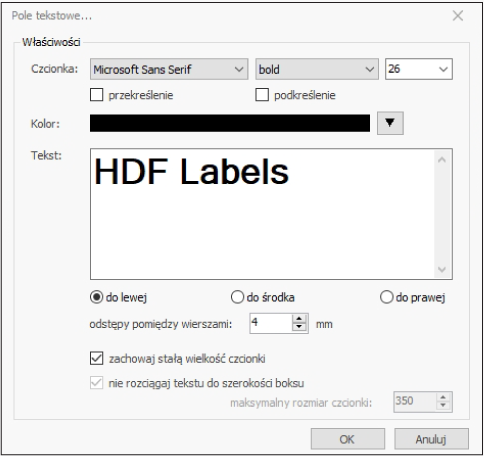
- Font type Choose the typeface, style (regular, bold, italic) and font size. You can also enable Strikethrough or Underline for the text.
- Color Click the arrow next to the field to choose the text color.
- Text Enter the field's content — it can have several lines. The field automatically adjusts its size to the text; the three buttons below let you align the text left, right or center. If the text is to come dynamically from a data file during printing, parameterize the field by giving it a parameter name. Two fields with the same parameter name will receive the same text in serial printing (this topic is expanded in the chapter "Serial printing").
- Fixed font size Applies only to parameterized fields. When selected, the font keeps a fixed size regardless of the length of the text; when not selected, the text adjusts to the size of the field.
- Do not stretch text to box width Applies only to parameterized fields. When selected, the text is scaled proportionally; when not selected, it is fitted (stretched) to the field regardless of proportions.
- Max. font size Sets the upper limit of the font size during automatic adjustment.
Variables can be inserted directly into the text — they must start with "@" and end with "@@". You set the handling of empty variables (removing empty spaces or lines) in Help > Program settings, the Other tab.
7.4.4. Inserting images
To insert an image, click the Image symbol on the bar on the left. In the Windows window, select the file and click Open (or double-click it). The cursor takes the shape of a cross — place it at the position of the image's top-left corner and press the left mouse button.
Supported image formats: PNG, BMP, JPG and GIF.
7.4.5. Inserting pictograms
Pictograms are symbols commonly used in the packaging and transport industries to mark products. Available ready-made pictograms:

To insert a pictogram, click the Pictogram symbol on the toolbar. The cursor takes the shape of a cross — place it at the position of the pictogram's top-left corner and press the left mouse button. To choose another pictogram, select it in the list and click Select or double-click it.
7.4.6. Inserting barcodes
HDF Labels 9 has an efficient barcode module supporting many symbologies. Numerous 1D codes are available (e.g. Code 39, Code 128) as well as 2D codes (PDF417, Datamatrix, Maxicode, QR Code, Aztec and others).
To add a barcode, click the Barcode symbol on the bar on the left, move the cross to the position of the code's top-left corner and press the left mouse button. A standard or most recently used code will be added. To display a different one, double-click the added code — the Barcode Wizard (described in the chapter "Barcode Wizard") will launch.
If the code is to encode a fixed value (e.g. a product's EAN number), enter it in the appropriate Wizard field. If the code is to encode a variable value during serial printing, enter sample text of a similar length — you will see a preview of the code's target size. The variable parameter is set with the Extended object properties function from the context menu.
For quality reasons, barcodes must not be stretched with the mouse. Their width and height are set exclusively in the Barcode Wizard.
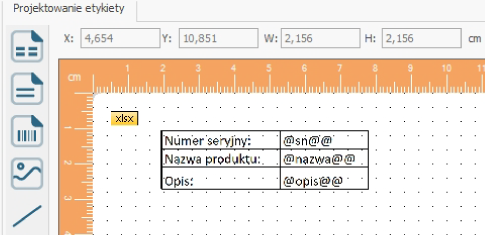
7.4.7. Inserting an xlsx template
To create an XLSX template on a label, choose "Xlsx template" from the side toolbar. After double-clicking the work area, a spreadsheet editing window opens, in which you create labels with defined parameters.

After entering the data, click "Save" — a preview of the label template appears in the work window.
7.4.8. Inserting an rtf template
To create an RTF template on a label, choose "Rtf template" from the side toolbar. After double-clicking the work area, a text document editing window opens.
The RTF template options allow advanced text editing: bold, italic, underline, justification, bullet points, superscripts and subscripts.
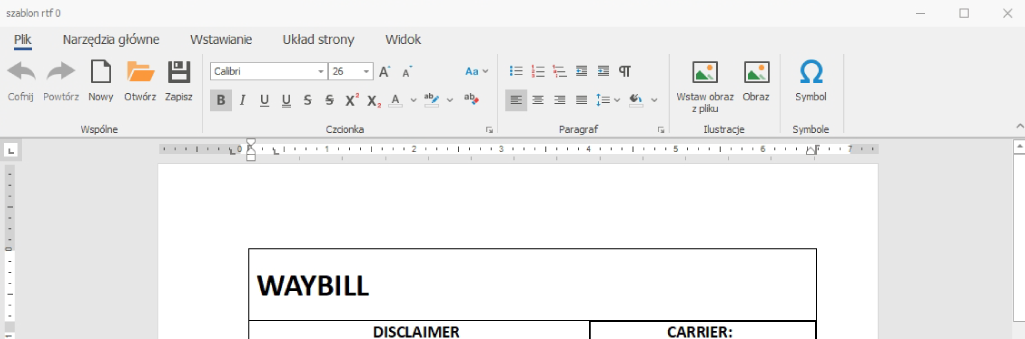
After entering the data and formatting the text, click "Save" — a preview of the label template appears in the work window.
7.5. Extended object properties
The extended object properties are used primarily to precisely set the size and position of objects. For text fields, images and barcodes, you can also specify whether the object is filled with variable data during serial printing.
7.5.1. Extended line properties
To define the extended properties of a line, select it, right-click and choose Extended object properties.
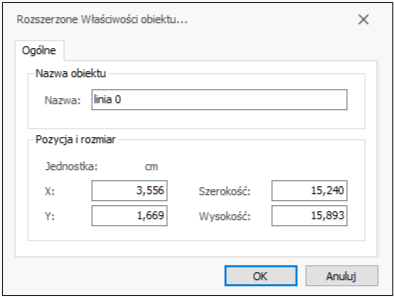
- Name The object name, generated automatically and shown in the object list; aids identification.
- X The horizontal position of the line's start (from the left).
- Y The vertical position of the line's start (from the top).
- Width The length of the line.
- Height The vertical distance between the start and end of the line. A value of "0" means a horizontal line; any other value — a sloped line.
7.5.2. Extended rectangle and ellipse properties
To define the extended properties of a rectangle or ellipse, select the object, right-click and choose Extended object properties.
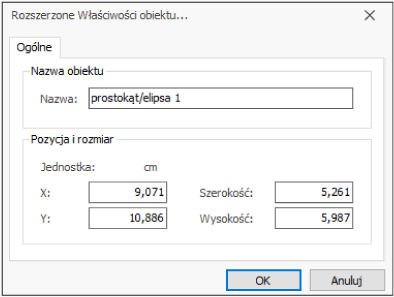
- Name The object name, generated automatically and shown in the object list.
- X The horizontal position of the rectangle's top-left corner (for an ellipse — the corner of the virtual rectangle surrounding it).
- Y The vertical position of the rectangle's top-left corner (for an ellipse — as above).
- Width The width of the rectangle or ellipse.
- Height The height of the rectangle or ellipse.
7.5.3. Extended text field properties
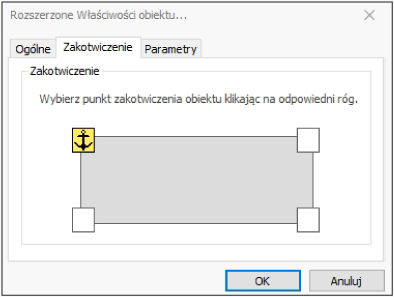
To define the extended properties of a text field, select the object, right-click and choose Extended object properties. A window with three tabs appears.
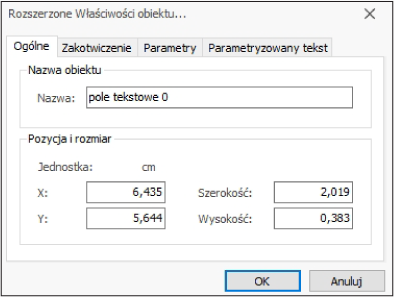
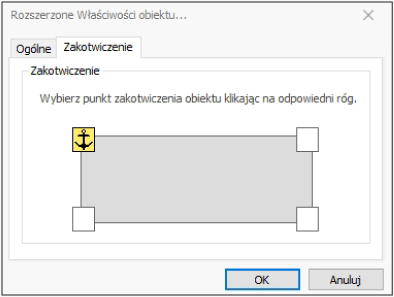
Anchoring: the anchor point stays fixed when the text field expands during serial printing due to the length of the text. Click the appropriate corner to set the anchor point.
- Name The object name, generated automatically and shown in the object list. It can be changed, but the object's internal number remains permanently assigned. You can check a text field's number by pressing Alt+F9 in label editing (pressing Alt+F9 again returns to field names).
- X The horizontal position of the text field's top-left corner.
- Y The vertical position of the text field's top-left corner.
- Width The width of the text field.
- Height The height of the text field.
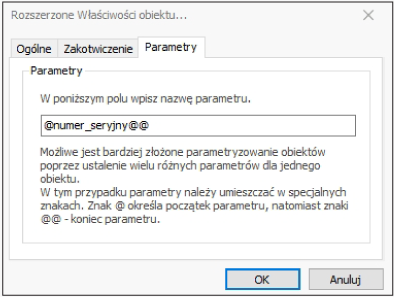
- Parameters Entering a parameter name means the field will be filled with variable data during serial printing. The parameter must start with "@" and end with "@@" (with a single parameter, these characters are added automatically after clicking OK).
Assigning a parameter only records that this is a variable field. The link to a specific field of the serial print file or database is defined later (see the chapter "Serial printing").Several parameters can be entered in a single text field — each separately enclosed in @…@@ characters, e.g. @postcode@@, @city@@.

- Parameterized text Entering a parameter name means the field will be filled with variable data during serial printing. The parameter must start with "@" and end with "@@" (with a single parameter, these characters are added automatically after clicking OK).
7.5.4. Extended pictogram and image properties
To define the extended properties of a pictogram or image, select the object, right-click and choose Extended object properties. A window with two tabs appears.
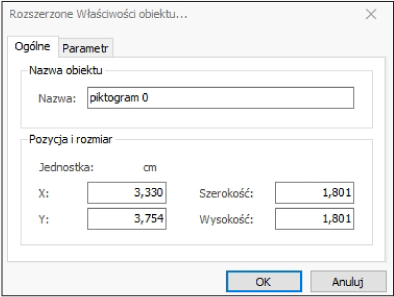
- Name The object name, generated automatically and shown in the object list.
- X The horizontal position of the image or pictogram's top-left corner.
- Y The vertical position of the image or pictogram's top-left corner.
- Width The width of the image or pictogram.
- Height The height of the image or pictogram.
Entering the height and width may shrink, enlarge or distort the image.
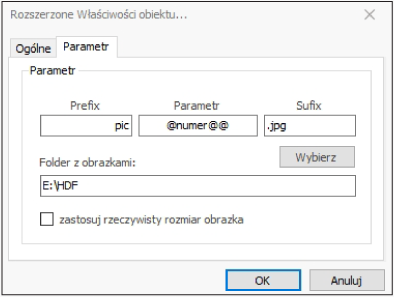
In the image parameterization tab, the file name is generated dynamically during serial printing, and the matching image is automatically attached to the label:
- Prefix If the name of each image file starts with the same prefix (e.g. PIC), enter it here.
- Parameter The parameter name, later linked with the file name for serial printing, a database or a counter. It must be enclosed in @…@@ characters, e.g. @number@@.
- Suffix If all images have the same suffix, enter it here. The suffix must include the file extension.
- Image folder The full path to the folder with the images. All images used for printing must be in the same folder.
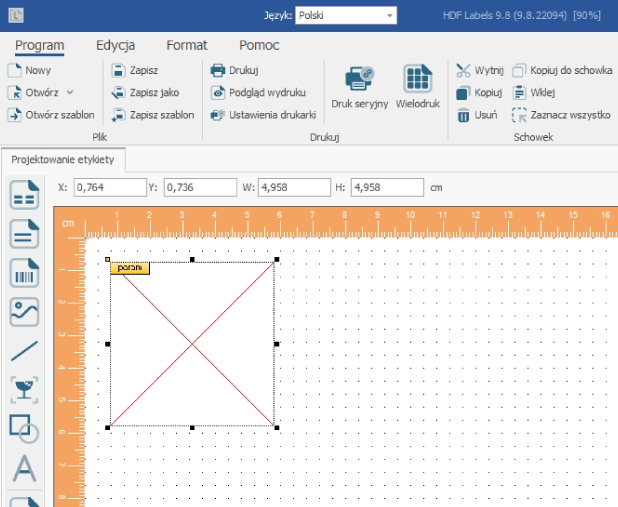
The prefix and suffix are useful when file names are created according to a scheme, e.g. PIC012345.JPG — you then enter the prefix PIC and link the parameter to a counter.After parameterization, the program does not display the image but a crossed-out square with the note "param".
7.5.5. Extended barcode properties
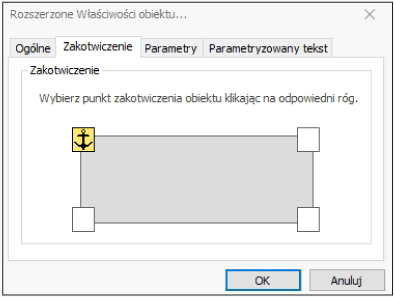
To define the extended properties of a barcode, select the object, right-click and choose Extended object properties. A window with three tabs appears.
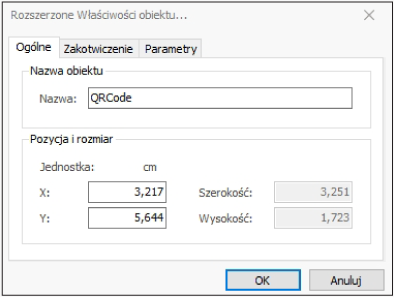
- Name The object name, generated automatically and shown in the object list.
- X The horizontal position of the barcode's top-left corner.
- Y The vertical position of the barcode's top-left corner.
- Width Unavailable — for quality reasons, the width of the bars and spaces is set only in the Barcode Wizard; the total width also depends on the amount of encoded data.
- Height Unavailable — the height is set only in the Barcode Wizard.
- Anchoring The anchor point stays fixed when the code expands due to the amount of data during serial printing. Click the appropriate corner to set it.
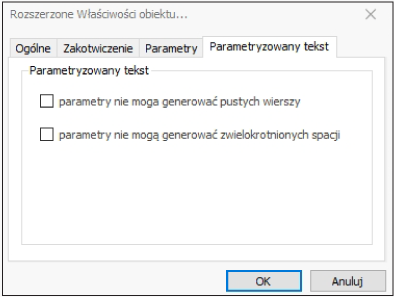
- Parameter Entering a parameter name means the code will encode variable data during serial printing. The parameter must start with "@" and end with "@@" (with a single parameter, these characters are added automatically after clicking OK).
Several parameters can be entered for a single code, each separately enclosed in @…@@ characters, e.g. @product number@@@serial number@@.The note "param" indicates that the object has been parameterized.
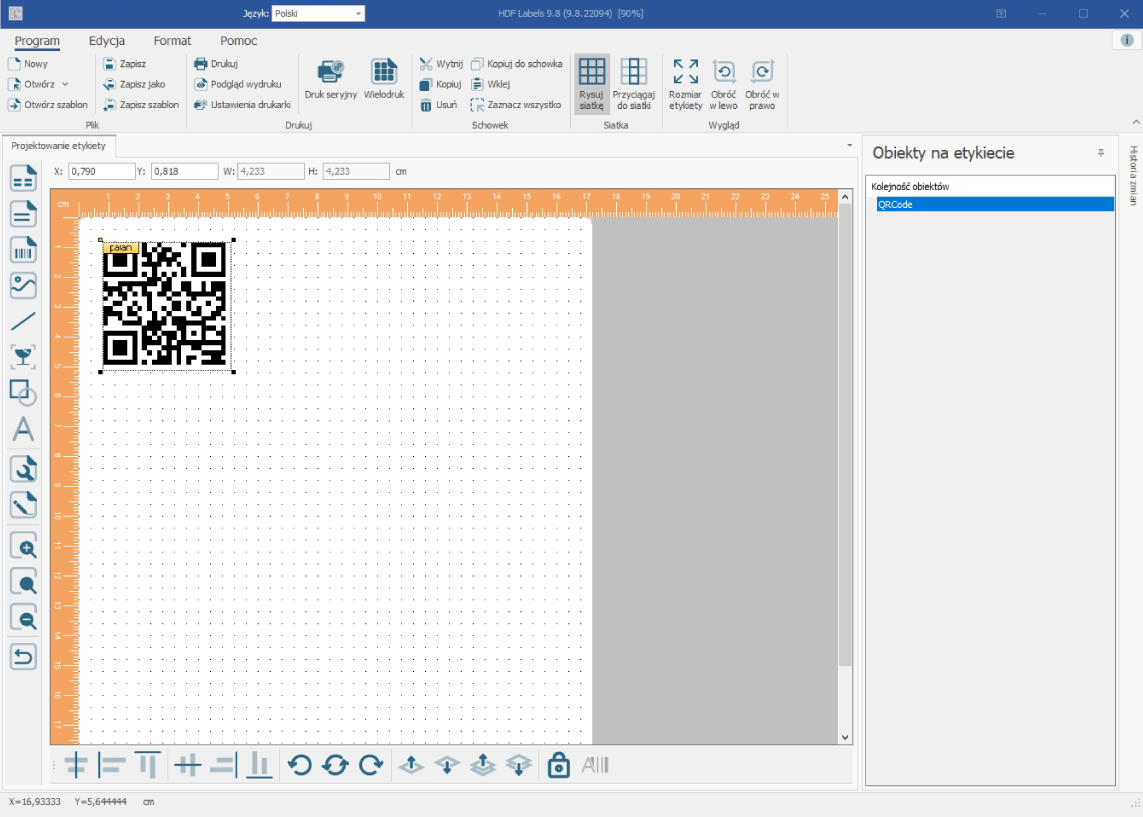
7.5.6. Extended xlsx and rtf template properties
To define the extended properties of an xlsx or rtf template, select the object, right-click and choose Extended object properties. A window with two tabs appears.
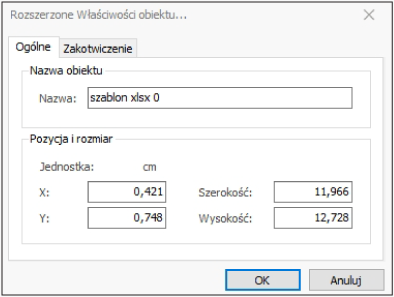
- Name The object name, generated automatically and shown in the object list.
- X The horizontal position of the template's top-left corner.
- Y The vertical position of the template's top-left corner.
- Width The width of the template.
- Anchoring The anchor point stays fixed when the template expands during serial printing due to the length of the text. Click the appropriate corner to set it.
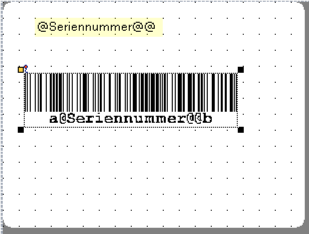
7.6. Linking a parameterized text field with a barcode
A text field can be automatically linked with a barcode, without additional parameterization of the code.
- Insert a text field and assign it a parameter (e.g.
@serialnumber@@). - Insert a barcode and define its properties.
- Select both the text field and the barcode at the same time (with Ctrl held down), right-click and choose Text field with barcode from the context menu.
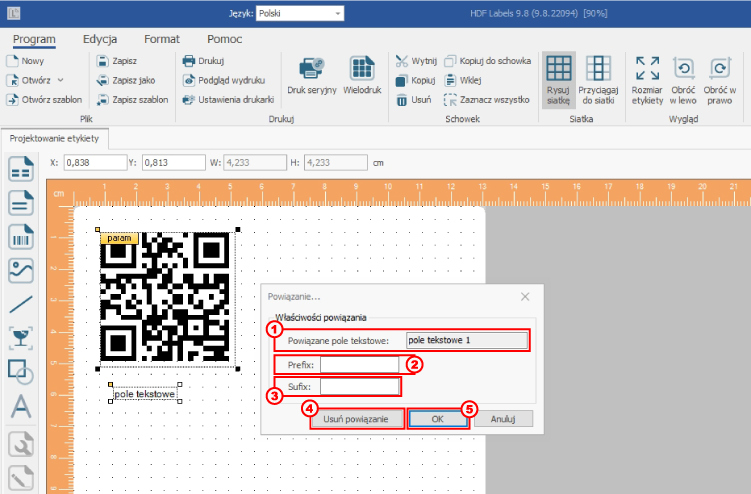
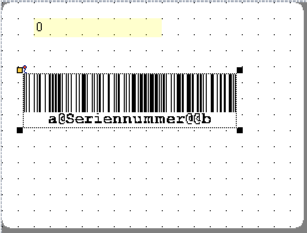
- In the Link window, you will find the name of the linked text field in the Linked text field (1) field.
- You can extend the encoded text from the field with a prefix (2) and suffix (3) — these will be encoded in the code during printing. Make sure the prefix and suffix belong to the character set of the chosen symbology (e.g. Code 2/5 Interleaved encodes only digits — letter characters would be ignored).
- Click OK (4) to finish.
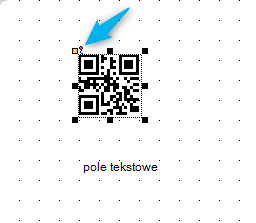
- The barcode will be marked with an additional symbol in the top-left corner, confirming the link with the text field.
- To remove the link, select the barcode alone (without the text field), right-click, choose Text field with barcode again, then click Remove link (5).
8. Serial printing
Serial printing of labels means printing a whole series of labels with the same layout but filled with variable data. This data can come, for example, from a text file or a database and is dynamically inserted into the label during printing. Text fields, images and barcodes can be filled with variable data.
Before serial printing, parameterize at least one such object (as in the chapter "Extended object properties"). "Parameterized" means that instead of a fixed value, the object has a parameter that is linked before printing with a field for serial printing.
A serial print file contains structured data: it can be a text file with fields separated by a delimiter, an Excel file or a database connected via ODBC. HDF Labels 9 also supports serial printing through automatic numbering and by entering values directly during printing.
In the example below, we use a label with three parameterized 1D codes (parameters "Model", "Serial number", "Product number") and one 2D QR code, encoding the same parameters in a single code.
To start serial printing, choose Program > Serial printing. A dialog box appears:
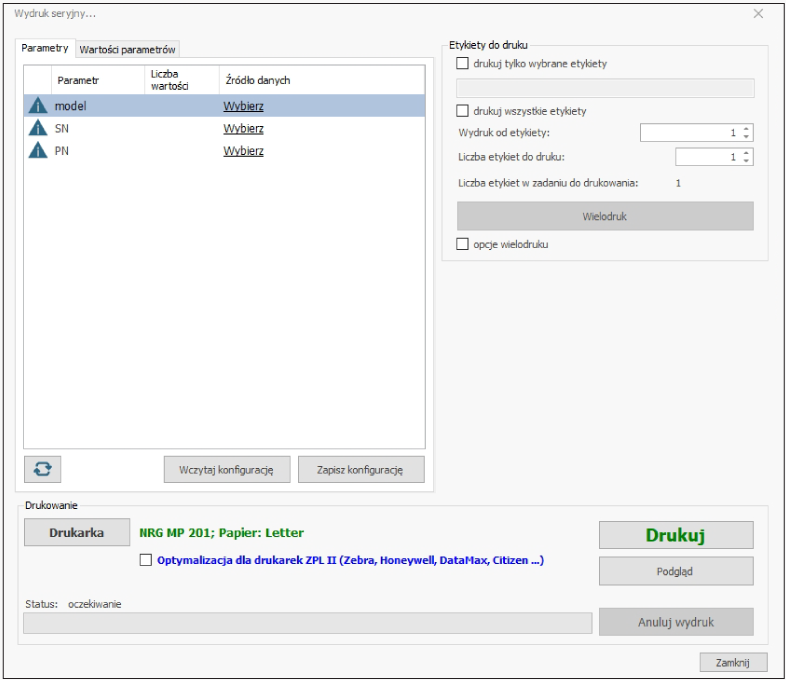
- First, specify how each parameter is to be filled with variable data: by numbering, date, database, text file or Excel table (details in the chapter "Specifying the data source for parameters").
- After assigning the data, the relevant information will appear in the parameter list (1).
- The configuration can be saved with the Save configuration (2) button and loaded later with the Load configuration (3) button for another label using the same parameter names.
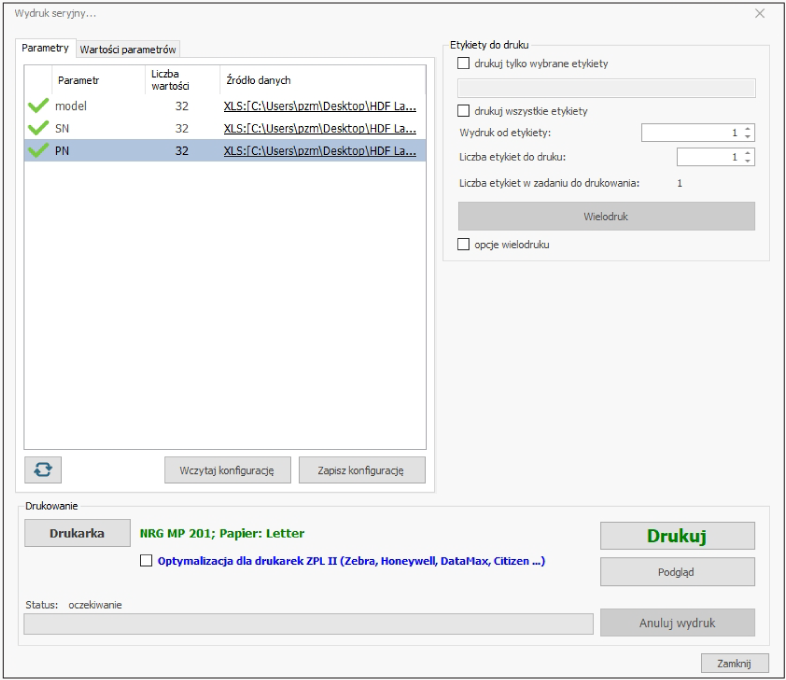
After loading a configuration, all databases and file links are restored automatically — provided the data sources remain in their original locations and the label uses parameter names identical to the configuration file.
- Click Printer (4) to select the target printer and its settings.
- Specify which labels to print:
- only selected labels (1): from a range (e.g. 2-5), specific ones (e.g. 2, 6, 9), a fixed number (e.g. 1×10) or a multiple of a range (e.g. 2-5×10),
- all labels (2),
- a specific number of labels, counting from the one given (3),
- multi-printing (4) — several labels per page (e.g. on cut A4 sheets); after selecting it, the multi-print settings window appears.
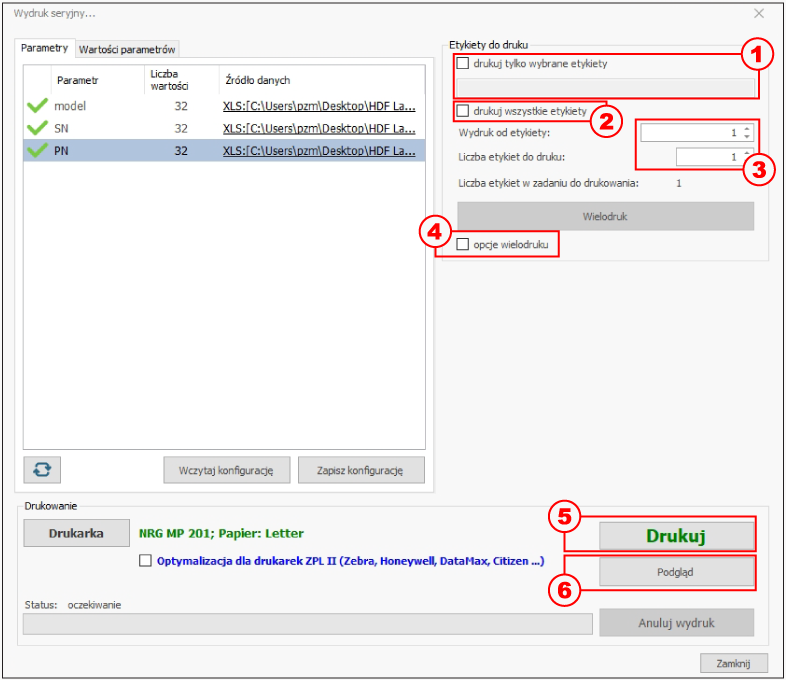
- To see a preview of the first page, click Preview (5).
- To start serial printing, click Print (6).
Parameter values
In the Parameter values tab, you can manually select labels for printing using advanced filters and a search; each data column can be sorted.
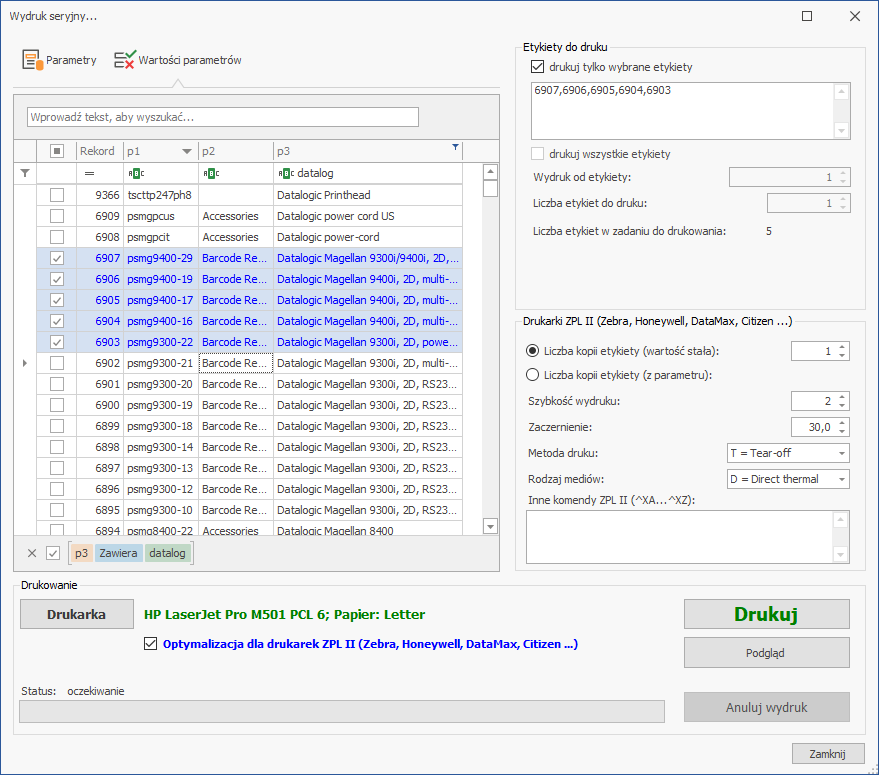
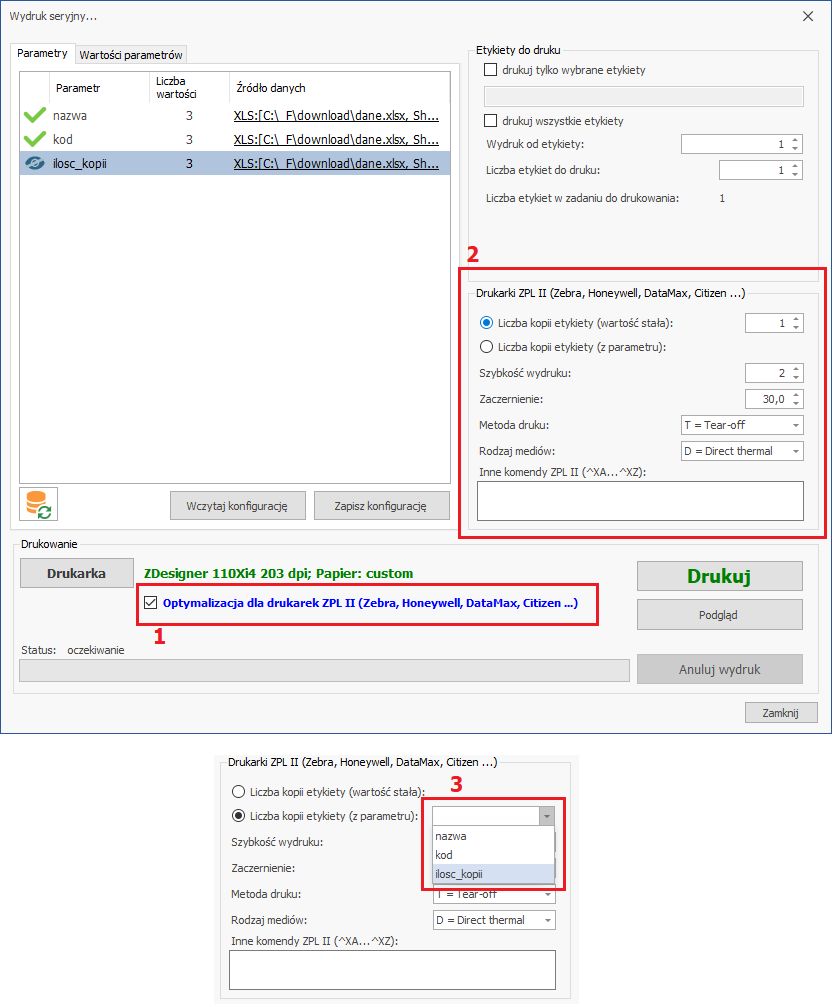
Optimizing serial printing for ZPL II printers
The program supports printers using the ZPL II language (Zebra, Honeywell, DataMax, Citizen and others). To optimize serial printing on such a printer, select the Optimization for ZPL II printers (1) checkbox and expand the settings menu (2). The function works only with ZPL II-compatible printers — first make sure the printer has ZPL II emulation enabled, otherwise a print error may occur.
The menu offers the options:
- Number of label copies (fixed value) Specifies how many copies of each created label will be printed.
- Number of copies (from a parameter) Each label can be assigned an individual number of copies, taken from a parameter (e.g. from the "Number of copies" column in an Excel sheet). The parameter must exist on the label but does not have to be visible on the printout (choose Data source > Data type > Do not print value on label).
- Print speed The print speed in ZPL II units (usually inches/second).
- Darkness The darkness level of the label — the higher it is, the clearer the printout.
- Print method For ZPL II printers: T (tear-off), P (peel-off), R (ribbon rewind), A (applicator), C (cutter), D (delayed cutter), F (RFID module).
- Media type D (direct thermal) or T (thermal transfer).
8.1. Specifying the data source for parameters
HDF Labels 9 automatically recognizes the parameters assigned during label design and shows them in the parameter list. Before serial printing, specify what data each parameter is to be filled with.
For each parameter, define the data source — this can be serial numbers, the current date, a value from a database, from a text file, from an Excel sheet, manually entered data or special characters. Click Select next to the parameter name to specify the source.
Repeat the procedure separately for each parameter — this way different fields can come from different sources.
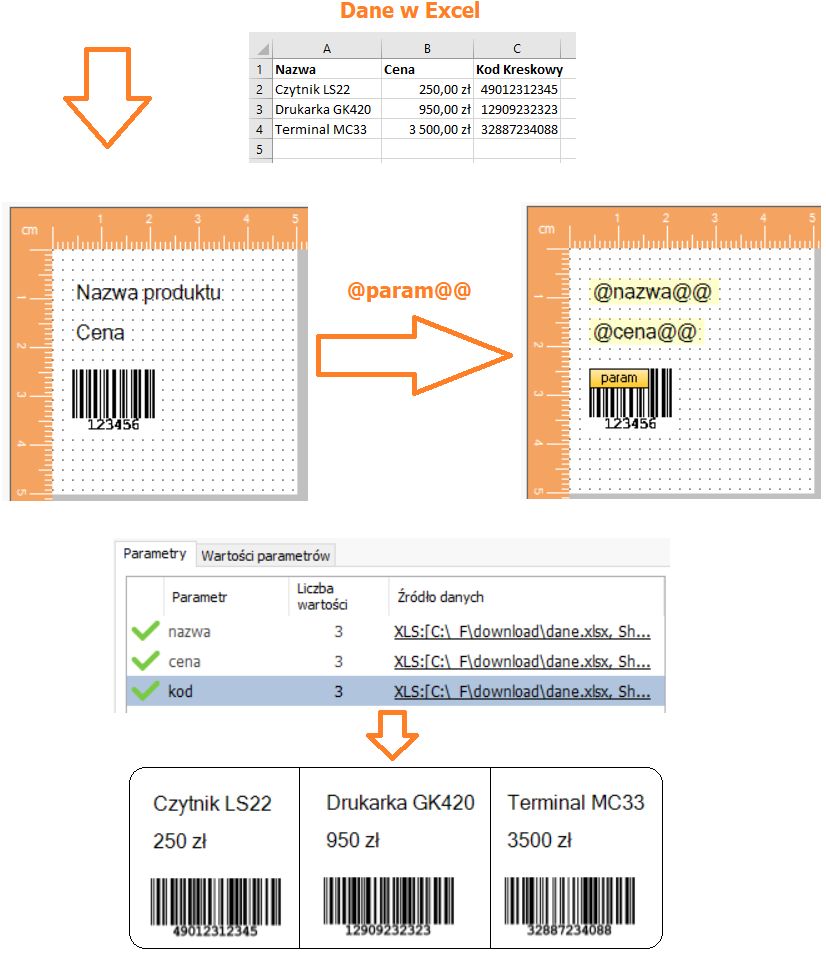
Procedure for creating serial prints in HDF Labels:
- In Excel, create a sheet with the data to be placed on the labels. For example, for labels with a product name, price and barcode, create three columns with the headers Name, Price and Barcode, fill them in and save the sheet.
- In HDF Labels, create the corresponding objects: a Product name text field, a Price text field and a Barcode. Parameterize them (right-click > Extended object properties > Parameters > Parameter name), e.g. the Price field as
@price@@. - Link the parameterized fields with the appropriate sheet columns. Choose Serial printing > Parameters > Data source, expand Data type and choose Data from an Excel sheet. Upload the file, check "first row contains column names", select the sheet and the column appropriate for the given parameter, then click OK. Repeat for all three parameters.
- As a result, you get three different labels, each with values matching the sheet. Preview them in the Preview — these are dynamic labels: the parameter values change while the template stays fixed.
The Refresh button (in the bottom-left corner of the Serial printing > Parameters window) automatically fetches changes made in the Excel sheet that is the data source.
8.1.1. Numbering
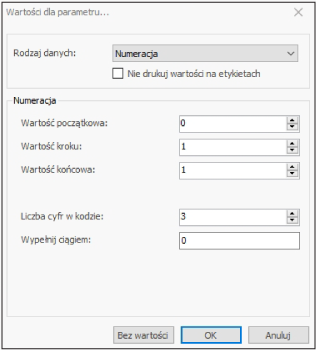
To assign a serial number to a parameter, choose Numbering in the Data type field and enter the start value, step value and end value.
In the Number of digits in the code field you set the length of the value field, and in the Fill with string field — the fill character. For example: value 17, field length 8, fill character 0 gives the result 00000017.
To keep the values from being visible on the printout, select Do not print values on labels — the parameter will be kept in the project but will not appear on the printout.
8.1.2. Data from a database
After choosing Data type > Data from a database, a dialog box appears.
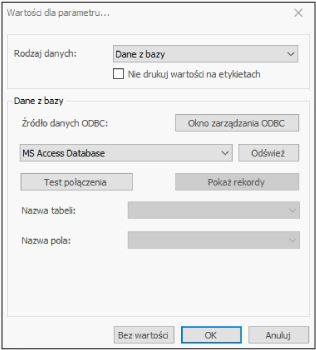
If you do not yet have a data source defined in Windows, click ODBC management window.
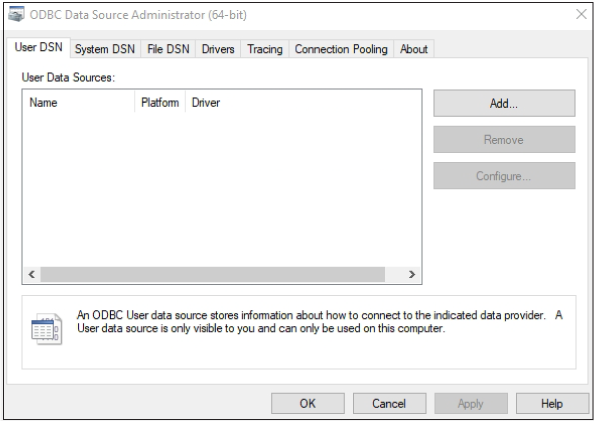
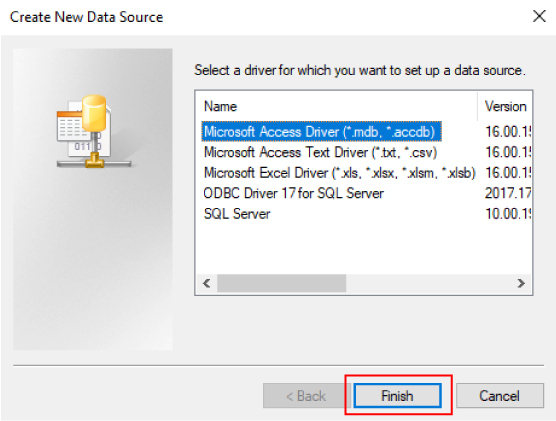
Choose the User DSN tab (a source available only to you) or System DSN (available to all users). Click Add and select a database driver, e.g. Microsoft Access (*.mdb).
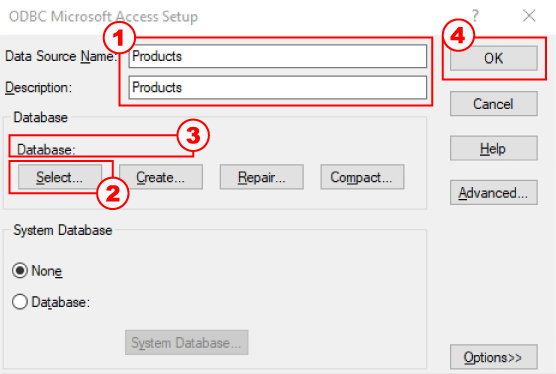
Enter the data source name, e.g. Products (1), click Select (2) and point to an existing database file. The path and file name will appear in the window (3). Click OK (4).
The database has been added as a System DSN. Click OK to finish.
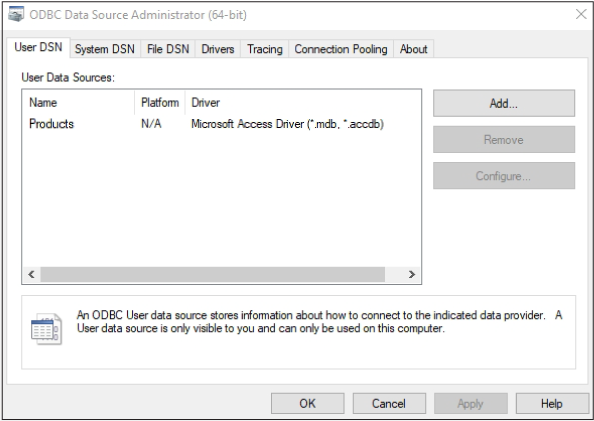
The created System DSN will appear in the HDF Labels 9 drop-down field (1). Click Test connection (2) to check it. Then select the Table name (3) and Field name (4) you want to link with the label parameter, and click OK (5).
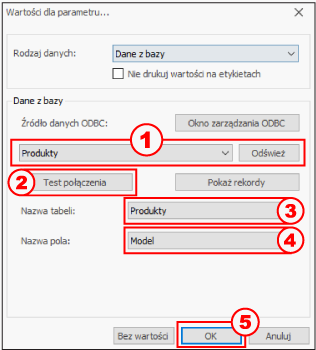
You undo the parameter-to-database link with the No value button. With the Show records button you display the database contents (with a large database this may take a moment).
Repeat the procedure for all parameters linked with database fields.
To keep the values from being visible on the printout, select Do not print values on labels.
8.1.3. Date
To fill a parameter with the current date, choose Date (1) in the Data type field and set the Date format (2). You can also define a Prefix (3) and Suffix (4) — the parameter value will then be a combination of Prefix + Date + Suffix. Finally, click OK (5).
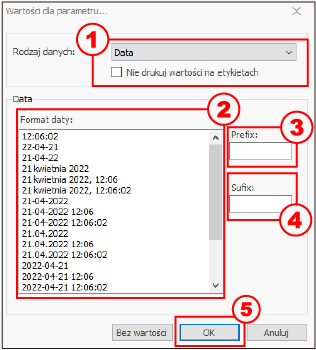
You undo the parameter-to-date link with the No value button.To keep the values from being visible on the printout, select Do not print values on labels.
8.1.4. Data from a text file
Choose this option (1) if you saved the variable data in a text file. Fields in the file may be separated by only one of the delimiters: semicolon, comma, tab or space.
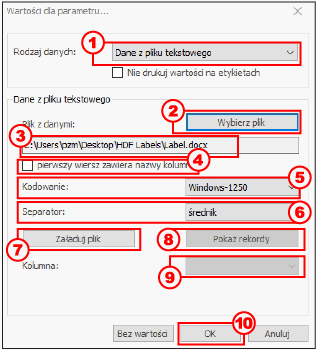
To link a parameter with a text file field:
- click Select file (2) — the path and name will appear in the Data file (3) field,
- choose the file encoding (4): Unicode, ASCII, ISO8859-2, Windows 1250 or UTF8,
- specify whether the first row contains column names (5),
- choose the field separator character (6),
- load the file (7),
- preview the data with the Show records (8) button,
- choose the column to link with the parameter (9) and click OK (10).
You undo the link with the No value button. To keep the values from being visible on the printout, select Do not print values on labels.
8.1.5. Data from an Excel table
Choose this option (1) if you saved the variable data in a Microsoft Excel table.

- Choose the Excel file (2) — the path will appear in the Data file (3) field.
- Specify whether the first row contains column names (4).
- Select the appropriate data sheet (5).
- Preview the data with the Show records (7) button.
- Choose the column to link with the parameter (6) and click OK (8).
You undo the link with the No value button. To keep the values from being visible on the printout, select Do not print values on labels.
8.1.6. Manually entered data
To enter the parameter value yourself before each printout, choose Manually entered data in the Data type field. The program will ask for the parameter values after you click Print.
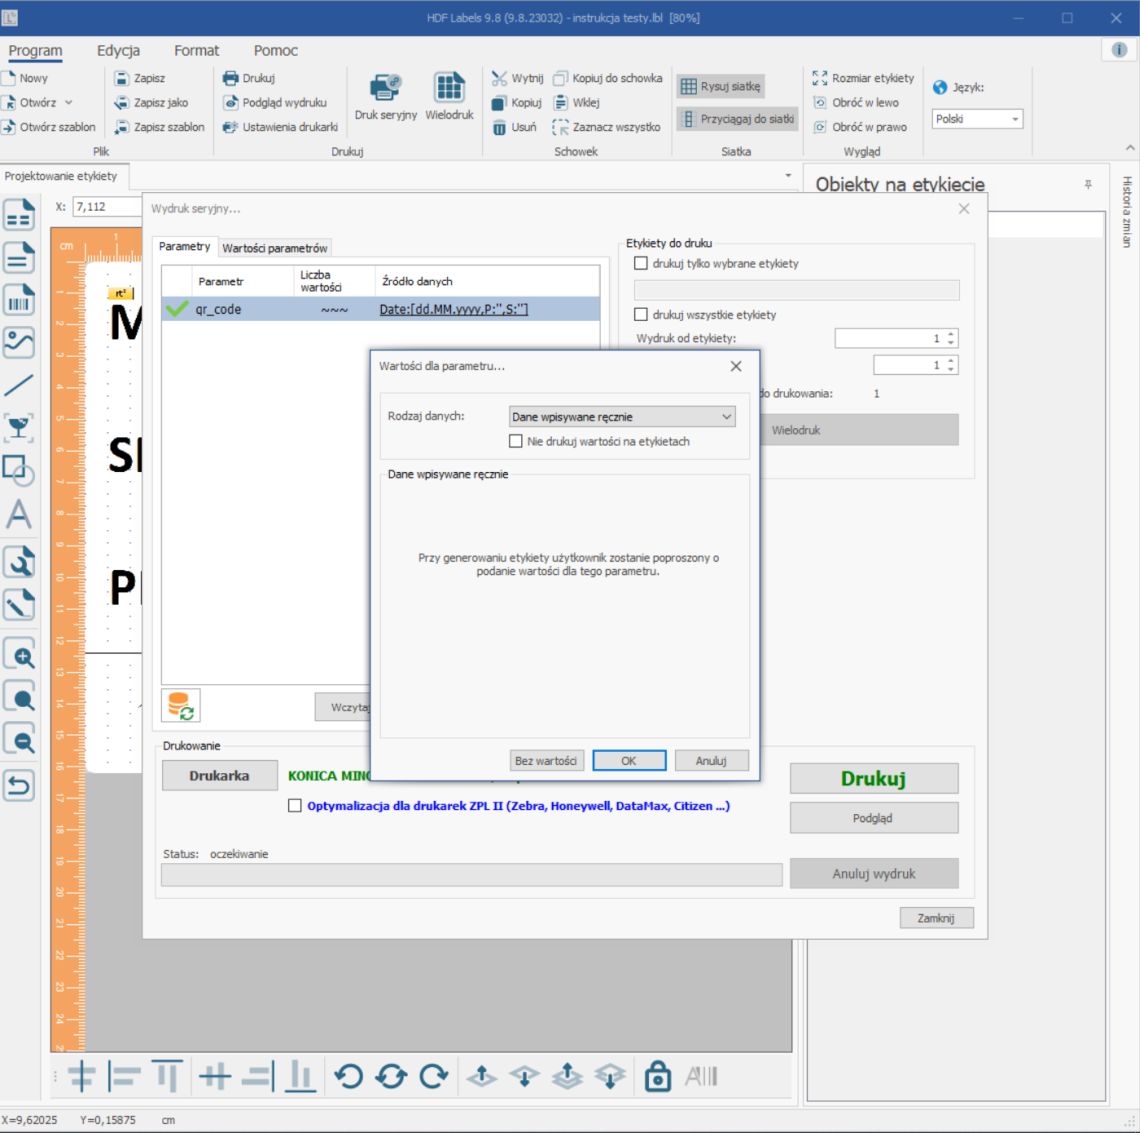
A window with all the parameters to fill in will open. After entering the values, click OK to start printing, or Skip to cancel the manual assignment.
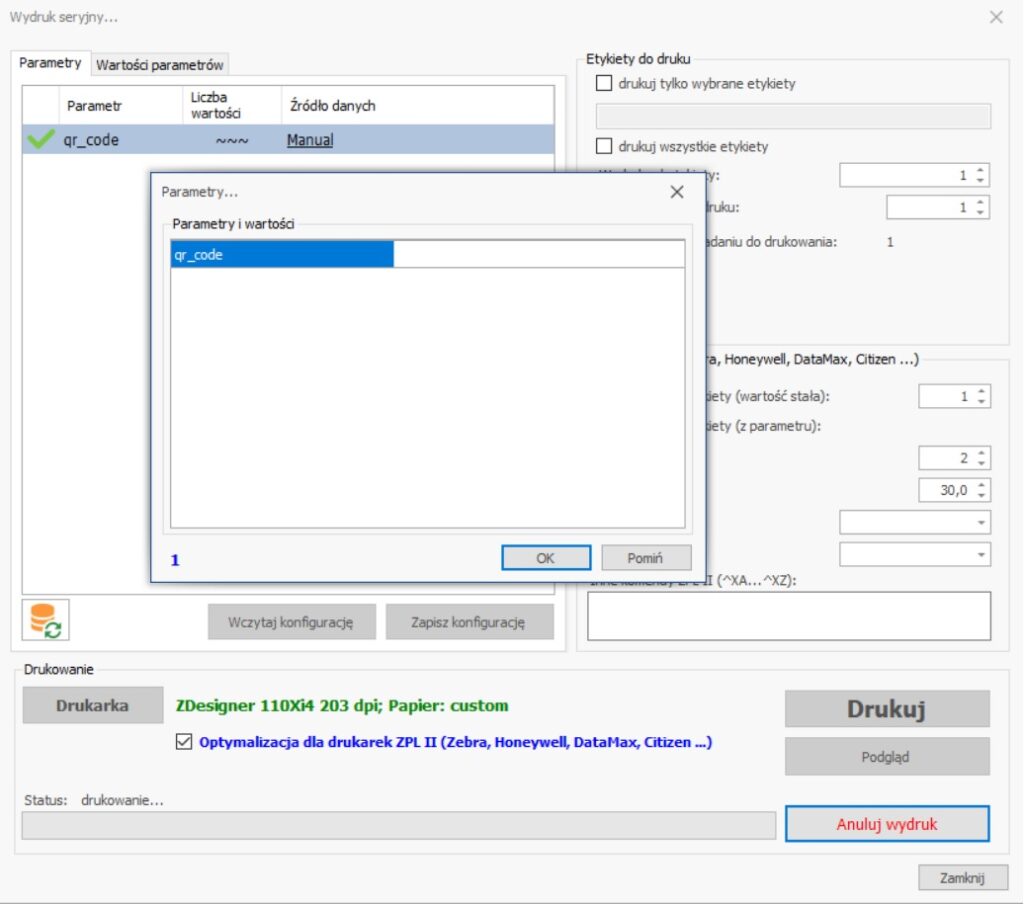
To keep the values from being visible on the printout, select Do not print values on labels. This function is useful, for example, when printing different quantities of the same label.
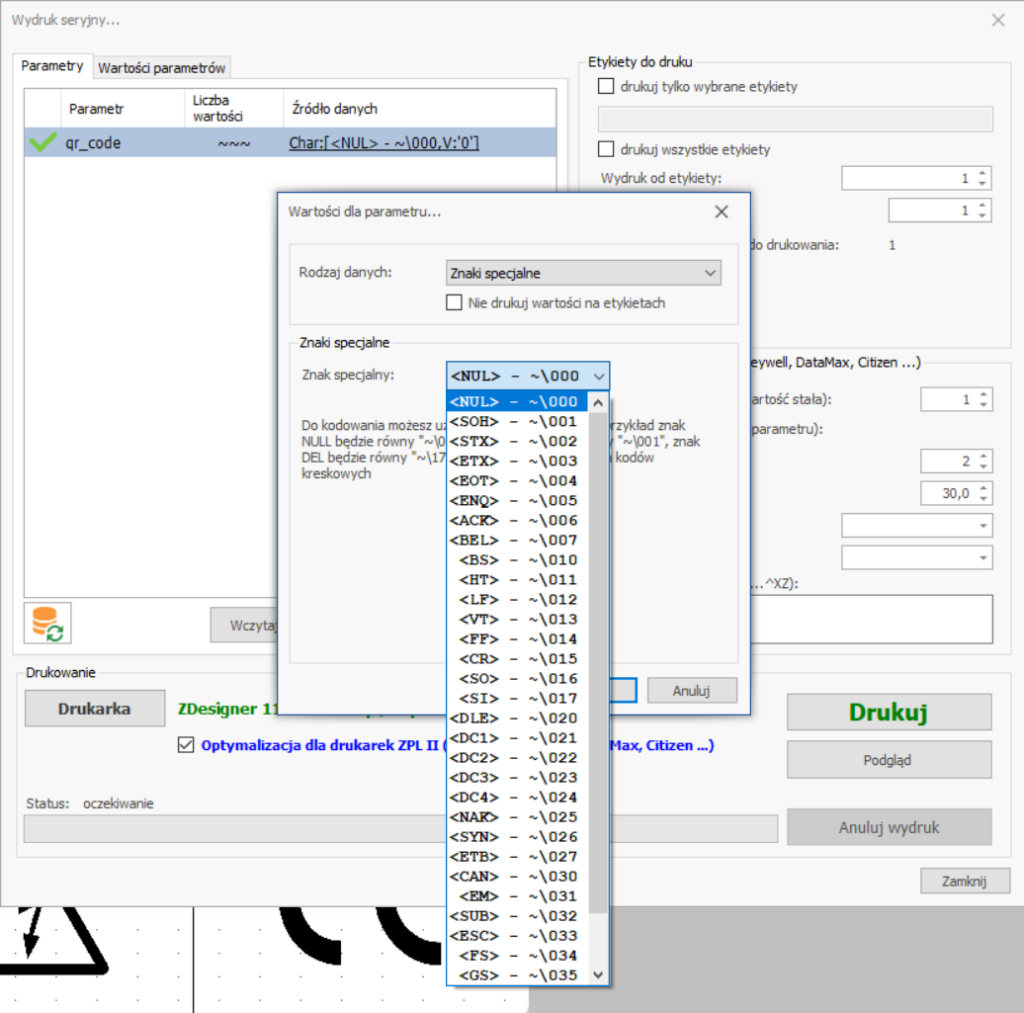
8.1.7. Special characters
The data source for a parameter can also be Special characters. Encoding uses the octal number system, which allows encoding characters not visible on the printout, such as Null, Enter, Escape, Delete or Tab. This function is especially useful for encoding barcode text, in which such characters perform specific functions in company systems.
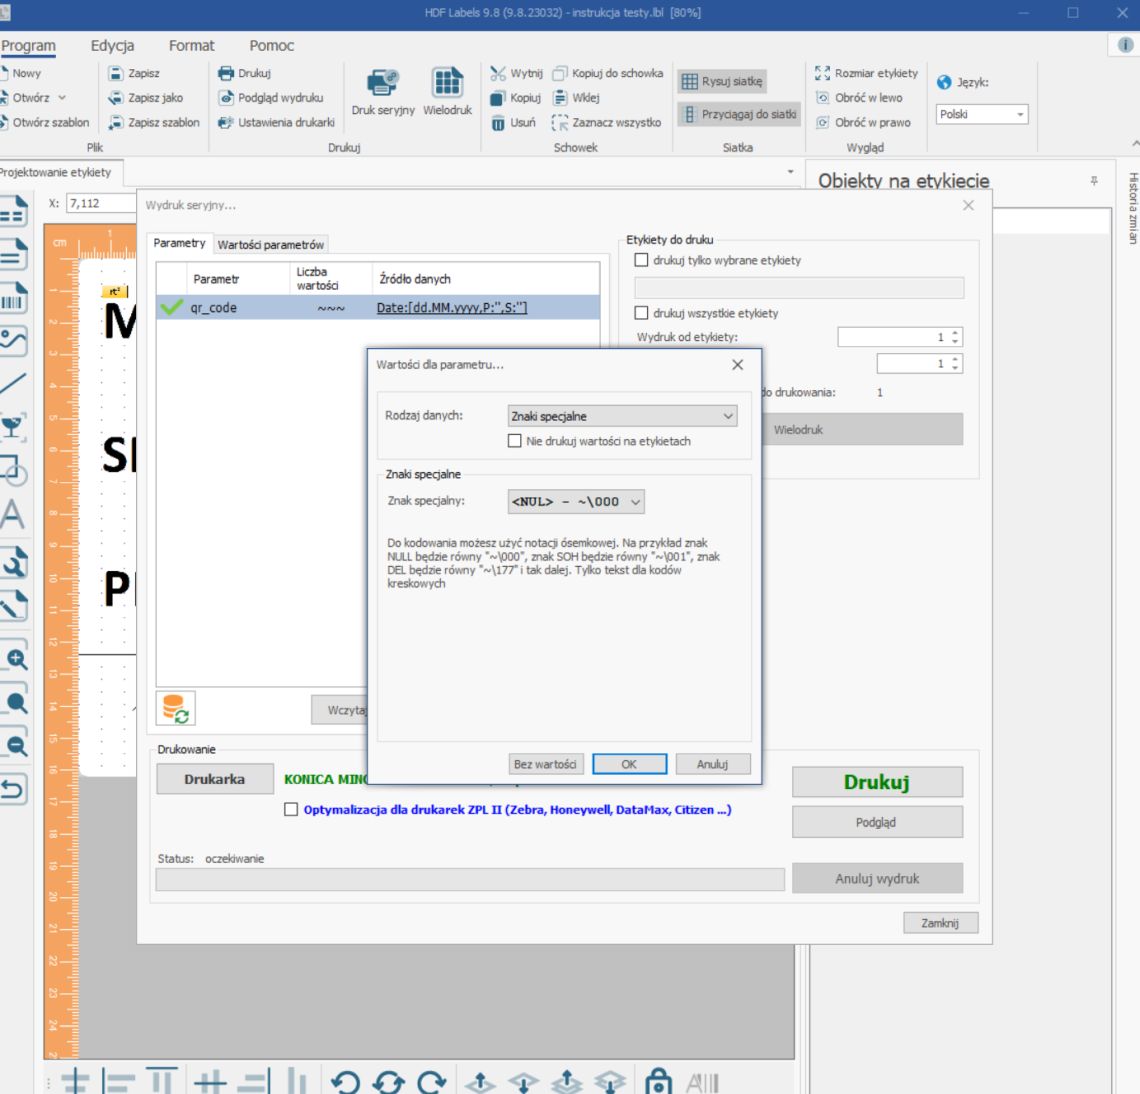
To use this function, click the chosen parameter, then its Data source. In the Data type field, choose Special characters and select the character to encode (available in the Special character drop-down menu, written in octal notation — e.g. Escape is ~\033). Click OK.
To keep the values from being visible on the printout, select Do not print values on labels.
9. Barcode Wizard
The Barcode Wizard is a part of HDF Labels 9 that makes designing barcodes easier. It offers all the popular 1D and 2D codes — over 110 symbologies in total.
The Wizard launches automatically after you double-click a selected barcode. You can also right-click the code and choose Object properties from the context menu. To first insert a code onto a label, click the code symbol on the bar on the left, move the cursor onto the label area and click the left mouse button.
9.1. Designing barcodes with the Wizard
After launching the Wizard, a window with tabs appears, in which you enter values defining the code's properties: symbology, height, width, etc.
9.1.1. Barcode list
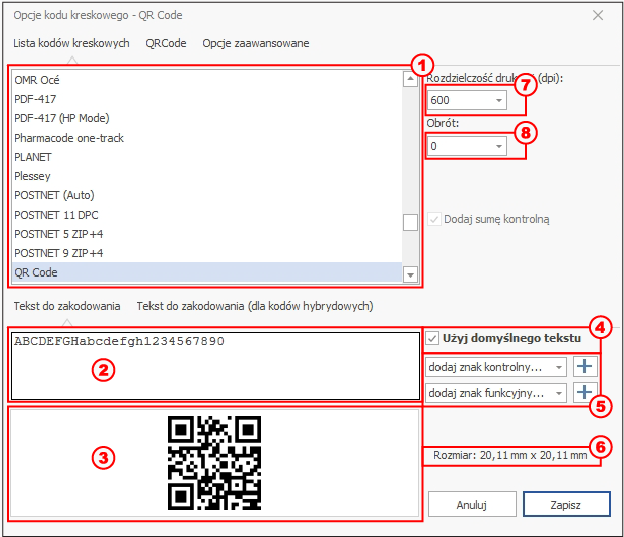
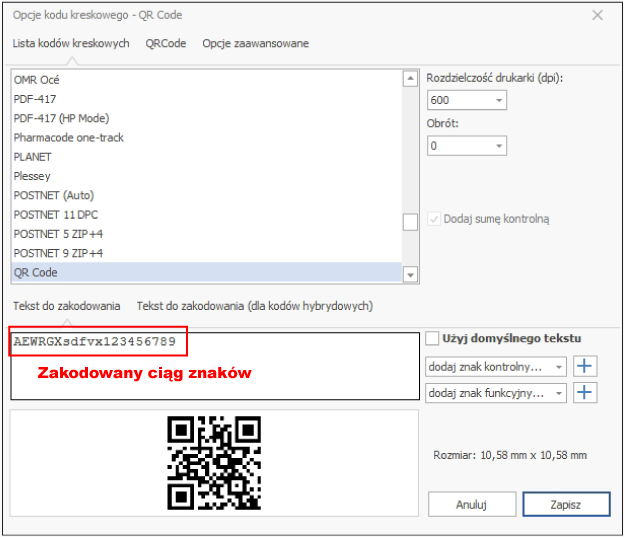
- Choose the barcode symbology from the list (1).
- In the Text to encode (2) field, enter sample text matching the real data — you will see the code's target size (dimensions in the Size (6) field). To enter characters not available from the keyboard, click the + symbol (5). For data that cannot be encoded with a given symbology (e.g. letters in 2/5 Interleaved), an error message appears. Selecting Use default text (4) will replace the entered text with the standard text.
- To print at a resolution other than 600 DPI, choose the desired value (7) — make sure the printer supports it.
- To rotate the code, choose a value (8). Codes can be rotated by 90 degrees.
9.1.2. Barcode board
The second tab concerns properties typical of a given symbology or group of symbologies (e.g. Code 39, 2 of 5, Codabar, Code 32 belong to the so-called 2W codes).
Example 1: 1D barcode properties

1D codes consist of bars of two widths and corresponding spaces. The ratio of narrow to wide bars (Ratio) should be between 1:2 and 1:3. The width of the remaining bars is calculated automatically.
- Enter the width of Bar 1 (1) — this determines the total width of the code.
- Enter the code height (2).
- Click Apply (3) — the total width will appear in the (4) field.
Example 2: QR code properties
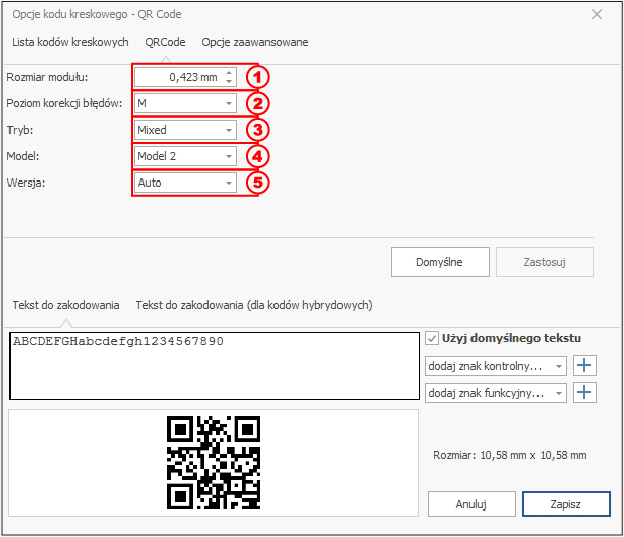
A QR code is a high-capacity 2D code — it can encode 7,089 digits, 4,296 alphanumeric characters or 1,817 kanji/kana characters (ISO/IEC 18004:2006 specification).
- Enter the Module size (1) — the module is the smallest element of the code; the larger it is, the larger the code.
- Choose the error correction level (2): L (7%), M (15%), Q (25%) or H (30%) of damaged data recovered.
- Choose the Mode (3) of data interpretation; if unsure, choose Mixed.
- Choose the model (4) — usually Model 2 (Model 1 is obsolete).
- Choose the Version (5) — 40 versions are defined; the higher it is, the more data can be encoded. The Auto option selects the smallest sufficient version, but the code size may then change depending on the amount of data.
9.1.3. Barcode text tab (HRT)
In this tab you specify whether the code should be accompanied by a line of human-readable text (HRT).
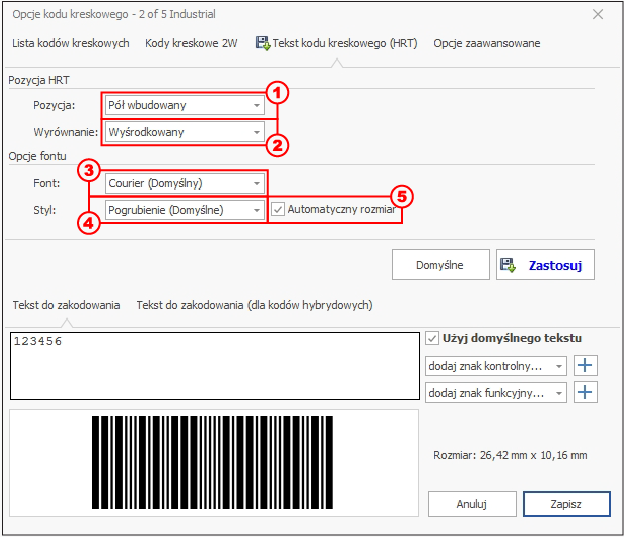
- Choose the HRT position (1): None, Above the barcode, Half-embedded, Embedded or Below the barcode.
- Choose the alignment (2): left, right or centered.
- Choose the Font (3): Courier, SM Gothic, SM Unit, SM Unit Condensed, Roman or OCR-B. You can also add a checksum to the HRT.
- Choose the Style (4): Bold, Bold (default), Bold italic, Italic or Standard.
- Specify whether the font size is to be generated automatically (5); if not, choose the size in the Automatic size field.
- Click Apply to save the settings.
9.1.4. Advanced options tab
The Advanced options tab is used by HDF experts when, in special situations, settings beyond the standard are needed.