HDF Labels v10 — user manual
Current version.
Table of contents
- Introduction
- Installation, registration and license transfer
- Objects on the label
- Barcodes
- Label templates (ready-made layouts)
- Editing and object layout
- Batch printing
- Printing and export
- Example: a label step by step
- Program interface
- FAQ — frequently asked questions
- Instructional videos
Note. The interface language can be switched to English in the program (Program ribbon > View > Language). The screenshots in this documentation show the Polish interface; the English interface is identical in layout, only the labels differ.
1. Introduction
HDF Labels 10 is a modern, high-performance Windows application for designing and printing labels. Its capabilities include, among others:
- Support for labels of any size.
- Printing on any type of printer.
- Object-based label design with full formatting: text, pictogram, line, image, rectangle, ellipse and a Barcode.
- Batch printing: labels can contain parameters filled with a variable value during printing. The variable can be a serial number, a date, or data read from a connected database. Mail-merge data can also be loaded from text files, an Excel spreadsheet, or a database connected via ODBC.
- Graphic objects can be embedded dynamically.
- Multiple printing: many labels printed on a single sheet, across multiple rows and columns.
- Batch printing combined with multiple printing: labels with selected data can be printed in series on a single sheet, across multiple rows and columns.
- Templates: you can create and save your own label templates with Save template.
- Undo and history: any action can be undone with Back, and the history cleared with Clear history.
- Object anchoring: while designing, you can lock a selected object in any place on the label with Anchor object.
- Formatting: every object can be formatted — its position, rotation and order set as needed.
- Grid: the Program tab offers Show grid, which helps arrange objects evenly. The Snap to grid option automatically aligns objects to grid points.
The license is perpetual — you buy once and use it with no time limit. Want to try the program before buying? Download the demo version from the HDF website, in the Download menu. The demo is fully functional but prints a “Demo Version” watermark on labels and codes — it disappears once you register a full license.
2. Installation, registration and license transfer
System requirements:
- System: Windows 10, Windows 11 or Windows Server (currently supported versions).
- RAM: at least 1–2 GB of free memory.
- Disk space: about 150 MB.
- Printer: any printer installed in Windows. Barcode printers give the best results (e.g. Zebra, Honeywell, TSC, SATO, Citizen, Brady), but the program also works with office printers — e.g. HP, Brother, Canon, Epson, Lexmark — as long as they have a Windows driver.
To install HDF Labels 10, run setup_hdf_labels_[version].exe. It installs the program and the required components on your computer.
The program updates itself automatically — at startup it checks for a newer version and offers to download it in the Program update window (comparing the current and the new version). You do not have to download the installer manually to stay up to date.
To register the program, you first need to purchase it. To do so, send us your order:
- E-mail [email protected]
- Mail HDF Software Sp. z o.o., ul. Sępa-Szarzyńskiego 34-36/L3, 50-351 Wrocław, Poland
When placing the order, provide your e-mail address — it serves as the login for registering the software. If you order more than one license, you can assign a separate e-mail address to each user, or the same address to all. The number of purchased licenses is stored in our database and managed by us.
After payment you will receive by e-mail a generated password, linked to the given e-mail address, needed for registration.
Registration requires an internet connection. From the menu choose Help > License. The Register window opens, where — next to the automatically generated Unique application key — you enter the login (e-mail address) and the password, then click Register.
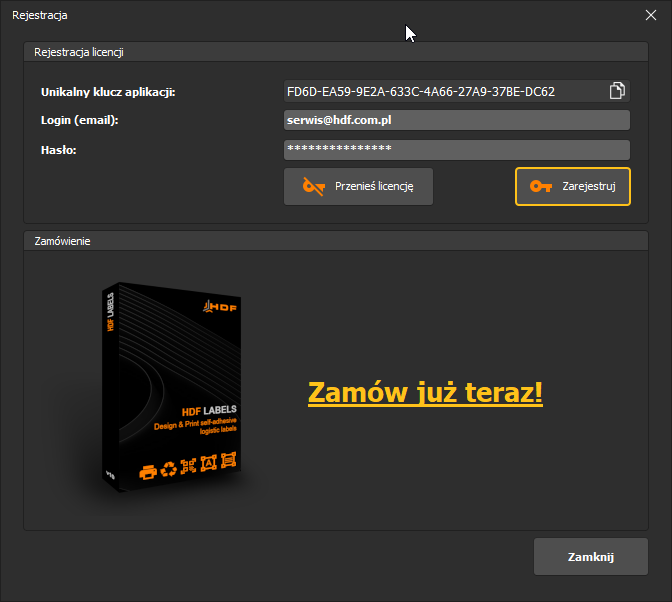
A message confirming the registration appears on screen. After registering, restart the program to use its full version.
If you want to change the workstation on which the program is used, you can transfer the license to another computer using the same e-mail address and password as at the first registration.
Transferring the license also requires an internet connection. Choose Help > License. In the Register window the login and password should fill in automatically; if not — enter the data used at the first registration and click Move license. The program will be unregistered from the current computer.
After a restart the program will run in demo mode. You can now install it on another computer and repeat the registration. Using this method you can move the program between computers an unlimited number of times.
Note! The Unique application key is different on every computer. This means that if a computer fails, the license with that key stays active only on it and can be transferred only from it. It is not possible to transfer the license from a computer other than the one on which it is active. To transfer a license from an unavailable computer to a new one, contact us by e-mail [email protected] and we will unregister it for you.
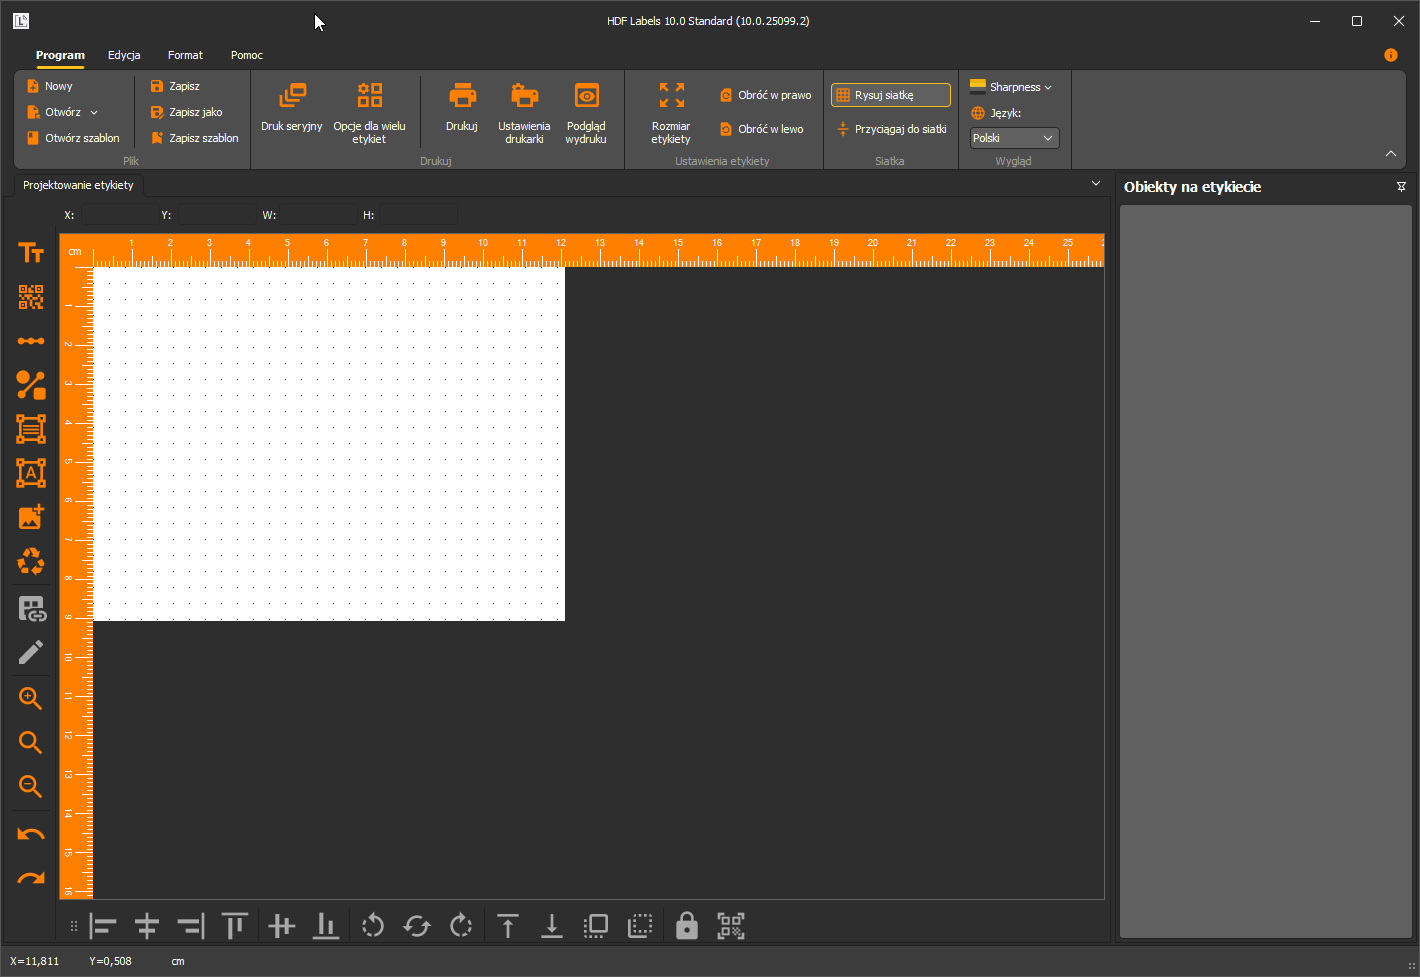
After the first launch of the registered program you will see an empty work area. This is your starting point for building a label — the ribbon with the Program, Edit, Format and Help tabs at the top, a grid canvas in the middle, the Objects on label panel on the right, and the object toolbar (left) and layout toolbar (bottom).
3. Objects on the label
You build a label from objects inserted via the vertical object toolbar on the left side of the window. Each object has its own properties window (position, size, formatting) and anchoring. This chapter covers object types; shared operations (selecting, copying, aligning, order) are described in the Editing and object layout chapter.
The object toolbar contains (from the top): text, barcode, line, rectangle / ellipse, formatted table, advanced text field, graphic, pictogram, and the object-properties icons, followed by zoom (in / original size / out) and Back / Redo. An inserted object appears on the canvas and in the Objects on label list on the right.
Simple objects: line, rectangle, ellipse
You insert graphic objects from the object toolbar and format them in their properties window (double-click the object).
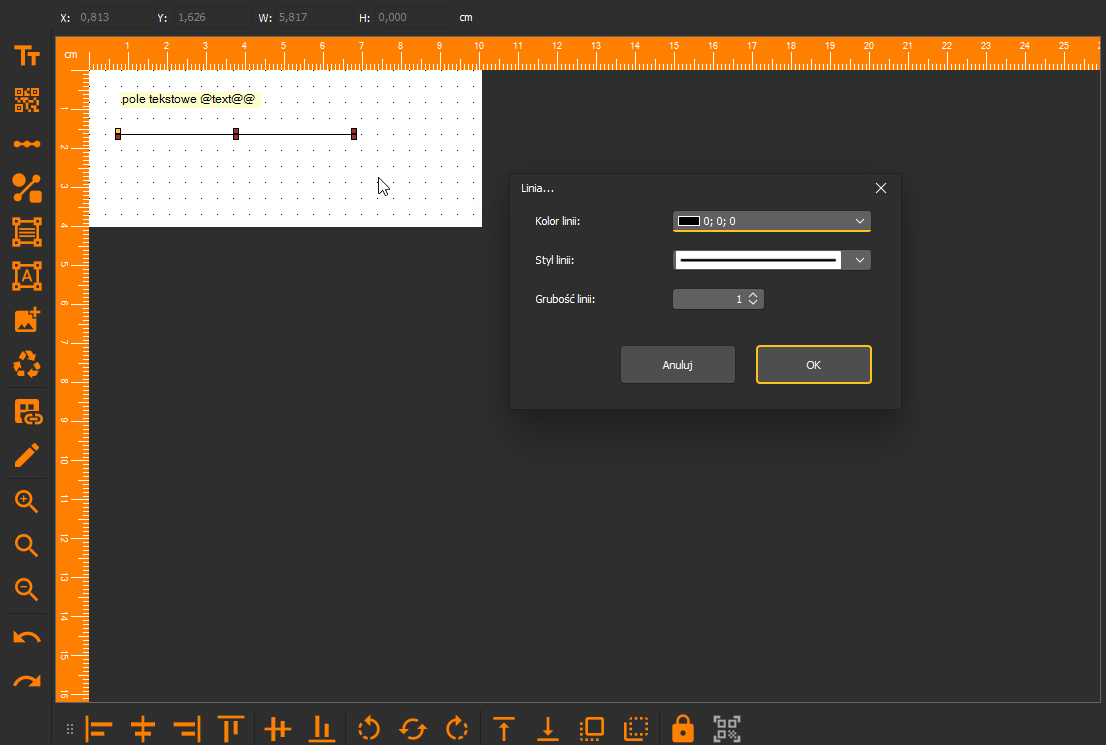
Line — properties:
- Line thickness — stroke width.
- Line color — stroke color.
- Style — solid or dashed.
- Position and size — PosX / PosY / width / height in cm.
- Anchoring — the corner relative to which the object keeps its position when the label is scaled.
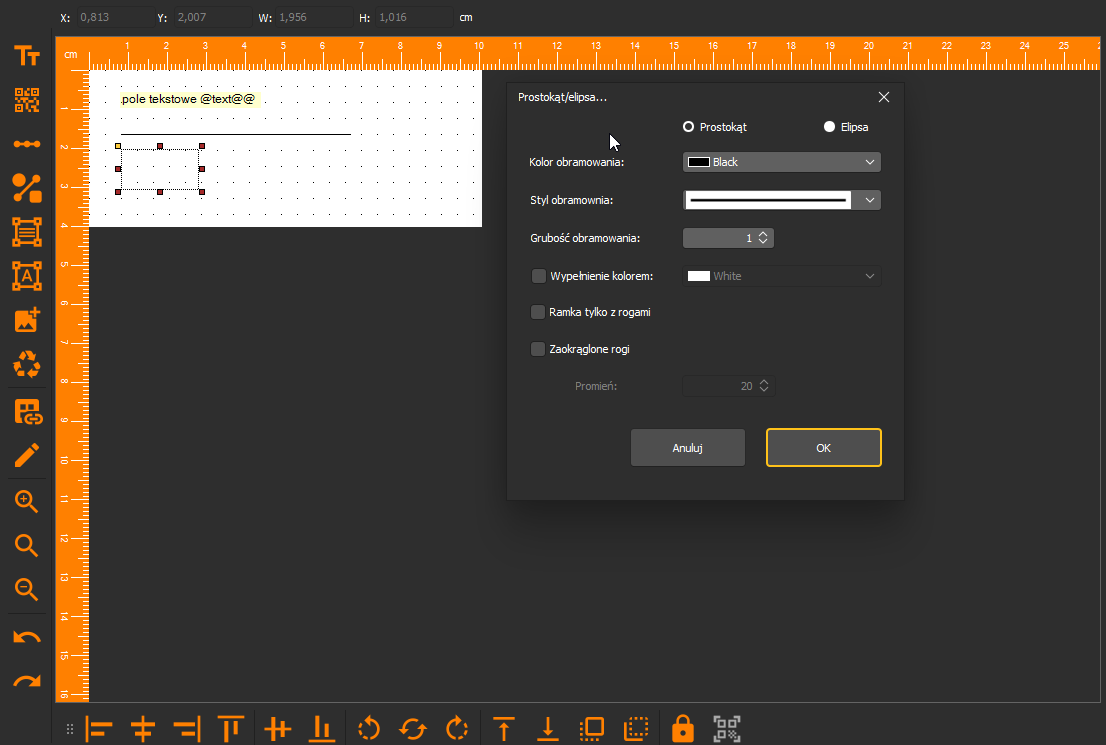
Rectangle / ellipse — properties:
- Border — edge thickness and color.
- Fill — the shape's interior color.
- Corner rounding — for a rectangle, the corner radius.
- Position and size — PosX / PosY / width / height in cm.
- Anchoring — corner selection.
Images and pictograms
You insert a graphic from the object toolbar by pointing to an image file — it lands on the label as an object you can position and scale. An image can also be dynamic: in the advanced object properties you supply a prefix, a parameter and a suffix, plus an image folder, so the program picks the file based on the record's data (see the text-field section below).
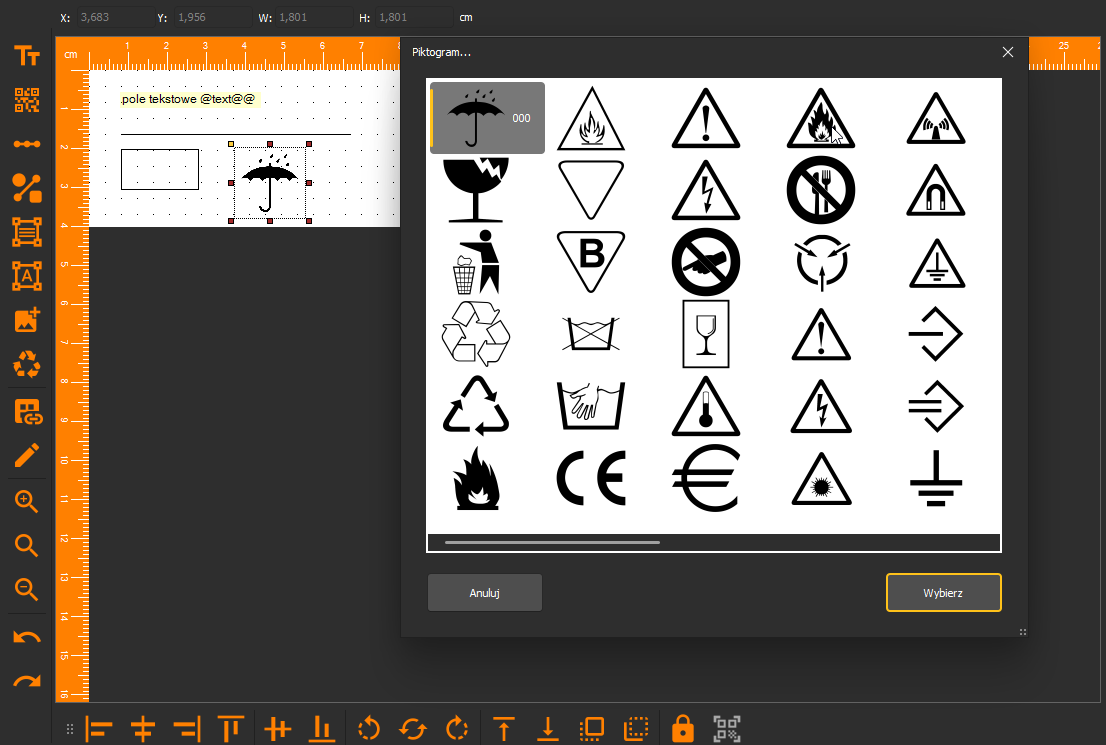
You choose a pictogram from the built-in library — the window shows a grid of symbols (transport, warning, recycling, etc.) with a filter/categories and a preview. The selected pictogram is placed on the label as a graphic object.
Text field
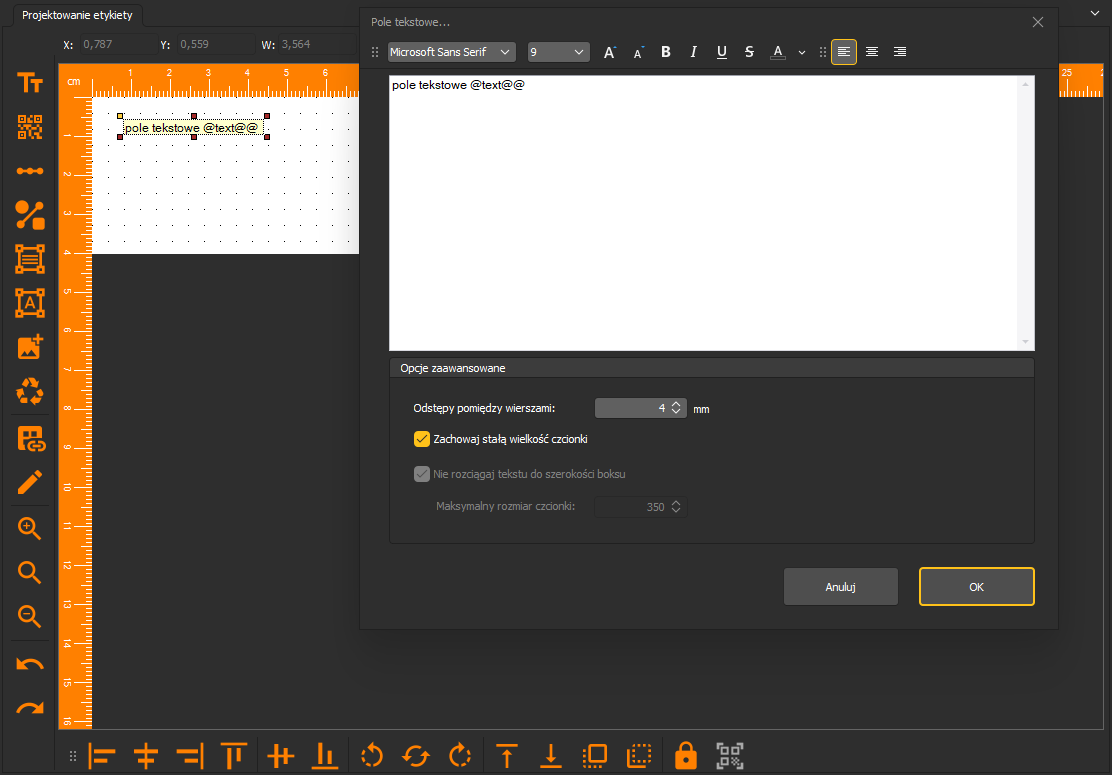
The text field is the basic object for text — fixed or parameterized. Basic formatting (double-click the object) covers font, size, style (bold / italic / underline), alignment and text color. In the field's content you also place parameters in the @name@@ syntax, which batch printing replaces with data from the record.
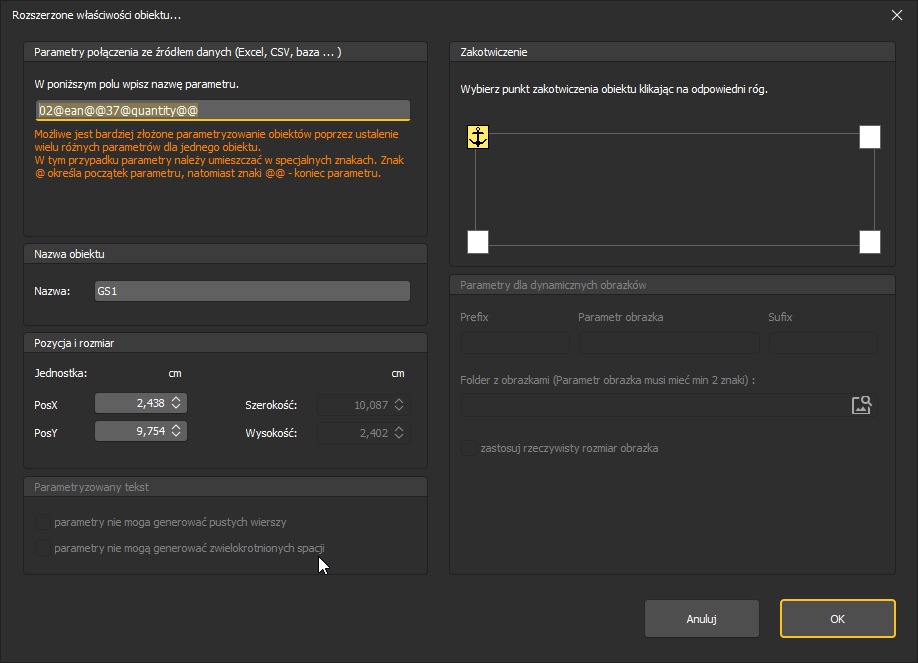
Advanced object properties is the shared parameterization window for all objects that can pull data from a source (text fields, barcodes, dynamic images). It contains:
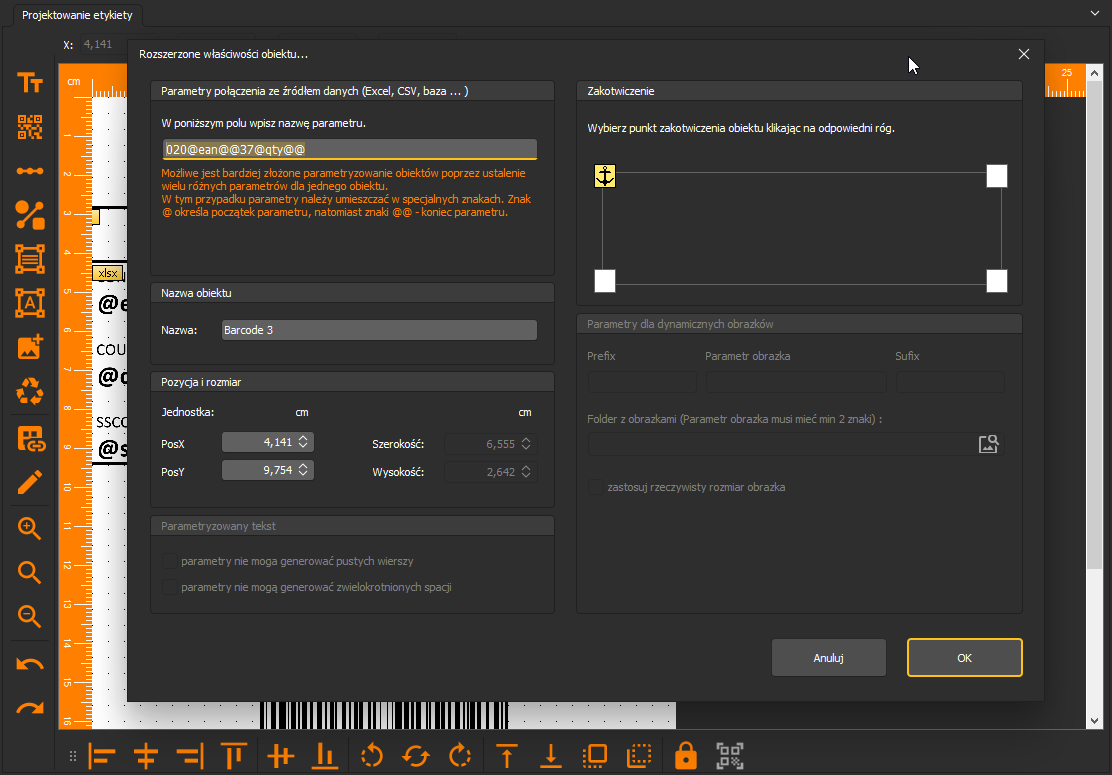
- Data-source connection parameters — the field where you enter a parameter name or a composite content with several parameters, e.g.
02@ean@@37@qty@@. The@character opens and@@closes a parameter; a single object can contain many parameters. Values are substituted by batch printing. - Object name — the object's label in the list (e.g.
Barcode 3,GS1). - Position and size — PosX / PosY (editable) and width / height in cm.
- Merge-Options — options: "parameters must not generate empty lines" and "…multiplied spaces" — they tidy the result when a record has empty fields.
- Anchoring — selection of the corner relative to which the object scales/positions.
- Dynamic-image parameters — prefix / image parameter / suffix and the image folder — they compose the graphic file name picked from the record's data. Option "use the image's actual size". The image parameter must be at least 2 characters.
Parameter names depend on the project — you assign them. The same code in another template might use e.g.
@quantity@@instead of@qty@@. The program has no fixed list of keywords. You may name parameters in your own language, e.g.@ilosc@@or@jednostka@@, but avoid diacritical marks in names — use@ilosc@@, not@ilość@@.
Templates as objects (XLSX, RTF)
Two objects let you place a formatted block of content on the label, edited in a built-in editor. These are separate object types, not to be confused with label templates (ready-made layouts of the whole sheet — chapter 5).
- Formatted table (XLSX template) — a tabular block edited in a pseudo-Excel editor (File / Home / Page Layout / Data / View ribbon). Suited to data in a cell layout — a company header, a table of serial fields with descriptive labels. Cells can contain
@name@@parameters. - Text field (advanced) (RTF template) — a formatted-text block edited in a pseudo-Word editor (Home / Insert / Page Layout / View ribbon). Suited to a freely formatted description — a product name, a note. It also supports parameters.
You open the editor by double-clicking the object. The practical use of both is shown in steps 2–4 of the tutorial.
Barcodes are also objects on the label, but because of their scope they are described in a separate chapter, Barcodes.
4. Barcodes
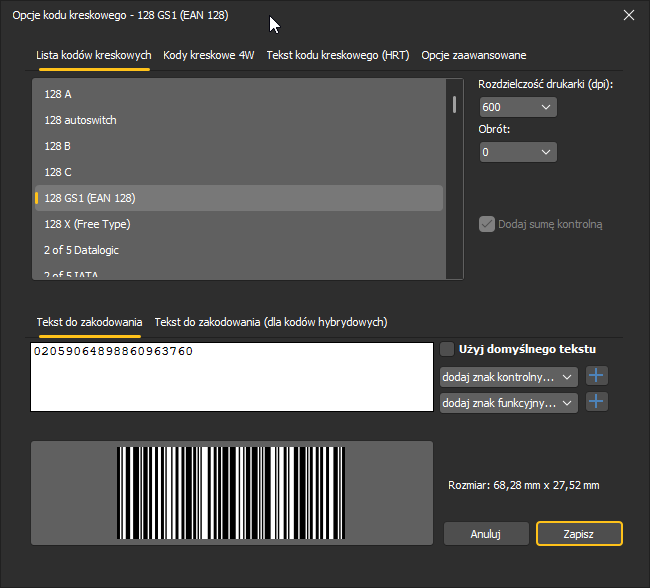
You insert a barcode from the object toolbar. The Barcode options window opens, where you choose the code type from a list, enter the content to encode and set the appearance. The preview and the resulting size (in mm) are shown at the bottom of the window. You confirm with Save.
The tab layout depends on the code type:
- 1D codes (linear, e.g. 128 GS1) — Barcode list · 4W barcodes · Barcode text (HRT) · Advanced options.
- 2D codes (e.g. QR Code) — Barcode list · QR Code · Advanced options.
New in v10. The 4W barcodes tab appears for 1D codes.
In any code content you can use @name@@ parameters — the code then takes the value from the record during batch printing (see the Linking a text field with a code section).
Available code types
The program supports over a hundred symbologies. This chapter covers only the two most commonly used — GS1-128 and QR Code — because that is what the tutorial label uses. Below are the most popular remaining types:
1D codes: Code 128 (A, B, C), GS1-128 (EAN-128), EAN-13, EAN-8, UPC-A, UPC-E, Code 39, ITF-14, ISBN, ISSN, Code 93, Code 11.
2D codes: QR Code, DataMatrix, PDF417, MicroPDF417, Aztec, MaxiCode.
Hybrid codes: RSS (DataBar), EAN/UCC Composite, Aztec Mesas.
Correct use of codes requires knowledge of the codes themselves. Choosing the symbology, the data structure, check digits and GS1 Application Identifiers is not trivial — a malformed code will not scan on the production line. Before choosing a type other than the GS1-128 / QR described here, check its structure and use. A full description of all supported symbologies (with examples) is available in our service kody-kreskowe.dlawas.com — including GS1-128, Code 128, EAN-13, DataMatrix, PDF417, QR Code. The structure of GS1 codes and the choice of Application Identifiers is covered by our article: GS1 and Application Identifiers.
GS1-128 / Code128
On the Barcode list tab you choose a variant of the 128 family — for logistics labels, 128 GS1 (EAN 128). The right panel sets the printer resolution (dpi), rotation and check digit. In the Text to encode field you enter the code content (for GS1, with Application Identifiers, e.g. (02)…(37)…). "Add check character…" and "add function character…" are also available.
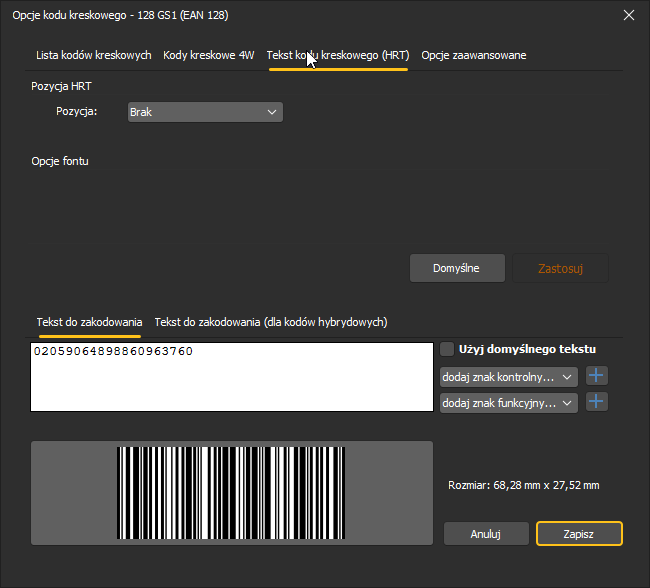
Human-readable text (HRT) — the "Barcode text (HRT)" tab controls the text printed next to the code:
- HRT position — a list of the text's position relative to the code (including "None" — no text).
- Font options — the HRT text font (default or chosen).
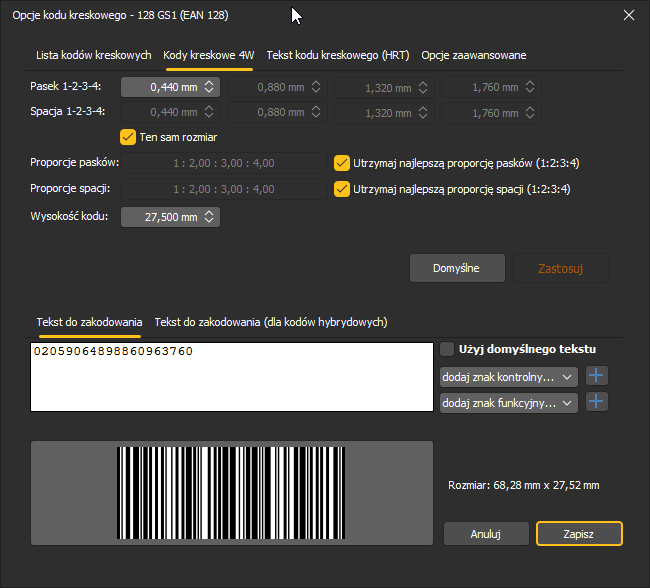
Width and height — on the "Advanced options" tab you set the code geometry:
- Bar 1-2-3-4 — bar width in mm (e.g. 0.440 mm), with a "Same size" option.
- Space 1-2-3-4 — width of the gaps between bars.
- Bar / space ratios — keeping the best ratio (1:2:3:4).
- Code height — height in mm (e.g. 27.500 mm).
QR Code
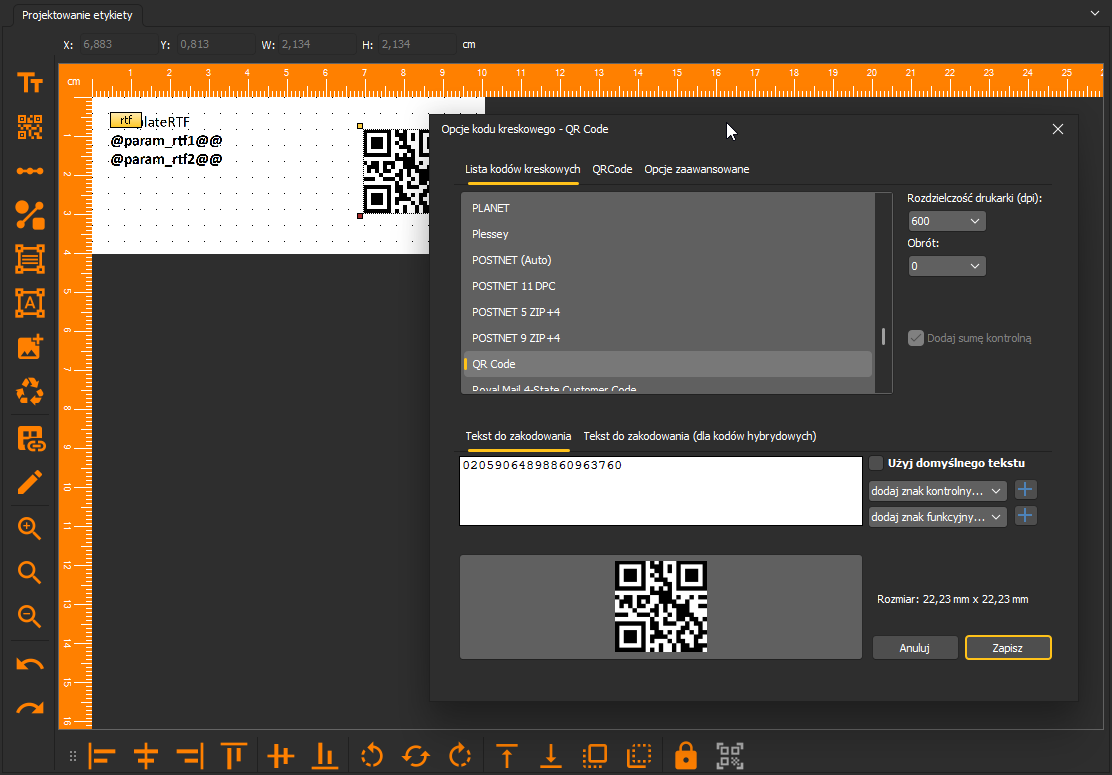
For a 2D code you choose QR Code from the list. On the QR Code tab you enter the content in the Text to encode field; you set resolution and rotation as for 1D codes. The QR matrix preview and the size in mm are shown at the bottom of the window.
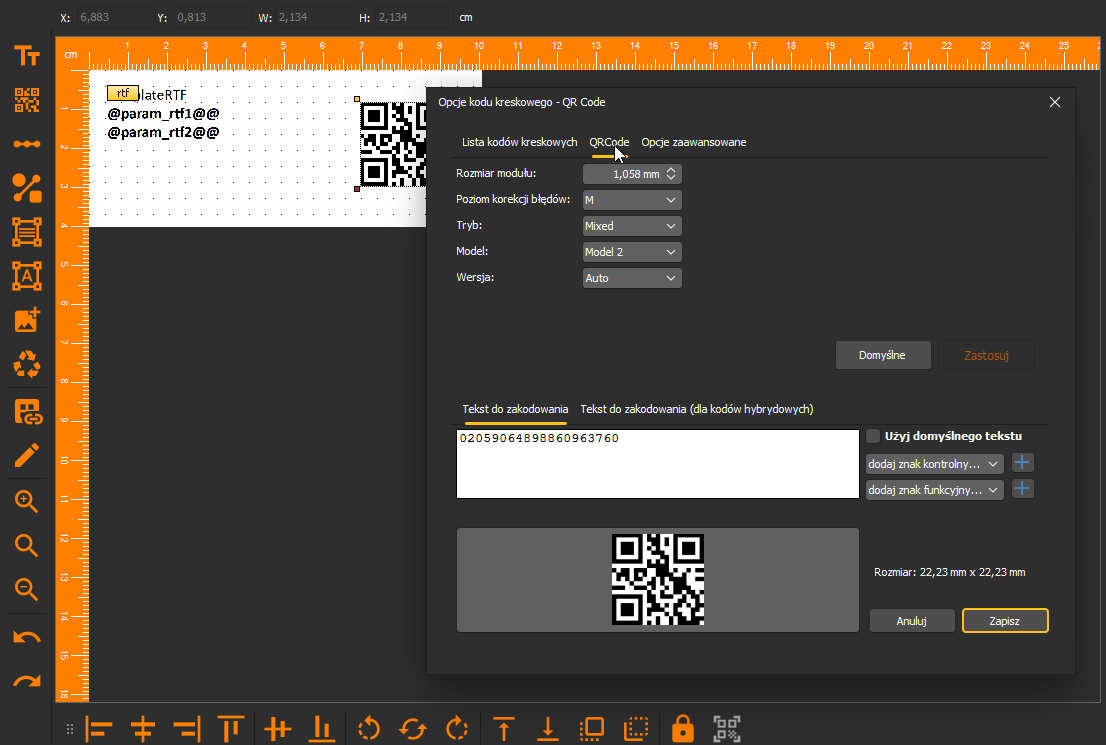
QR parameters — on the "Advanced options" tab:
- Module size — the size of a single cell in mm (e.g. 1.058 mm) — it determines the code size.
- Error correction level — resistance to damage (default M; the higher the level, the more redundant data).
- Mode — the data-encoding method (e.g. Mixed).
- Model / Version — Model 2 and the version (Auto — matched to the amount of data).
Linking a text field with a code
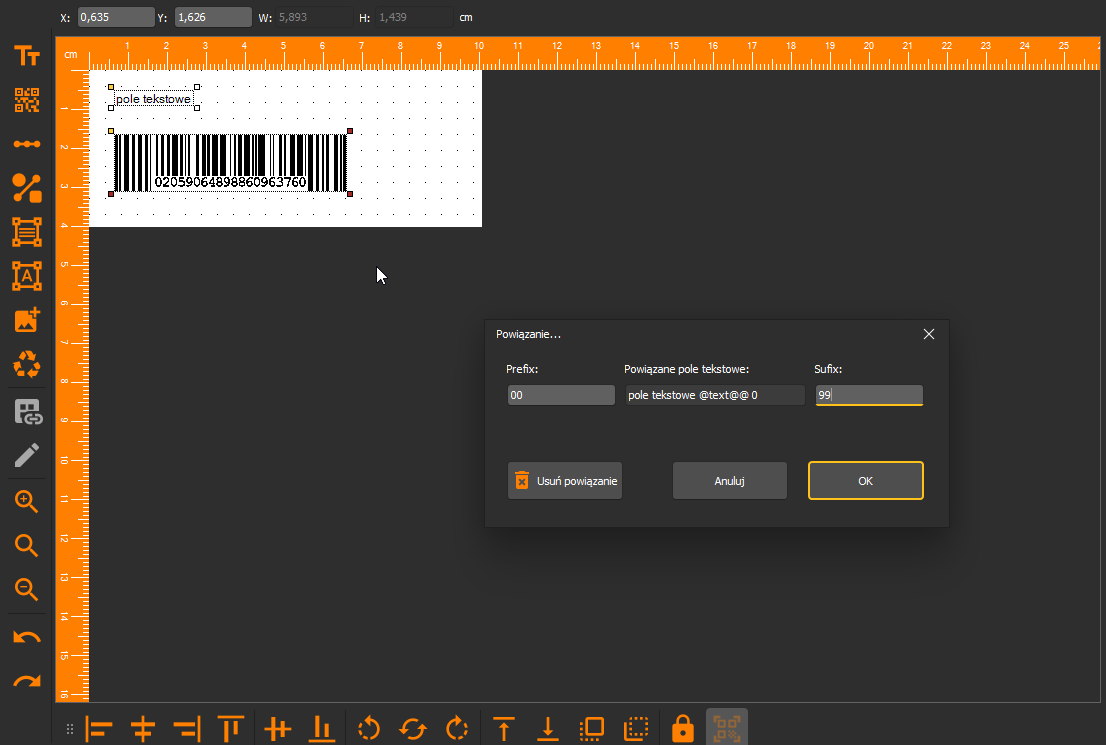
A code and a text field can share the same @name@@ parameter. When you enter the same parameter in the advanced properties of both objects, the code takes the same value as the text field — one data source feeds both objects. This is the same mechanism as in Advanced object properties: the data-source connection field plus the @…@@ syntax. Practical use is shown in step 6 of the tutorial.
5. Label templates (ready-made layouts)
A label template is a ready-made layout of the whole label (size, object arrangement) saved for reuse. Do not confuse it with the Formatted table / Text field (advanced) objects from chapter 3 — those are single content blocks on the label; here it is the whole label.
Saving and loading a template
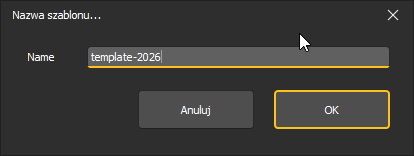
You save a finished project as a template with Save template (File group). The program asks for a name in the Template Name window.
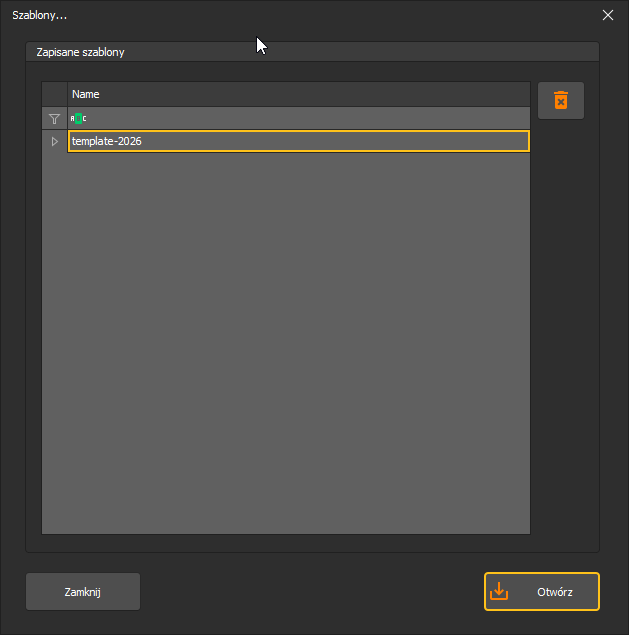
You browse saved templates with Open template — the Templates window shows the Saved templates list. You pick a template and load it as a new label.
New label from a template
You can also pick a template when creating a new label — in the Label size window (tutorial step 1), in the Free label templates section, by clicking a thumbnail (e.g. logo-gs1-150x210.lbl). The program loads a complete layout with objects and parameters instead of a blank label — all that remains is to connect the data in batch printing.
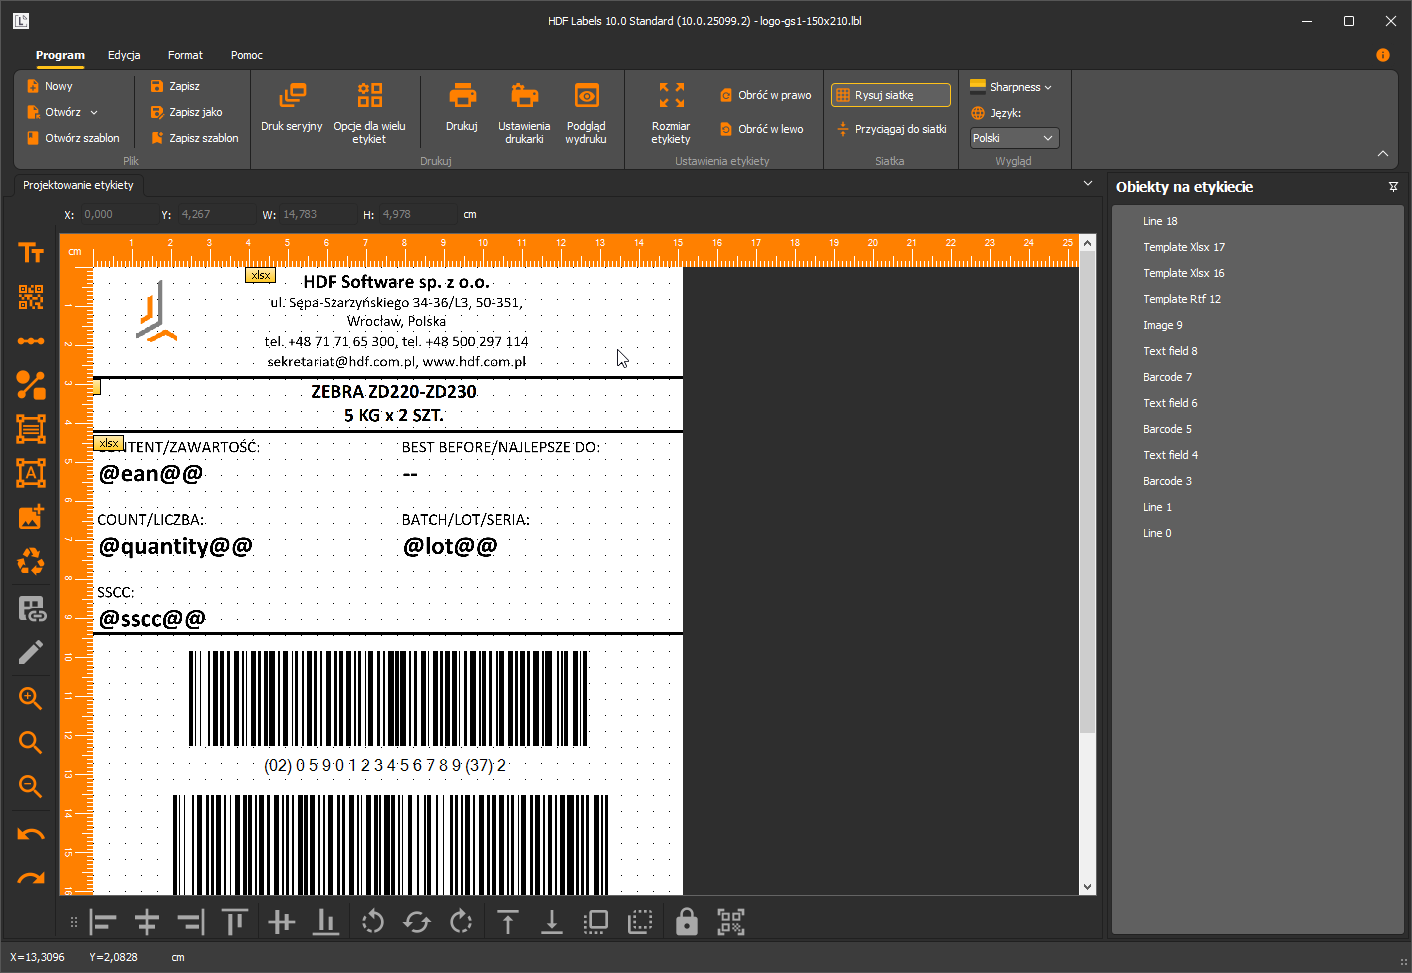
This template uses the parameters
@quantity@@and@lot@@— different from example-label (@qty@@,@seria@@). Each template has its own parameter names; there is no fixed list.
Many labels on a sheet (multiple printing)
If a single sheet is to hold many copies of a label, use Options for multiple labels — the Multiple printing window lays out the label in a grid:
- Number of labels — the number of columns and rows on the page.
- Margins and spacing — sheet margins (left / right / top / bottom) and the vertical and horizontal spacing between labels; the unit is selectable (e.g. mm).
- Paper and orientation — paper size and orientation (landscape / vertical); multiple printing is enabled by default for the current size.
- Preview and print — a layout preview plus print-preview and print buttons.
You save the settings as multiple-printing configurations — each is tied to a specific printer and paper size. The idea is to define several ready layouts once (e.g. one for an A4 sheet on an office printer, another for a roll on a label printer) and later pick them with Load configuration, instead of setting up the grid every time.
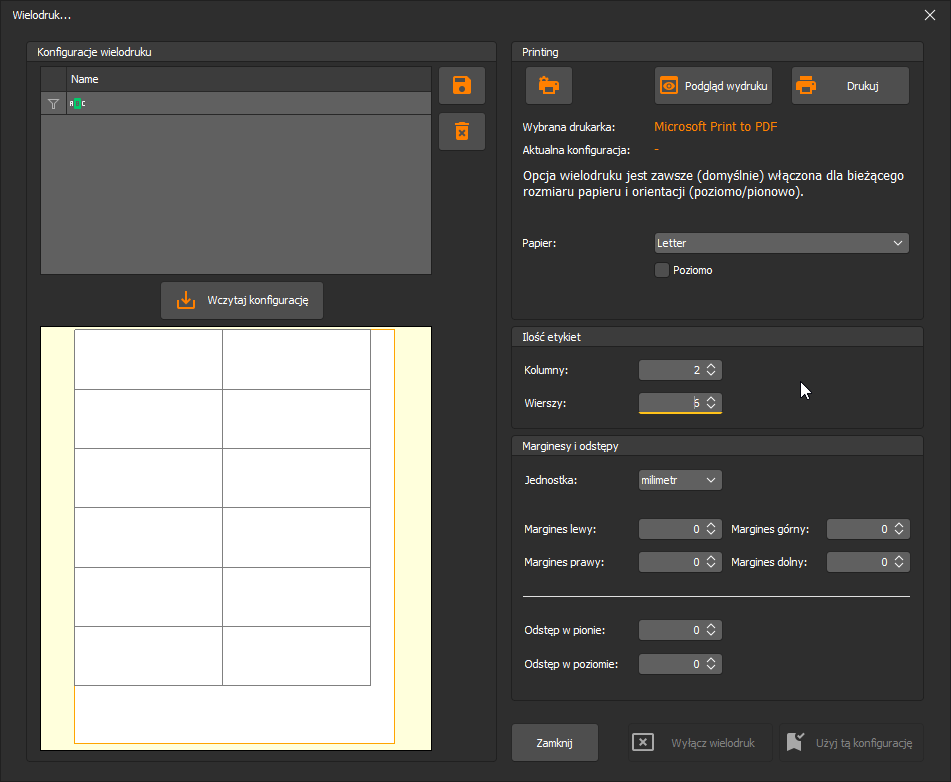
The same window is available from batch printing — in batch printing you pick a saved multiple-printing configuration and print all records on it at once, on a single sheet across many rows and columns. Printing details: the Printing and export chapter.
6. Editing and object layout
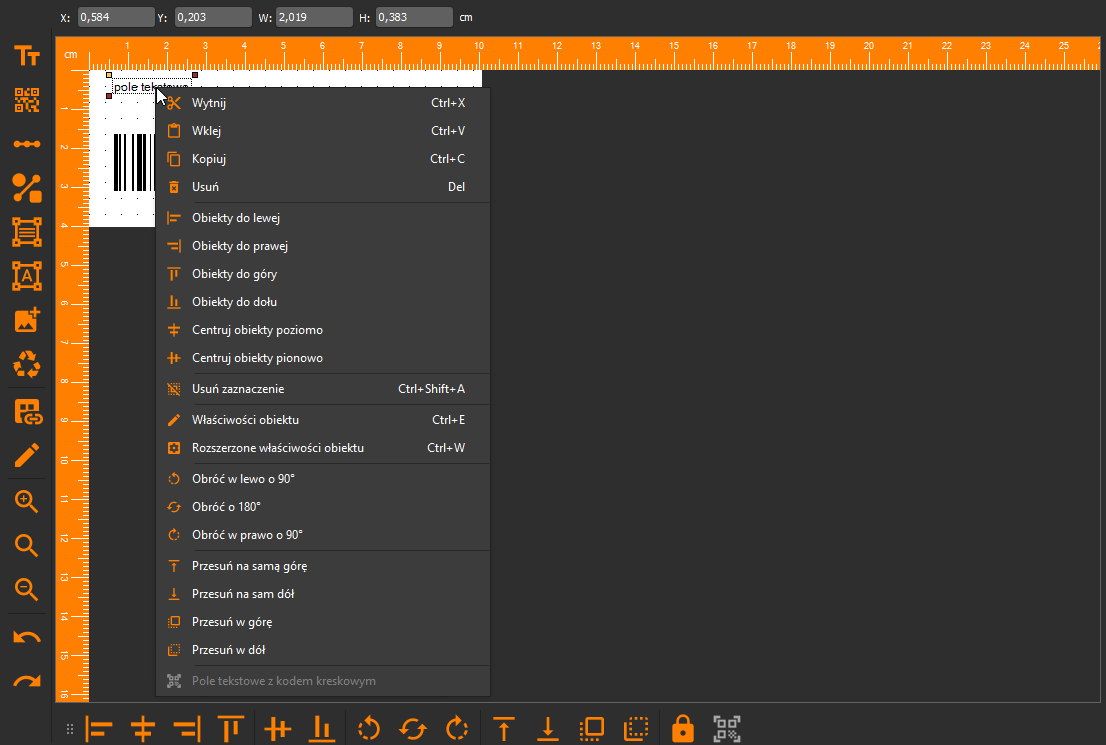
You trigger object operations in three ways: from the context menu (right-click on an object), from the icons on the bottom toolbar, or from the Edit / Format menu. Below are the operations common to all object types.
- Selecting — a left-click selects an object. Ctrl + click adds more; dragging the mouse encloses objects in a frame. Program > Select all selects everything. In the Edit menu: Remove selection (Ctrl+Shift+A) and Invert selection.
- Cutting and removing — Cut (Ctrl+X) moves the object to the clipboard. Remove (Del) deletes permanently. The difference: cut objects can be pasted, removed ones are gone.
- Copying and pasting — Copy (Ctrl+C), Paste (Ctrl+V).
- Rotating — Rotate left by 90°, Rotate right by 90°, Rotate by 180°. This also applies to text fields (they can be rotated and parameterized).
- Moving — select an object (the cursor turns into a hand), drag it to the target place. For precision: the PosX/PosY coordinates in Advanced object properties.
- Resizing — drag a handle on the selection frame. For precision: width/height in Advanced object properties. Text fields scale only when parameterized — fixed-text fields fit their size to the content. Barcode size is set only in the code window.
- Alignment — Align to left / right / top / bottom line up the margin of all selected objects with the one selected first. Center horizontally / vertically centers them relative to each other.
- Order (layers) — an object on a higher level covers lower ones; a new object goes on top by default. Move to top / bottom and Move up / down (by one level) change the order.
- Anchoring — Anchor (Format menu) locks an object against accidental movement — in the object list it stays highlighted in red with a lock symbol. Clicking again unlocks it.
- Properties — Object properties (Ctrl+E) — the formatting window for the given object type. Advanced object properties (Ctrl+W) — parameterization, position, anchoring (see chapter 3).
Context menu
Right-clicking an object opens a menu with all the operations above: Cut, Paste, Copy, Remove; alignment and centering; Remove selection; Object properties and Advanced object properties; rotations; order changes; and Text field with barcode — linking a text field with a code, described in chapter 4.
Rotating the whole label
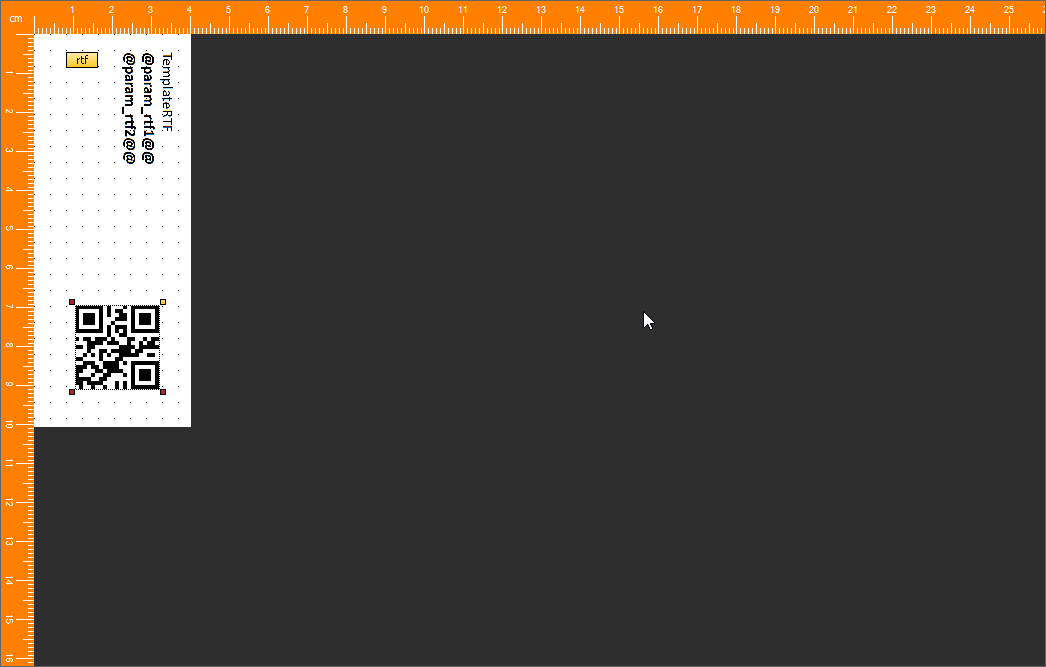
Apart from rotating individual objects, you can rotate the whole label: the Label settings group → Rotate right / Rotate left. It swaps the work-area orientation (landscape ↔ portrait) together with the arrangement.
7. Batch printing
Batch printing means printing a whole series of labels with the same layout, filled with variable data. The data comes from e.g. an Excel spreadsheet, a text file or a database, and is inserted into the label during printing. Variables can fill text fields, images and barcodes.
Prerequisite: at least one object must be parameterized — instead of a fixed value it has a @name@@ parameter, which is linked to a data field before printing. The practical flow on a real project is shown in step 8 of the tutorial.
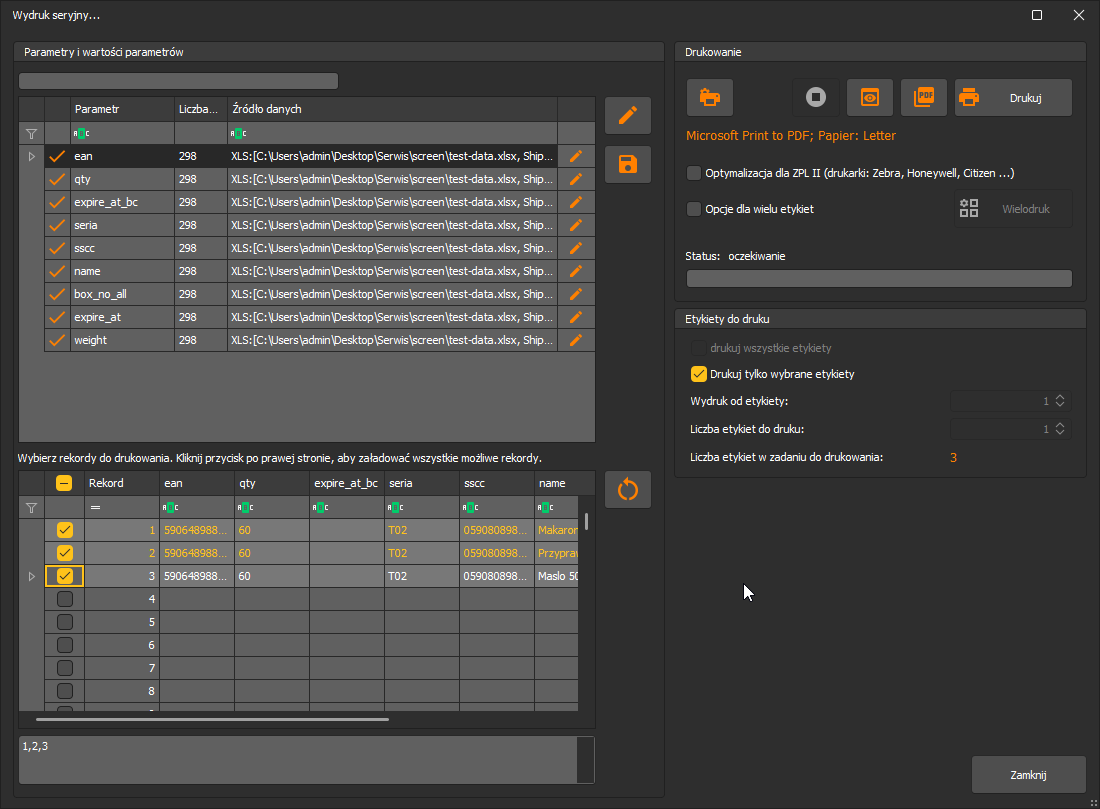
You launch batch printing from the Print group → Batch printing. The Serial print window opens. Before a source is connected, the parameter and record tables are empty:
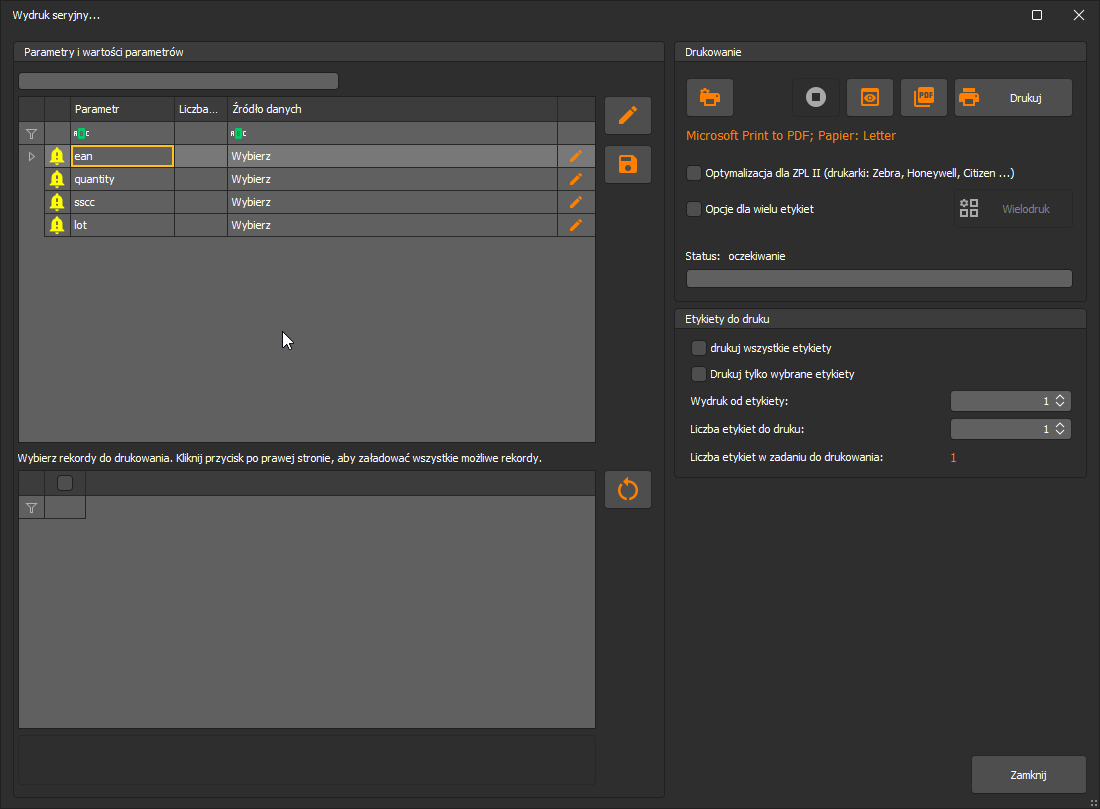
The window is divided into four areas:
- Parameter and parameter values — the list of label parameters; you assign a data source to each. The configuration can be saved and loaded.
- Records — the table of loaded records; you select which labels to print.
- Print — printer and paper selection, multiple-printing options (choosing a saved multiple-printing template — see chapter 5), ZPL II optimization, the Print button.
- Labels to be printed — range: all or only selected, printing from label N, the number of labels.
The Records table shows the data that will actually be generated — loaded from a database/file or computed for generated sources (numbering, date). If, for example, you assign numbering to a parameter, this table shows the successive sequence values before you print anything. The point is for the operator to see what will go on the labels. You load/refresh records with the square icon with the refresh symbol next to the table. At the bottom is the selected-records field — selections from the table are entered here as a list (e.g. 1,2,3) and can also be typed manually.
Saving a parameter configuration. You can save the whole set of parameters together with their assigned data sources under a name and reuse it — instead of configuring the mapping from scratch for each similar label. You save it in the Parameter configuration window (you provide a name), and open saved sets from the list in the parameter configurations window. After loading, databases and file links return automatically — provided the source files are in their original places and the label has identical parameter names.
Defining a data source for parameters
You point to a source for each parameter separately — different fields can come from different sources. You click a parameter, then its Data source, and expand Data type. Available types: numbering, date, database, text file, Excel spreadsheet, manual data and special characters.
A parameter name by itself forces nothing — you assign its data type. Examples of a logical choice:
Parameter | Data type | Value source |
|---|---|---|
@print_date@@ | Date | The current date in the chosen format. |
@quantity@@ | Excel spreadsheet | The unit-count column in the data file. |
@label_no@@ | Numbering | An automatic sequence (from–to, with a step). |
@product_name@@ | Excel spreadsheet / database | A column or a table field. |
@net_weight@@ | Manual data | Entered by the operator before each label. |
@sscc@@ | Numbering / file | A logistics number, generated or from a file. |
Manual data in practice. A common scenario is weighing goods: the operator weighs the product and enters the weight before printing (e.g. "50 kg"). A
@net_weight@@parameter set as manual data makes the program ask for the value for every label — the entry window appears before each print.
For all types: you undo a connection with the No value button, and selecting Do not print the value on labels keeps the parameter in the project but hides it on the printout (useful e.g. for a column that controls the number of copies). The Refresh button pulls in changes made in the source file.
Numbering
A parameter filled with an automatic sequence. You provide a Start value, a step and a Stop value. The Number of digits plus the fill character set the format — e.g. value 17, length 8, fill "0" gives 00000017.
New in v10: the Change the step after so many labels field lets you repeat the same value across several labels before the counter advances. E.g. value 2 prints 2 identical labels, then increments the number — useful when one label with the same number is to go on several copies.
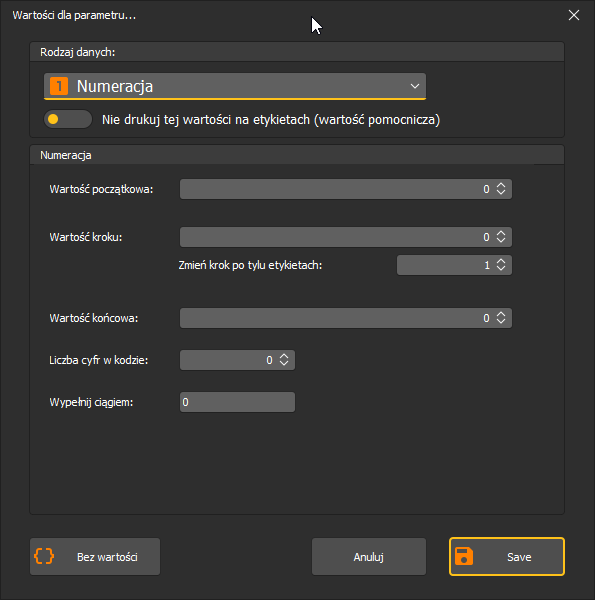
Date
A parameter filled with a date. You choose a date format from a list of ready layouts (e.g. 06-07-2026, 06.07.2026, 6 July 2026, with or without time) and can add a prefix / suffix — the value is composed as prefix + date + suffix.
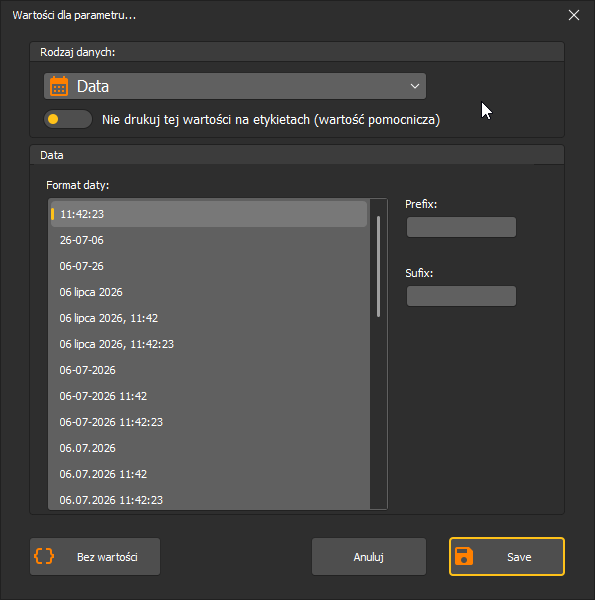
Excel spreadsheet
The most common source (used by example-label: test-data.xlsx). You point to an .xlsx file, mark whether the first row contains column names, choose the sheet, then the column to link to the parameter. Show data sets previews the data.
The program does not require Excel to be installed — it has built-in drivers for reading spreadsheet files. You can prepare the source file in Microsoft Excel or in LibreOffice Calc (confirmed in practice) — the important thing is to save it in .xlsx format.
It is simplest when the column headers in Excel match the parameter names on the label — then mapping comes down to pointing at the column with the same name (see the table in step 8 of the tutorial).
New in v10: the Save a relative path to the data (as a reference to the label file) option. Instead of an absolute path (C:\Users\...), the program stores the data file's location relative to the label file. This lets you keep the label and the data file next to each other and hand them to another person for printing — without fixing paths. A typical split in manufacturing companies: one person designs the label, another only prints.
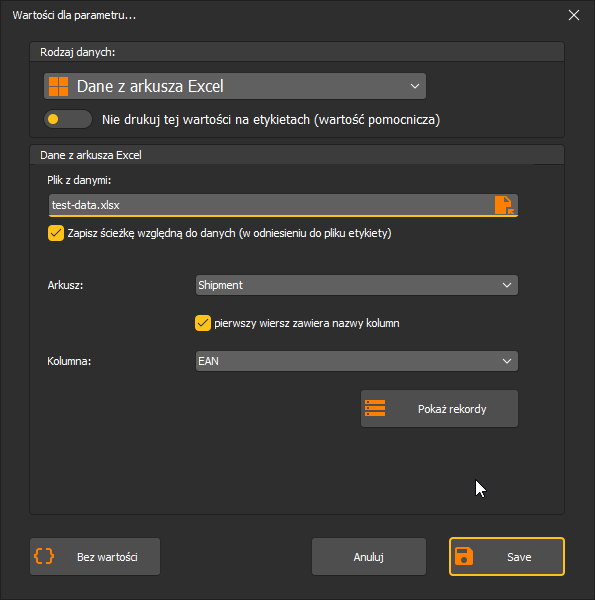
Text file
Data in a text file with fields separated by a delimiter (semicolon, comma, tab or space). You point to the file, the encoding (Unicode, ASCII, ISO8859-2, Windows 1250, UTF-8), mark the presence of headers, choose the delimiter and the column to link. The Save a relative path to the data option is available here too (see above, under Excel spreadsheet).
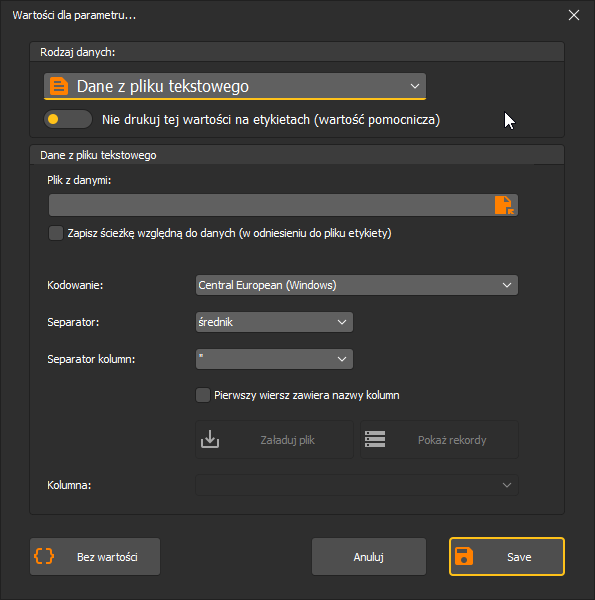
Database (ODBC)
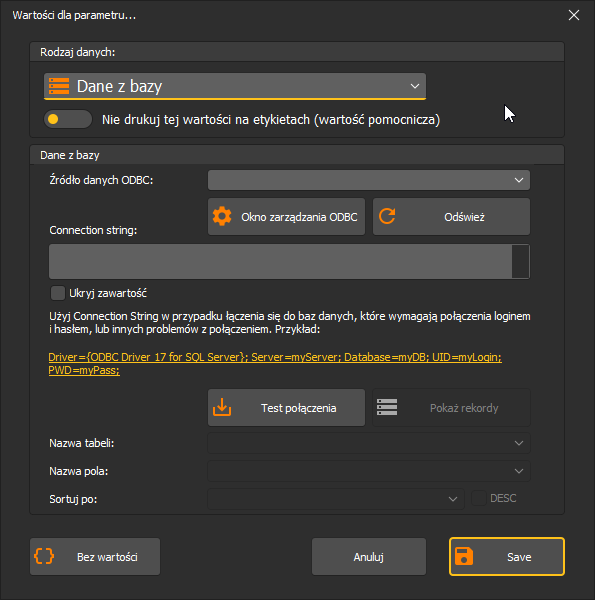
Data from a database via ODBC — most often for connections to MS SQL Server, Oracle or other company databases (including less typical ones, as long as they have an ODBC driver). If the source is not defined in the system, you open the ODBC management window, add a DSN (user or system), point to the driver and the database file/server. In the program you pick the created DSN, test the connection, point to the table and field to link to the parameter. Show data sets displays the content.
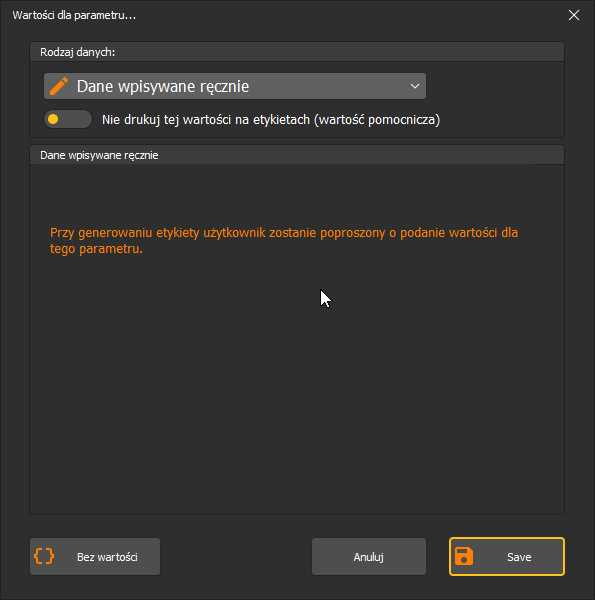
Manually entered data
You provide the values before each print. After you click Print, the program opens a window with all parameters to fill in; OK starts printing, Ignore skips the manual assignment.
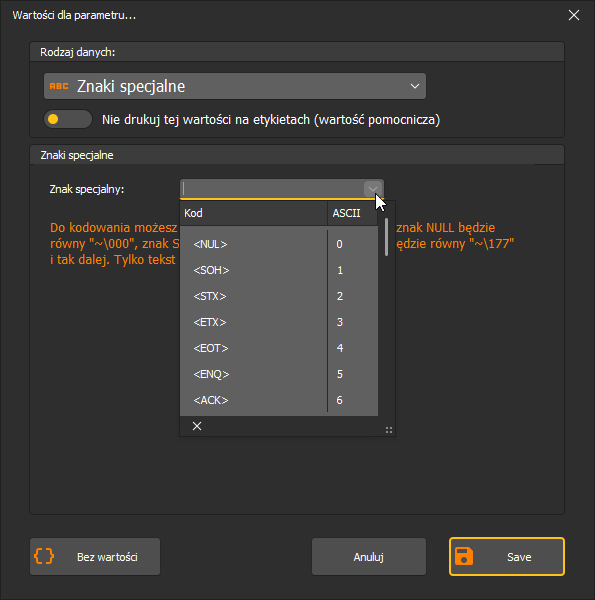
Special characters
Encoding of characters invisible on the printout (Null, Enter, Escape, Delete, Tab) in octal notation — e.g. Escape is ~\033. Useful in barcode content, where such characters act as control functions (e.g. FNC1 for GS1, separators).
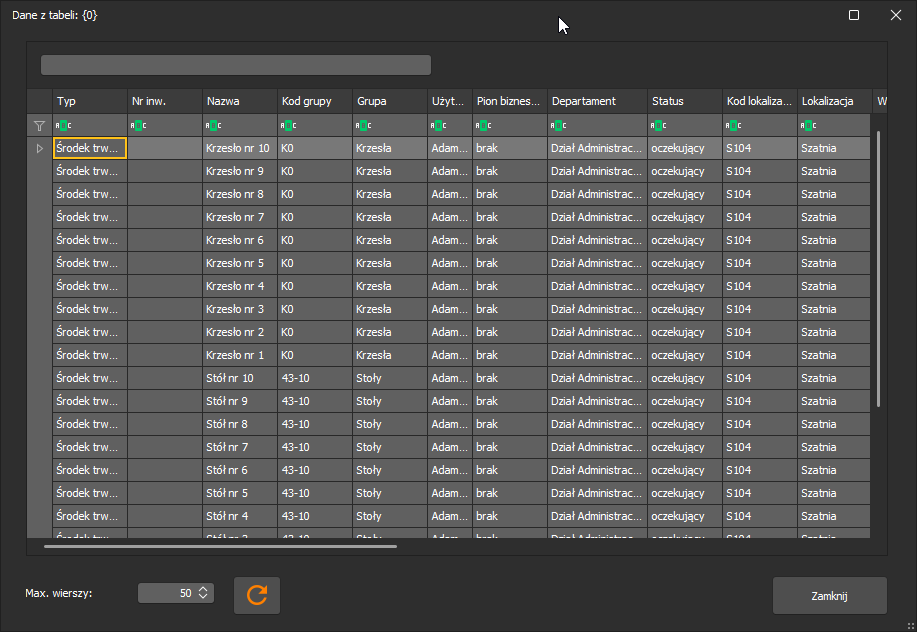
Record preview
The full table of loaded records (columns = parameters, rows = records) — a wider view than the mini-table in the print window. You select records to print, filter and sort columns, and see the record count.
Optimization for ZPL II printers
The program supports ZPL II printers (Zebra, Honeywell, Citizen, DataMax and others). After you select Optimization for ZPL II in the Print section, additional ZPL-specific fields appear:
- Number of copies (fixed value) — how many copies of each label to print.
- Number of copies (from parameter) — an individual copy count taken from a parameter (e.g. a "Number of copies" column); the parameter must exist on the label but can be hidden.
- Printer speed — print speed in ZPL II units.
- Darkness — the darkness level — the higher, the sharper the print.
- Print method — T (tear-off), P (peel-off), R (rewind), A (applicator), C (cutter), D (delayed cutter), F (RFID).
- Media type — D (direct thermal) or T (thermal transfer).
Optimization works only with ZPL II-compatible printers — enable ZPL II emulation in the printer, otherwise printing may fail.
Progress and PDF generation
At the bottom of the window a status bar shows the print job's progress. Worth watching for large series.
Native PDF export and quality. In the batch-printing window, next to the Print button, there is a PDF icon — the program generates PDF natively, in high quality (much better than printing through the Windows system PDF printer). It renders each label as a graphic, so with many records the PDF takes a long time to generate and can be large — that is the cost of quality, not a bug. The status bar shows progress; with hundreds or thousands of labels, give the program time.
8. Printing and export
Printer settings
Print → Printer settings — selecting the printer and its parameters (paper size, orientation). The paper size set here determines how the print preview looks.
Print preview
Print → Print preview shows the label before printing, in the paper format from the printer settings. In batch printing the preview renders the label with the record's data substituted — @name@@ parameters turn into concrete values (see step 9 of the tutorial).
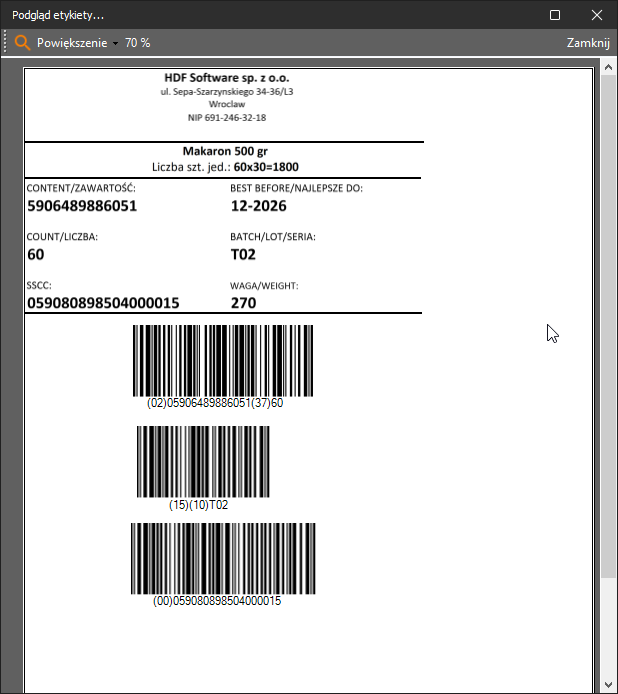
Printing a single label
Print → Print opens the Windows system printer window — you point to the printer and the number of copies, and confirm. This function prints one label on a sheet.
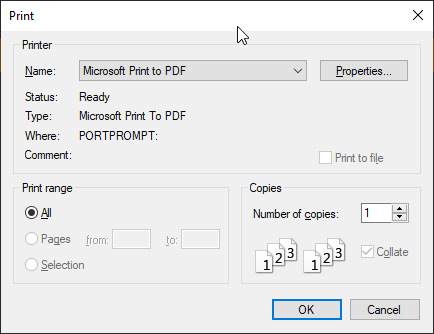
Many labels on a sheet
To fit many labels on one page, use Options for multiple labels (multiple printing). The grid configuration, margins and saved multiple-printing templates are described in chapter 5. Multiple printing combines with batch printing — all records land on one sheet across many rows and columns.
Export to PDF
The program has two ways to export a printout to PDF:
- Batch printing — in that window, next to the Print button, there is a PDF icon that saves the active label to a PDF file; the program handles this natively, in high quality. It produces a file with one page per record (see step 10 of the tutorial). If the label has no serial fields, a single label is produced.
- Ordinary printing to a PDF printer — in the Print window you select Microsoft Print to PDF as the printer, getting a PDF with the label.
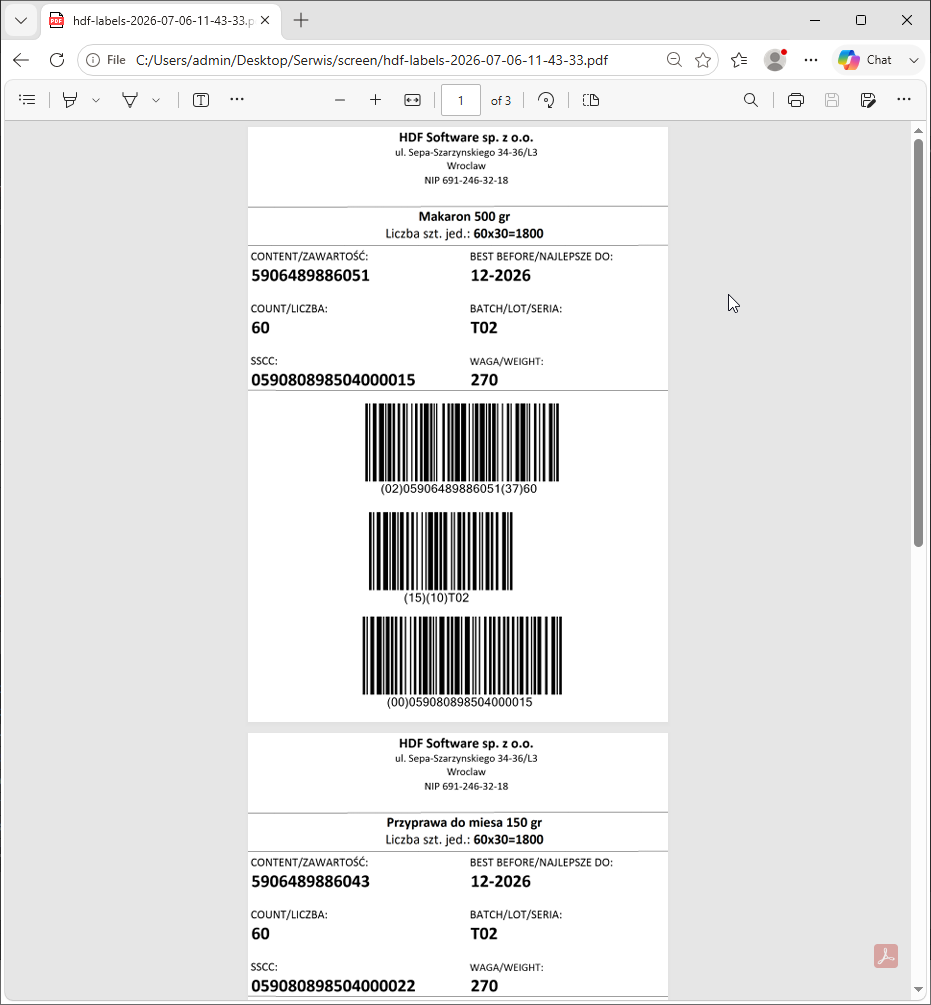
Native PDF export (the PDF icon next to "Print") renders each label as a high-quality graphic — much better than printing through the Windows system PDF printer. That is why, for large series, generation takes longer and the file can be large: the cost of quality, not a flaw. Details in chapter 7.
9. Example: a label step by step
This chapter walks you through building one complete logistics label, from an empty work area all the way to batch printing and PDF export. The resulting label contains company data, a product description, serial fields filled from an Excel spreadsheet, and GS1-128 barcodes. It is a practical summary: it brings together the elements described earlier (Objects, Barcodes, Batch printing, Printing) and shows them in action on a real project.
Note. The parameter names in this tutorial (
@ean@@,@qty@@,@seria@@, etc.) come from a specific example project. You name the parameters when creating them — they are not fixed program keywords. In another project you might just as well use@quantity@@or@lot@@.
Step 1. New label — choosing the size
Launch the program and from the File group choose New. The Label size window opens. In the Available label sizes table pick a ready size (e.g. 10 × 15 cm Shipping Label) or add your own with the button next to the table, giving the width, height and unit. Confirm with Selection.
The lower part of the window also has a Free label templates section — clicking a thumbnail (e.g. logo-gs1-150x210.lbl) loads a ready layout instead of a blank label. In this tutorial we build from scratch, so we choose just the size.
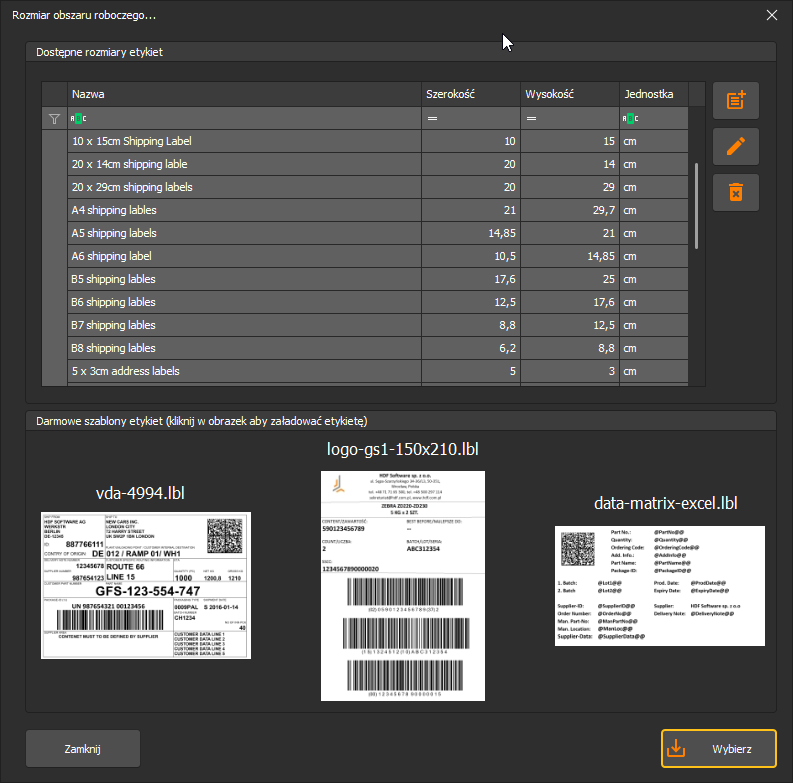
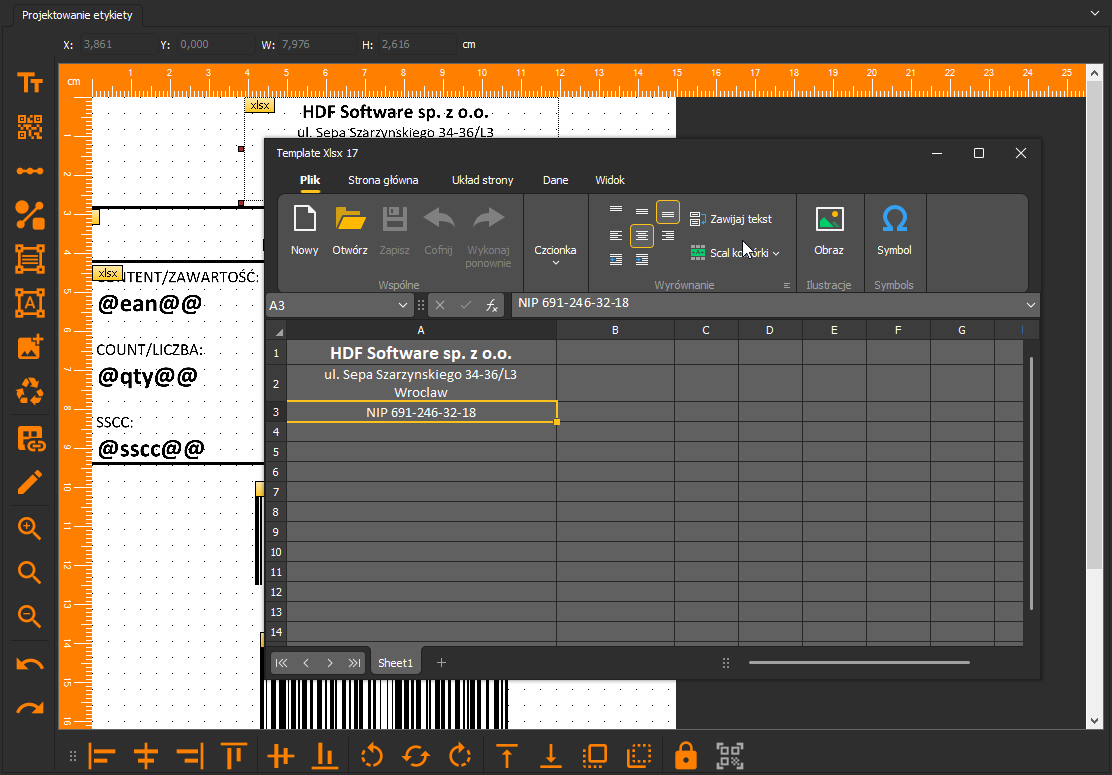
Step 2. Company data — XLSX template
From the object toolbar (vertical, on the left) insert a Formatted table (XLSX template) object and double-click it to open the built-in spreadsheet editor (pseudo-Excel). The toolbar icons have no labels — hover the cursor to see the name in a tooltip; a full icon legend is in the Program interface chapter. In the cells, enter the company's fixed header data, e.g.:
- A1: HDF Software sp. z o.o.
- A2: ul. Sępa-Szarzyńskiego 34-36/L3, Wrocław (merged cells)
- A3: NIP 691-246-32-18
The editor has its own ribbon (File, Home, Page Layout, Data, View) with font formatting, alignment, cell merging, and inserting images and symbols. After you close the editor, the company header appears on the label.
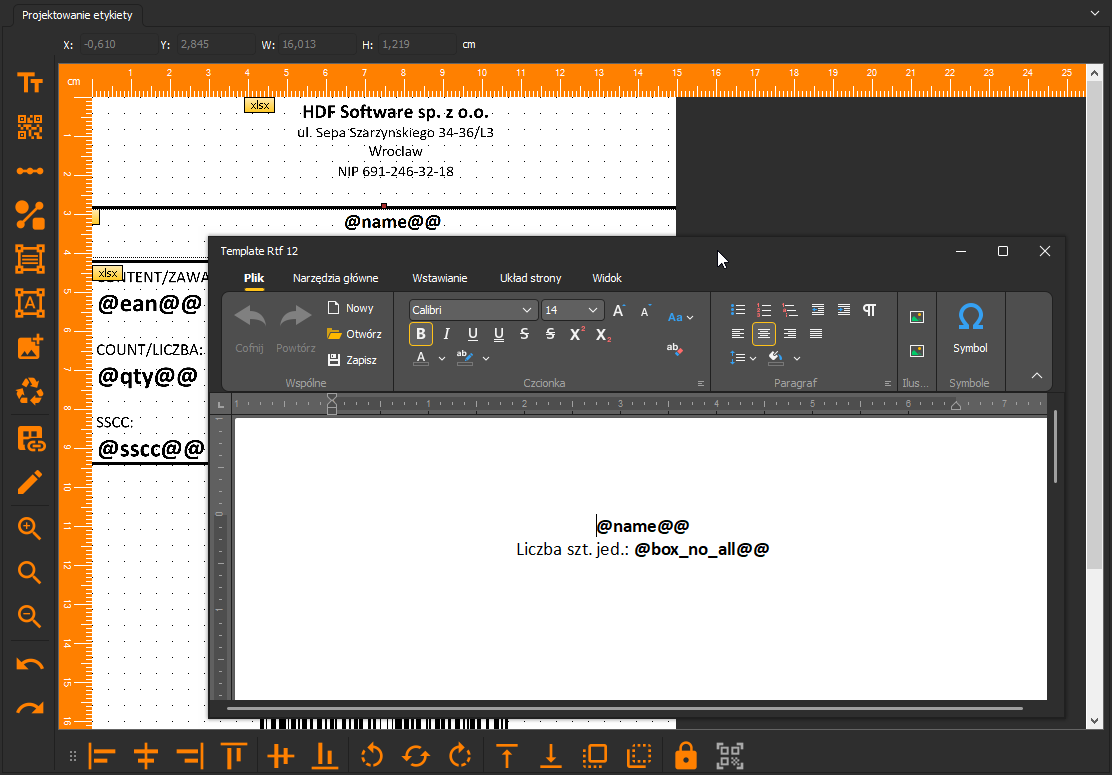
Step 3. Product data — RTF template
Insert a Text field (advanced) (RTF template) object and open it with a double-click — a formatted-text editor (pseudo-Word) appears with a Home / Insert / Page Layout / View ribbon. Here you place the product description together with parameters that the program will substitute during batch printing, e.g. the product name @name@@ and the number of units per pack @box_no_all@@.
Formatted table vs. Text field (advanced) are two separate object types: the first is a tabular layout (a sheet), the second is freely formatted text. Do not confuse them with label templates (ready-made layouts of the whole sheet) — a separate chapter is devoted to those.
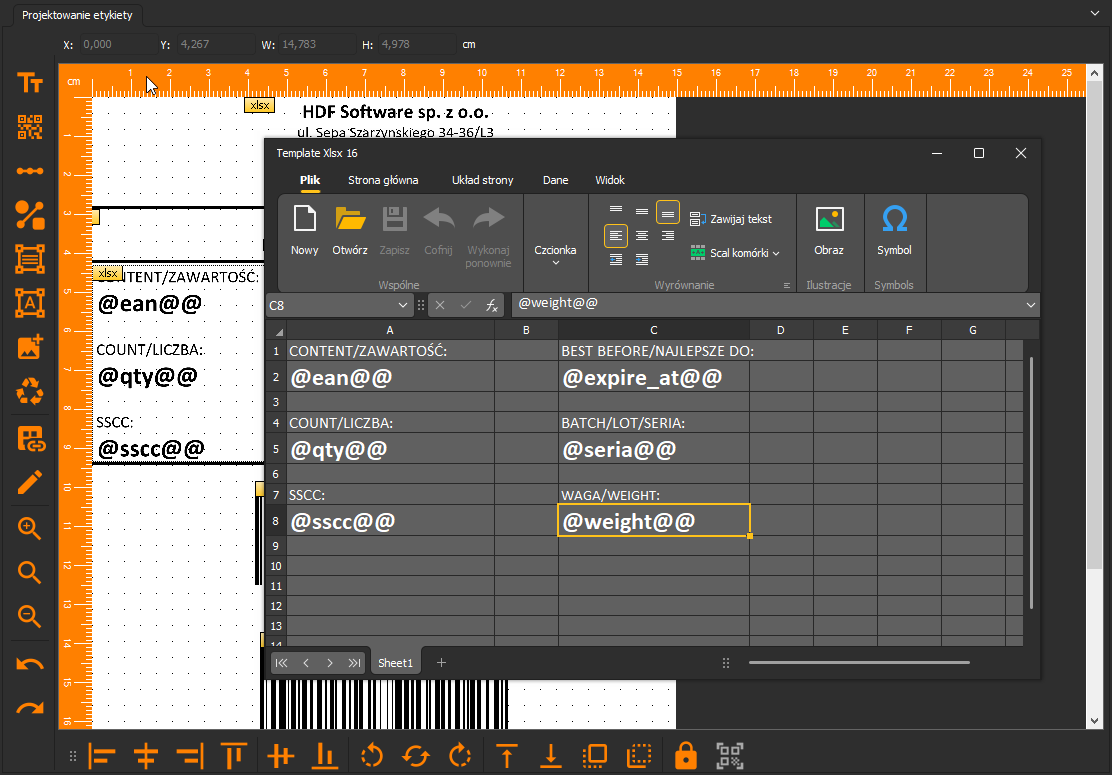
Step 4. Serial fields — XLSX template with parameters
Add another Formatted table object for the variable data. In the sheet, lay out descriptive labels and, below them, parameters that batch printing will fill — e.g. in a two-column layout:
- ZAWARTOŚĆ/CONTENT:
@ean@@— NAJLEPSZE DO/BEST BEFORE:@expire_at@@ - LICZBA/COUNT:
@qty@@— SERIA/BATCH/LOT:@seria@@ - SSCC:
@sscc@@— WAGA/WEIGHT:@weight@@
You write a parameter as a name surrounded by @ (start) and @@ (end). At this stage the parameters are not yet connected to data — you do that in step 8 (batch printing).
Step 5. GS1-128 barcode
From the object toolbar insert a Barcode. The Barcode options window opens with tabs: Barcode list, 4W barcodes, Barcode text (HRT), Advanced options. From the type list choose 128 GS1 (EAN 128). In the right panel you set the printer resolution (dpi) and rotation; in the Text to encode field you enter the code content. The preview and code size are shown at the bottom of the window. Confirm with Save.
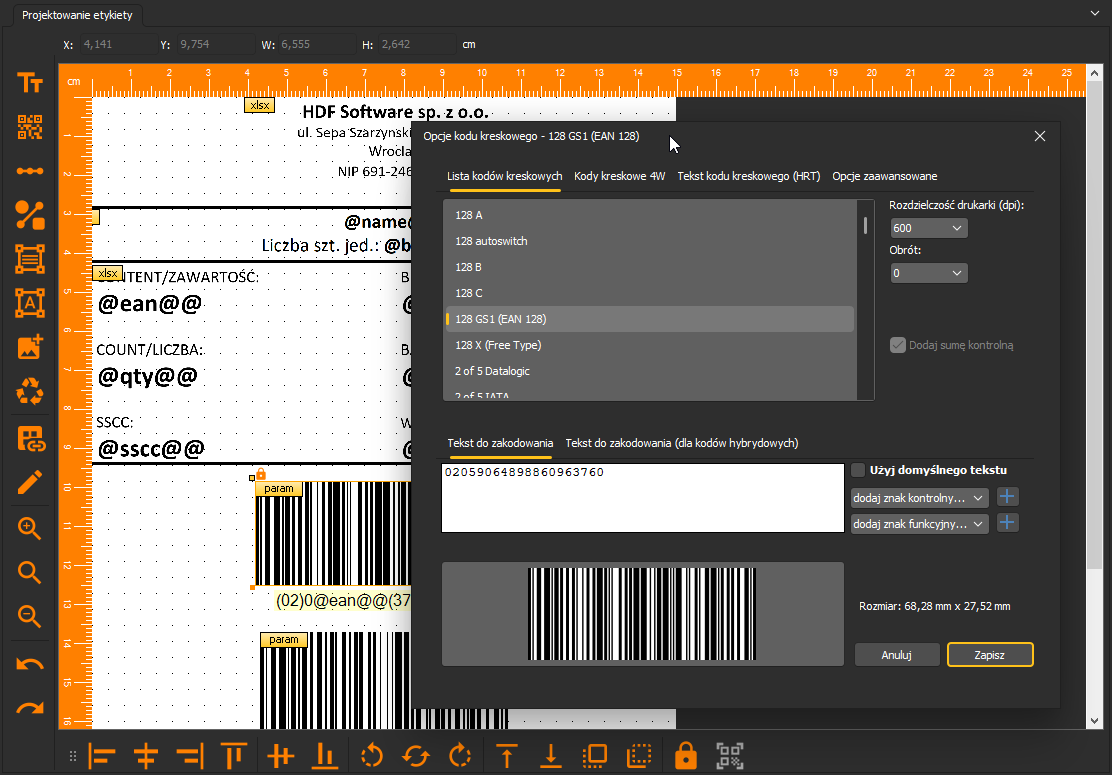
New in v10. A 4W barcodes tab has appeared in the code window. Barcode details are covered in a separate chapter.
Step 6. Linking the code with parameters
For the code to pull values from a data source, open its Advanced object properties. In the Data-source connection parameters field you enter the code content with parameters, e.g. 02@ean@@37@qty@@ — the program will substitute the @ean@@ and @qty@@ values from the record. The same syntax applies: @ opens, @@ closes a parameter; a single object can contain many parameters.
Where do the digits
02and37come from? They are Application Identifiers (AI) of the GS1 standard — they define what the value that follows means. In this code(02)is the GTIN of the product in a group pack, and(37)is the number of units in that pack. That is why you build the code content by hand from "AI + parameter" pairs:02+@ean@@, then37+@qty@@. How to choose the right Application Identifiers for your product and build a correct GS1 code is explained in our article: GS1 and Application Identifiers.
In the same window you set the object name, position and size, anchoring (choosing the corner relative to which the object scales), and — for dynamic images — the prefix, parameter and suffix pointing to a file in the image folder. Confirm with OK.
Step 7. The finished project
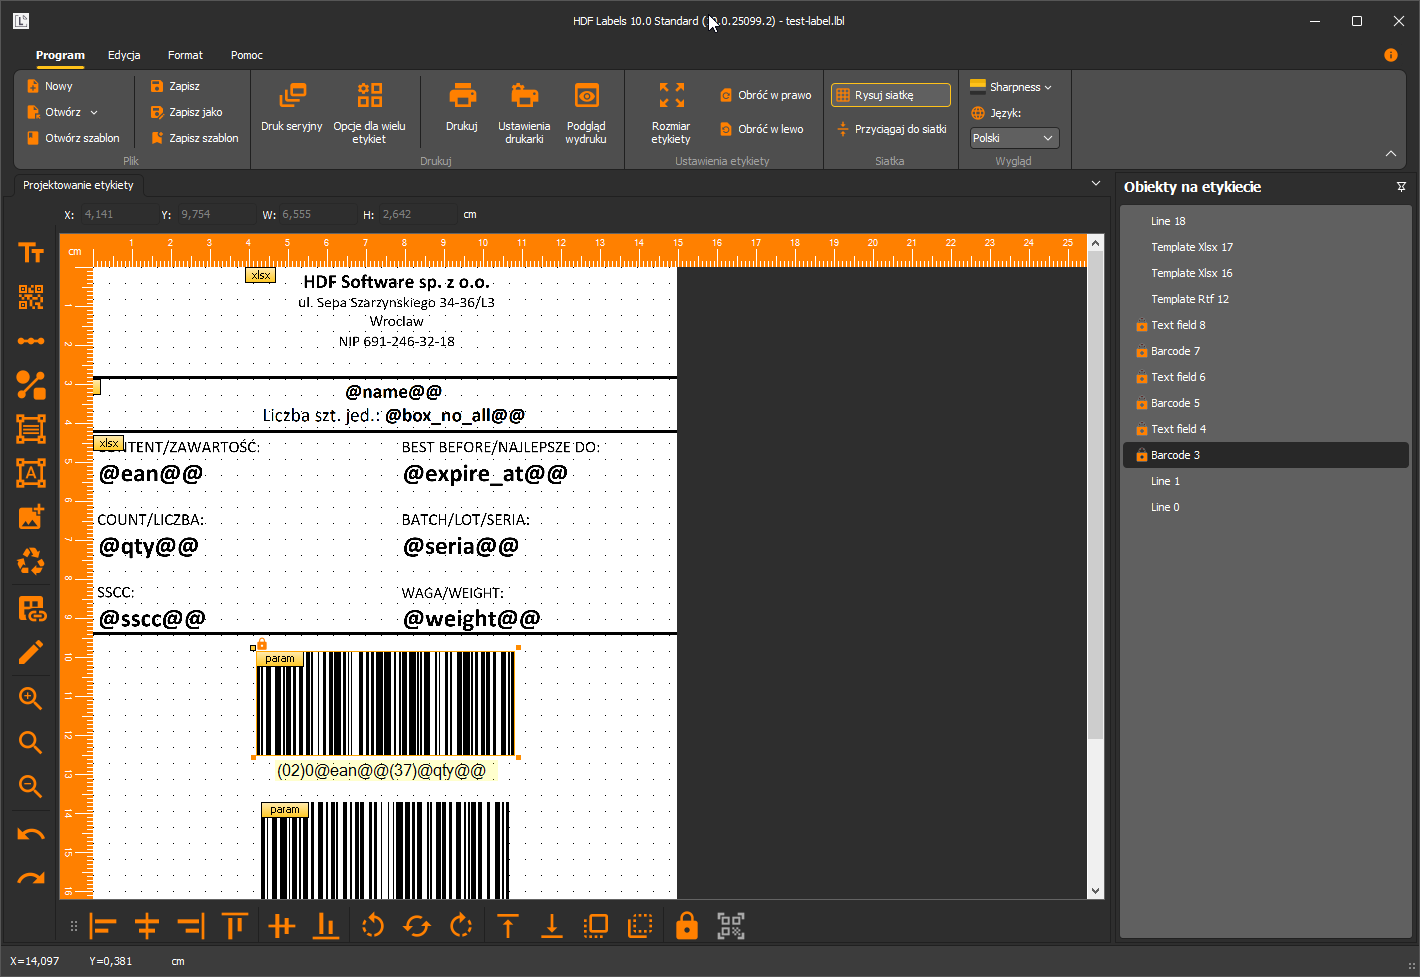
After adding the remaining codes and lines, the label is complete. The Objects on label panel (on the right) lists all the project's elements — lines, Xlsx and Rtf templates, text fields and barcodes — and lets you select and organize them. Save the project (here: test-label.lbl).
Step 8. Batch printing
From the Print group choose Batch printing. The Serial print window opens. On the left — the Parameter and parameter values table: to each label parameter (ean, qty, seria, sscc, name, weight, etc.) you assign a data source, e.g. an Excel spreadsheet column. Below, you load records and select the ones to print. On the right — the Print section (printer, paper, multiple printing) and Labels to be printed (all / only selected, range).
Preparing the sheet. It is simplest when the column headers in Excel match the parameter names used on the label — then mapping comes down to pointing at the column with the same name. For this project the sheet (test-data.xlsx) has, among others, the columns:
Column in Excel | Parameter on the label | Example value |
|---|---|---|
NAME | @name@@ | Makaron 500 gr |
EAN | @ean@@ | 5906489886051 |
QTY | @qty@@ | 60 |
SERIA | @seria@@ | T02 |
EXPIRE_AT | @expire_at@@ | 12-2026 |
WEIGHT | @weight@@ | 270 |
BOX_NO_ALL | @box_no_all@@ | 60x30=1800 |
SSCC | @sscc@@ | 059080898504000015 |
Each sheet row is one label. The sheet can also contain helper columns (e.g. PREFIX, SERIAL, CHK to compute the SSCC number, or EXPIRE_AT_BC — a date version for the barcode) that you need not connect directly to objects on the label. You connect only the parameters that are actually on the label.
New in v10. In the print section the Optimization for ZPL II option is available (Zebra, Honeywell, Citizen and related printers).
Step 9. Print preview
Before printing, check the result with the preview button. The Label preview window shows the label with the first record's values substituted — parameters @ean@@, @qty@@, etc. turn into concrete data, and the barcodes receive the full GS1 content. You adjust the zoom with the list at the top.
Step 10. Export to PDF
In the batch-printing window, next to the Print button, click the PDF icon — the program saves the series natively, in high quality (better than the Windows system PDF printer). It produces a file with one page per record: page 1 is the first product's label, page 2 the next, etc. — batch printing iterates over all records.
10. Program interface
A toolbar reference. The interface is a ribbon with four tabs (Program, Edit, Format, Help), a vertical object toolbar on the left, and a horizontal layout toolbar at the bottom.
Ribbon: Program
Groups from the left:
- File — New, Open, Open template, Save, Save as, Save template.
- Print — Batch printing, Options for multiple labels, Print, Printer settings, Print preview.
- Label settings — Label size, Rotate right, Rotate left.
- Grid — Show grid, Snap to grid.
- View — Theme (a list, e.g. "Sharpness") and Language (a list, e.g. Polish).

New in v10 in the View group: choosing the interface theme (Sharpness and others) and a language switch directly on the ribbon.
Ribbon: Edit
- Clipboard — Cut, Copy to clipboard, Copy, Paste, Remove.
- Selection — Select all, Invert selection, Remove selection.
- Properties — Advanced object properties, Object properties.
- History — Back, Redo, Clear history.

Ribbon: Format
Arranging and formatting objects: Center horizontally / vertically, Align to left / right / top / bottom, Rotate left by 90° / by 180° / right by 90°, and Text field with barcode (linking a field with a code). The same operations are available from the bottom toolbar and the context menu.

Ribbon: Help
Help, License (opens the registration window — see chapter 1), About.

Object toolbar (left, vertical)
A vertical column of icons. The icons have no labels — hover the cursor to see the name in a tooltip. From the top:
- Text field — plain text (single-line, no wrapping).
- Barcode — a 1D or 2D code object.
- Line
- Rectangle / Ellipse
- Formatted table — XLSX template; a tabular block (pseudo-Excel editor).
- Text field (advanced) — RTF template; formatted text (pseudo-Word editor), with wrapping.
- Graphic
- Pictogram
- Advanced object properties — the full properties window of the selected object.
- Object properties — quick edit of the selected object.
- Zoom in (+) / Original size / Zoom out (-) — view zoom.
- Back / Redo

Bottom toolbar (layout)
A horizontal row of icons operating on the selected objects. From the left:
- Align to left / Center horizontally / Align to right — horizontal alignment.
- Align to top / Center vertically / Align to bottom — vertical alignment.
- Rotate left by 90° / Rotate by 180° / Rotate right by 90°
- Move to the top / Move to the bottom / Move upwards / Move object down — layer order.
- Anchor object — locks an object in a chosen place.
- Text field with barcode — linking text with a code.
- Show grid / Snap to grid

Interface themes
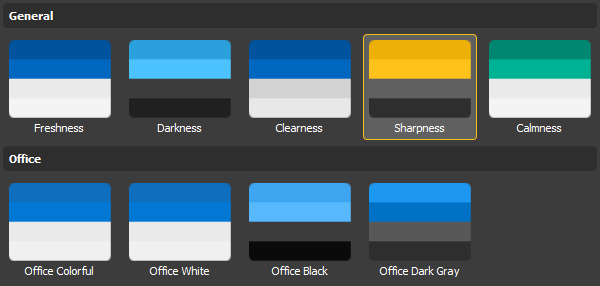
View group → theme list. Variants: General (Freshness, Darkness, Clearness, Sharpness, Calmness) and Office (Colorful, White, Black, Dark Gray). It changes the program's skin without affecting the label project.
Interface language
View group → Language list. It changes the program's interface language — available options include Polish (PL), English (EN) and German (DE).

11. FAQ — frequently asked questions
Registration and license
Registration fails — the program reports invalid login data
The login is the e-mail address given at purchase, and the password is the license password received by e-mail after payment (it is not a program login password). Check that you enter exactly this data, with no spaces at the start or end. If the password was lost, ask for a new one to be generated by writing to [email protected].
Registration fails — no connection
Registration, license transfer and cloud operations require an internet connection. Make sure the computer has network access. If a firewall is active in your company, add an exception for the domain https://licenses.hdf.com.pl/ and the whole hdf.dev subnet — without it the program will not connect to the license server.
The license is already active on another computer
Each license runs on one computer at a time. To move it to another workstation, first deactivate it on the current computer with the Move license button, then register it on the new one. The transfer can be done only from the computer on which the license is active.
The computer with the active license is unavailable (failure)
The license cannot be transferred remotely from a damaged computer. In that case contact us: [email protected].
Registration fails despite correct data
The most common cause is no free licenses — all purchased licenses are already used. Before registering the program on a new computer, make sure you have deactivated it (transferred the license) on the computer you are giving up.
A "Demo Version" watermark appeared on the printout — did I lose my license?
The demo works exactly like the full version but prints a "Demo Version" watermark on labels and codes. After a fresh installation the program always starts in demo mode — the watermark disappears once you register a license. If the watermark appeared on a previously registered workstation, the most common causes are: a temporary loss of connection to the licensing system (check internet access and the firewall — see the firewall question above), using an older version of the program with a license bought as an upgrade, or a billing matter on the account side. If in doubt, write to [email protected].
Parameters and variable data
What does @name@@ mean?
It is a parameter — a place where, during batch printing, the program inserts a value from a data source. The @ character starts the parameter name and @@ ends it. "name" is any name you assign yourself (e.g. @quantity@@, @print_date@@) — it is not a fixed program word. A field with fixed text you simply type normally; you use a parameter only where the value is meant to change.
I named a parameter in my own language and something does not work
Avoid diacritical marks (ą, ć, ę, ł, ń, ó, ś, ż, ź) in parameter names. Instead of @ilość@@ use @ilosc@@. Names in your own language are fine — only the diacritical marks are the problem.
Data from Excel does not connect to the label
It is simplest when the sheet's column headers match the parameter names on the label — then you point to the column with the same name. Also check that "the first row contains column names" is selected and the correct sheet is chosen. You pull in file changes with the Refresh button.
I moved the project to another computer and the program does not see the data file
By default the absolute path to the file (C:\Users\...) is saved, which does not exist on another computer. When choosing the Excel / text-file source, select Save a relative path to the data — then a data file kept next to the label file will be found regardless of the computer. This is the standard setup in companies where one person designs and another prints.
I want to enter a value manually before each print (e.g. weight)
Set the parameter as Manually entered data. After you click Print, the program asks for the value — the window appears before each label. Typically used when weighing goods.
Barcodes
The code does not scan / the reader does not recognize it
Most often it is a data-structure error, not the program itself. Check that the code type matches the content, that the GS1 Application Identifiers (e.g. (02), (37)) are correct, and that no check digit is missing. Building codes correctly requires knowledge of the symbologies themselves — descriptions of all types are in the kody-kreskowe.dlawas.com service.
I cannot resize the code by dragging its frame
Barcode size is set only in the code options window (the Advanced options tab — bar width, height), not by dragging on the canvas.
Printing and export
PDF export takes very long / the file is large
This is normal for large series. Native PDF export (the PDF icon next to "Print" in the batch-printing window) renders each label as a high-quality graphic — much better than printing through the Windows system PDF printer. Higher quality means a longer time and a larger file. It is the cost of quality, not a bug — with hundreds or thousands of labels, give the program time.
I cannot resize a text field
Fixed-text fields automatically fit their size to the content — they cannot be scaled freely. Only parameterized fields (meant for batch printing) can be scaled.
My text does not wrap on the printout
An ordinary text field does not wrap text. For longer content use a template object: in a Formatted table (XLSX template) set the cell's Wrap text option — that is the best solution. Wrapping is also supported by Text field (advanced) (RTF template). Leave the ordinary text field for short, single-line text.
Printing on a Zebra/thermal printer comes out badly
For ZPL II printers (Zebra, Honeywell, Citizen, etc.) select Optimization for ZPL II in the batch-printing window. Make sure the printer has ZPL II emulation enabled — without it printing may fail.
12. Instructional videos
Step by step in video form. Selected videos: